You’ve heard of the generation gap, and you might know about your spark plug gap, but what about the Dynafit tech gap? And now, the “kiss gap?”
To function properly, most “tech” type backcountry skiing bindings require specific spacing between the boot heel and the rear unit of the binding. The “tech gap,” if you will. In this WildSnow.com technical blog post, we’ll look at the “tech gap,” with emphasis on Dynafit brand bindings though the concepts apply to other brands as well.
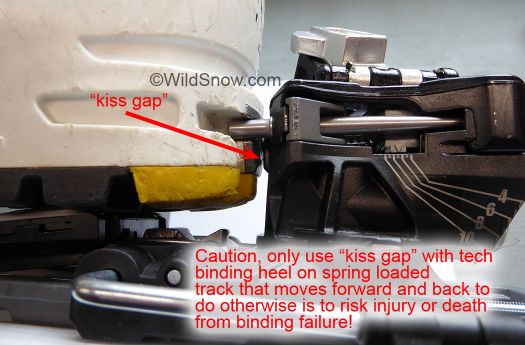
Dynafit Radical 2.0 heel unit, with ‘kiss gap’ adjusted to what we think works best, a very small gap that just allows a sliver of light to come through. We recommend this method because it insures you are not pushing the heel unit up too tightly against the boot heel. Note that some Radical 1.x bindings have a spring-loaded heel unit that moves fore/aft, but still requires a 5.5 mm gap! Confusing? You bet. (Note the binding shown here is all black and may be confused with Radical version 1, current versions of Radical 2 have green and gold components that make it easily identifiable.
Before we get started, fair warning: Due to numerous Dynafit binding models that look similar, have the same names and sometimes were even sold under the same SKU number, the issue of proper adjustment has become incredibly confusing. We feel that competent ski shops who deal with this issues daily are in many cases better than efforts at DIY. Even so, beware of the ski shop as well. They’re only human and can be easily confused as well.
2016 autumn addendum: We added a few photos at bottom of post to clarify how the tech binding pins should appear with a “classic” tech binding such as Dynafit Superlight 2.0.
2016 addendum: Certain tech bindings are now sold that specify a tiny gap at the heel, as illustrated in photo below. We call this the “kiss gap” and define it as setting the binding heel as close to the boot as possible while still being able to see a small sliver of light coming through a tiny gap. We use the term “kiss” because the best way to perform this adjustment is to move the heel unit to the point where it lightly touches the boot heel, then back off a tiny amount. While doing this adjustment, be sure to tap and wriggle the heel unit to make sure it’s not catching on its spring loaded track and giving a false impression of where you have it adjusted. Mainly, bindings using “kiss gap” MUST HAVE HEEL UNIT ON SPRING LOADED TRACK THAT MOVES FORWARD AND BACK. Examples of such bindings are the Dynafit Radical 2.0, Dynafit Beast, G3 ION. Unless you are sure about binding having spring loading or not, check binding literature for specified heel gap, and evaluate spring loading by manually moving the binding forward and back by inserting boot and observing behavior. Using a “kiss gap” with a rigid binding heel that’s not spring loaded will result in binding destruction that can cause injury or death.
With regards to Radical 1.x, while it was made with both a spring loaded heel unit and in an earlier version without BOTH USE THE WIDER HEEL GAP DETAILED BELOW. Note, we suspect that at least some part of the Dynafit Radical 1.x heel breakage we’ve seen in 2014-2016 is the result of improperly setting the heel gap.
See this blog post about “in line” change made to Dynafit Radical binding model 1.x that introduced the heel unit fore-aft travel spring system.
2013 addendum: a new feeler gauge is being sold with Dynafit bindings. See photos below.
Dynafit Radical 1.x models: Use the little white gauge as pictured below to set the 5.30 mm heel gap (official specification “5.5 mm” but the gauges measure more like 5.30 with our calipers). Only difference in original procedure is you need to double-check your heel gap by taking boot out of binding heel, snapping back down again, then pushing heel unit firmly towards boot heel before checking the gap again. Idea is to take up any lingering slack in the 2013/2014 heel elasticity system so you don’t end up with too wide a heel gap. We’re not sure why the gauge was changed from a solid plastic “shim” to the compressible device, but it works so whatever. (Two nickels and an American quarter coin measure about 5.30 mm. Three nickels measure about 5.5 mm. Be aware that the Dynafit gauge is not to be compressed completely closed, you just line up the “teeth” as illustrated to get the <> 5 mm gap.)
Note that _NO_ RADICAL 1.X USES THE “KISS GAP” SHOWN ABOVE, BUT ALL RADICAL 2.X DO USE THE SMALLER “KISS GAP.” Dynafit Radical bindings can appear quite similar upon cursory glance. To identify 2.0 version Radical, verify existence of rotating toe unit along with the substantially reinforced and re-designed heel unit visible in photos. Color schemes of bindings vary, so don’t go by colors. For example, the Radical 2.0 used to illustrate “kiss gap” above is an all black version, but other color schemes exist as well.
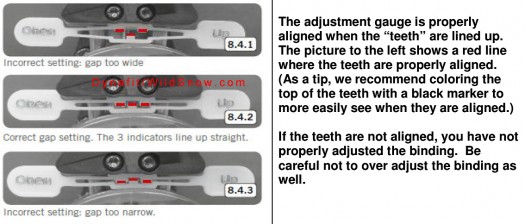
The gauge for heel gap is a compressible little device as pictured. It’s a bit confusing to use. Don’t over-think it, just line up the parts as indicated in photo and you’ve set your heel gap to plus-minus 5.3 mm.
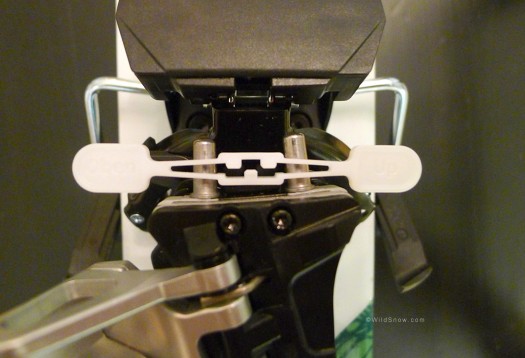
We’re assuming the idea of this gauge is you start with your gap a bit wide (see more about this below), then carefully crank the gap closed till the gauge closes to the point as shown in photo above this one. Beware, the idea is NOT to completely close the gauge, but rather to line up the ends of the tiny nibs, again, as shown above. Thanks Seth for the photo.
2011 clarification: All Radical series and Vertical series Dynafit bindings use a 5.5 mm gap at heel, per discussion above and below. Our calipers measure this as more like 5.30 mm, but that falls within our understanding that a .5 mm variation in heel gap is acceptable as a tolerance.
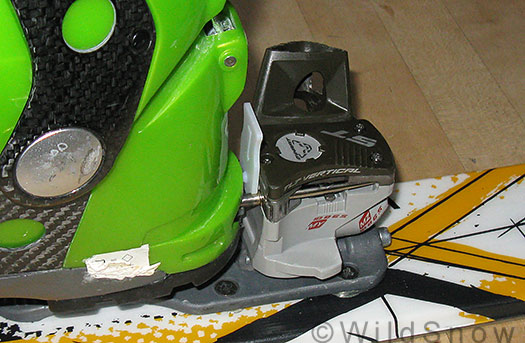
Dynafit 5.5 mm feeler gauge inserted between boot heel and ST model binding.
Photo above shows the correct way of setting your tech gap specific to Dynafit bindings, using the feeler gauge that’s shipped in the box with all Dynafit bindings. Boot should be snapped into the binding heel (downhill mode). Gauge should be inserted snug, but not forced. Adjust gap via the rear adjustment screw on the rear of the binding baseplate. No need to get your panties in a bunch over how this is done. So long as the gauge fits in there snug, the binding gap is set. A tiny bit of variation, say 1/2 mm, is fine. How do I know that? Because as you ski and your ski flexes, the gap varies immensely! Thus, a tiny bit of variation when you set it is obviously within tolerances. That said, I’m talking a tiny variation — not just eyeballing and calling it good.
Simple, eh? But just as the generation gap caused confusion, so does Dynafit’s gap result in cognitive dissonance. Prior to around 2010 Dynafit’s literature states the gap should be 6 mm for the Comfort/ST/FT models, and 4 mm for the TLT/Speed/Race. Only when measured with calipers, the newer white plastic ST/FT gauge measures 5.43 mm, and the older one measures 5.9 mm. Latter is close enough to 6 mm as to make sense, but regarding 5.43 mm, do we suddenly have a new specification they snuck in on us? The answer is yes. (Note, pins in TLT/Speed/Race will remain the same length, and require a 4 mm tech gap.)
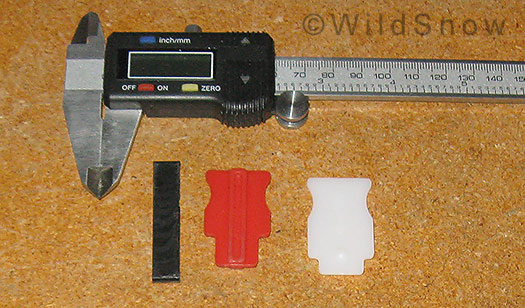
Dynafit gap gauges, 4 mm TLT gauge to left, earlier Comfort/ST/FT 6 mm gauge in middle, new 5.5 mm gauge to right.
I’m actually not surprised about the the 5.5 mm spec, as I’ve been using approximately that spec for years on flexible skis which when decambered radically end up popping the heel pins out of the boot heel.
But nothing is perfect. By the same token, with flexy skis you may find that when set at 5.5 mm and using heel-flat-on-ski mode , the smaller heel gap results in your boot heel catching on the binding when your ski bridges a gap such as a creek crossing, or while you’re breaking trail in deep low-density powder. This problem is actually quite common for larger skiers with heavy packs.
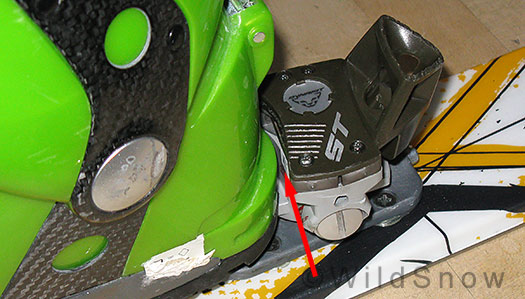
Dynafit heel gap in heel-flat-on-ski touring mode. In certain situations the gap indicated by arrow can close up and result in our boot heel catching on the binding. Setting the gap at 5.5 mm may exacerbate this problem. If so, set at 6 mm but beware release values that are changed when the gap is changed.
So besides touring clearance, what exactly does changing the boot gap do to Dynafit binding performance?
1. The gap between boot heel and binding is there so the ski can flex without jamming your boot heel against the binding heel unit. BUT, it’s also there so the boot can rotate out of the binding without catching during a safety release. Even so, it is my opinion that if you require lateral release when the ski is flexed and the gap is closed up due to ski flex, the heel of the boot can still catch on the binding and cause a spike in side release value. (Update: this is part of the reason binding makers have added spring loaded heel units that move forward and back on a track.)
Above can be easily simulated on the bench by adjusting the tech binding heel gap to nearly nothing, then hand checking the side release by rotating the heel unit. If you’re not convinced after that, take a fairly flexible ski with correctly set gap, stick a boot in the binding, suspend between two chairs and press down on the boot to flex the ski. You’ll notice it’s fairly easy to close up the tech gap. With the gap closed and ski loaded, try rotating the heel unit to simulate a lateral release. Observe that the heel unit may bind while rotating. To mitigate this effect, correctly milled boot heel fittings in tech compatible boots have an elongated horizontal slot that adds clearance (and also aids in ice ejection). Even so, in a worst case scenario (supple ski flexed to the max), you may still get this effect as demonstrated in the “two chair suspension test.”
(Boot buyer caveat: As I covered in a previous post, there is no standardized norm for tech boot fittings and milling, so some boots are still being made without this elongated slot. Buyer beware. Latest news is that an inter-industry boot configuration standard is in process for tech fittings, but such could take years if it ever happens, so don’t hold your breath. Instead, read WildSnow.com.)
2. As the heel tech gap varies, release values vary because the boot is exerting differing amounts of leverage on the pins. When the gap is smaller, the release values are higher (at least that’s what logic dictates, I did not test this). Thus, in my view, it’s possible you could get a spike in lateral release value if you happen to need a release when your ski is radically flexed. To mitigate, as always I advise setting your release values at the low end of what’s recommended in the DIN/ISO 11088 chart, and only increase if you have problems with pre-release. Also, I recommend setting vertical and lateral release independently. In other words, they don’t have to be the same number. This being said, it’s also true the if you de-camber (reverse flex) your ski and widen the tech gap, you’ll end up with lower release values while the ski is flexed. Such a situation might arise, for example, when doing something like making a hop turn with heavy snow piled on the tip and tail of your ski.
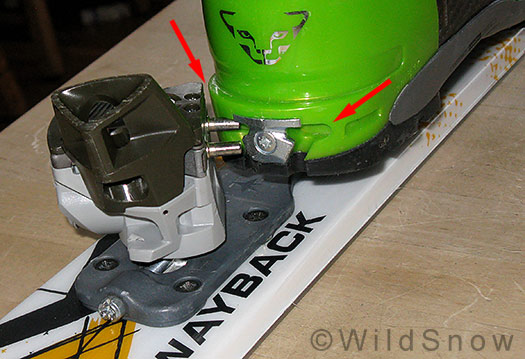
Dynafit backcountry skiing binding heel rotation during release. Note how the elongated horizontal slot in the boot heel allows the boot to eject without catching on the pins.
In my understanding, variation of the heel gap while in real world use is the main reason why Dynafit and other tech type bindings are not TUV certified to the DIN/ISO 13992 standard for tour binding release. In other words, while the Dynafit has a proven safety release, and I know for a fact the company does work hard to keep the release value numbers matching those of the DIN/ISO standard, as the ski flexes those values vary.
Conclusion one: In my view, while most (if not all) frame touring bindings such as Fritschi are TUV tested/certified to meet DIN/ISO standard 13992, boot wear and dirt (as well as user adjustment error), result in wide variations of release values during real-world use. The beauty of the tech (Dynafit) binding system in terms of safety is it eliminates the variable of boot friction by suspending the boot between toe and heel fittings. Conversely, the tech system introduces the problem of ski flex and heel/binding clearance and they are thus not TUV certified to DIN/ISO 13992. Even so, real life use validates my opinion that both tech and frame binding systems are equally as safe — when correctly maintained and set with proper clearances. Main caveat being that any binding system should be carefully adjusted and tested for safety release.
Conclusion two: The 5.5 millimeter Dynafit tech gap will probably work fine for the vast majority and is recommended. But if you have problems, don’t hesitate to experiment with small changes in the gap. Only if you do so, be aware that by changing the gap you’ll change your release values or possibly introduce annoyances such as the pins actually pulling out of your boot heel fitting when the ski is de-cambered (in this case, exacerbated by gap set wider than spec).
Conjecture: It seems to me that actually making the tech binding pins longer and specifying a wider gap would be the way to go for all tech binding makers. But everything is interrelated in this type of machinery, so who knows what problems that would introduce. Even so, a man is allowed to dream. It also occurs to me that perhaps ultimately we need a generation II tech binding interface. One with stronger and wider boot heel fittings, variable spring tension in the toe unit, longer heel pins, and so on. Is someone working on that as I dream? I wouldn’t be surprised.
Tip: If you can’t find a Dynafit tech gap gauge, 3 lightly used nickles measures about 5.5 mm, which in my opinion is within tolerance for setting your Dynafit tech gap.
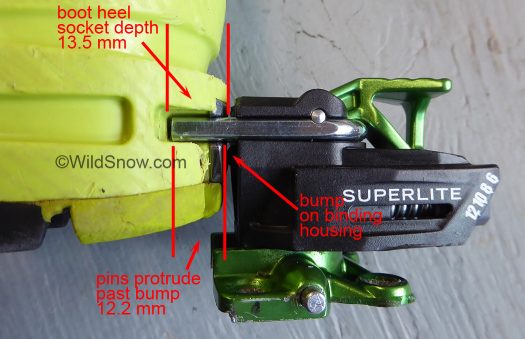
TLT6 Dynafit boot with Superlite 2.0 binding inserted with IMPROPER TECH GAP to illustrate how binding would appear when ski is heavily flexed and the tech gap closes up. Notice how the binding socket-cavity has enough depth to accept the total length of the pins, with a little extra.
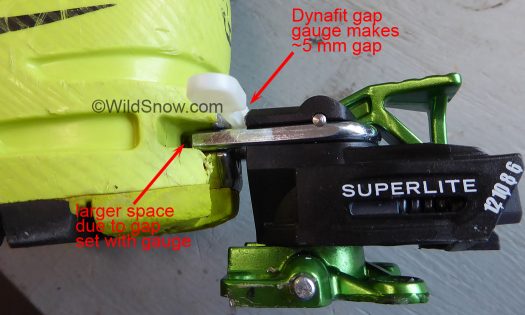
TLT 6 boot set up with Superlite 2.0 binding per Dynafit recommended tech gap using supplied gauge. Note how the depth of the boot socket allows room for the pins to move inward during ski flex, yet with ostensibly enough pin length riding inside the socket for situations when the ski is de-cambered (reverse flexed) and the pins slide outward to the rear and can thus possibly come completely out of the socket, causing accidental release.
WildSnow.com publisher emeritus and founder Lou (Louis Dawson) has a 50+ years career in climbing, backcountry skiing and ski mountaineering. He was the first person in history to ski down all 54 Colorado 14,000-foot peaks, has authored numerous books about about backcountry skiing, and has skied from the summit of Denali in Alaska, North America’s highest mountain.
