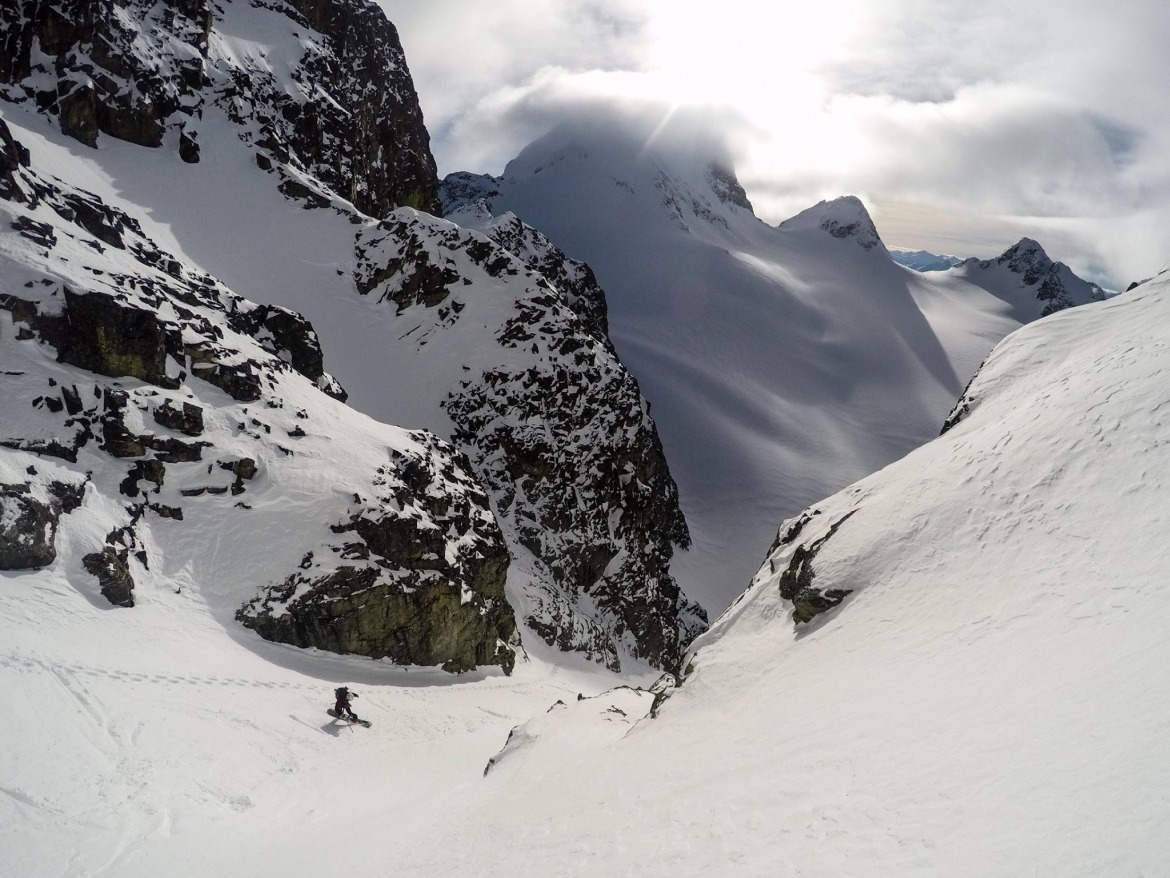
The author rides his toe edge on BC’s Aussie Couloir. Splitboarders employ different strategies to move efficiently in the mountains.
Visualizing the backcountry as a Splitboarder takes a different perspective than a skier. Learning to splitboard and reading terrain has unique challenges — we’re here to minimize those challenges with helpful pointers on anticipating backcountry terrain and keeping the fun factor high.
“Dude, don’t become a splitboarder. They’re way too slow, inefficient, and can’t keep up with skiers.” I’ve heard this repeatedly during my ten years of exclusively splitboarding. And while I can understand the sentiment, splitboards as a mode of travel aren’t the limiting factor. After splitboarding with some of the industry’s high performing skiers and guides, I’m confident in my ability to keep up with a skier’s transitions and movement. With some forethought, efficient and comfortable backcountry splitboarding is possible. We’ll cover some preparation strategies and resources to help with strategies for anticipating terrain and moving more efficiently in the field.
Preparation Strategies
Route Planning Using Modern Navigation Tools for the Splitboarder
There are many tools available to plan your tour. But the overall theme involves optimizing the fall line towards the flats, regrouping outside of harm’s way in flat terrain before transitioning to uphill travel, then finding a downhill transition point immediately on top of the fall-line run. In general, this technique is applied across all realms of skiing, though with splitboarding, it’s even more paramount that we do this for safe and enjoyable travel because following traverses and pushing through flat areas will have a rider lose momentum.
This process involves choosing terrain features or runs that may not be part of a standard “run list” or route options catalog. Looking at the topo lines on a map, we can determine where fall line runs are located; the fall line will always be perpendicular to the positioning of the contour lines (see photo below). This approach may require adding one more transition into your day, but you’ll get one more run out of the process and significantly less stress than trying to traverse a great distance.
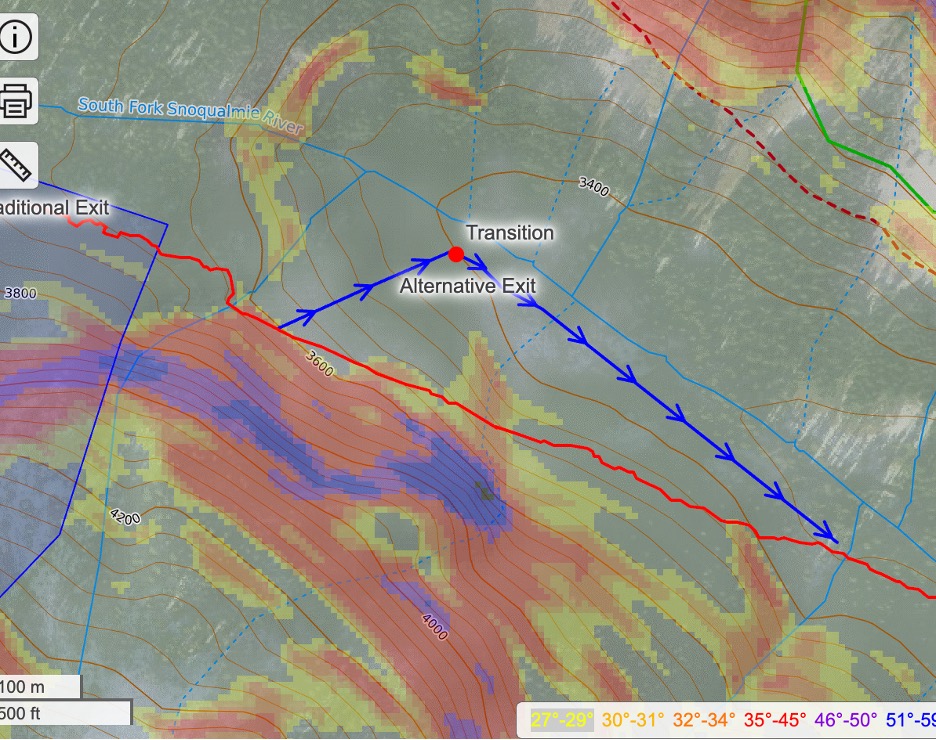
Here is a classic variation to a standard exit track. This is the exit from the Alpental Valley in Snoqualmie Pass, WA, which traditionally follows a long traverse (red path) back to the groomed runs on the ski area. This can be challenging for snowboarders because it is a long traverse. An alternative approach can be to follow the blue path, take the fall line to the valley bottom, then transition and hike back to the red path. This approach may take slightly longer, but increases comfort & overall efficiency for snowboarders. Photo courtesy: CalTopo.
Maintaining Momentum
Maintaining momentum is the key to success in lots of backcountry terrain. But before going into the backcountry, we recommend everyone practice movement at the resort, where pushing your comfort zone comes with the reassurance of ski patrol should the need arise (though this isn’t a free pass for reckless behavior).
I’d recommend gradually increasing your comfort zone with speed: find a blue or black run that ends at a flat area, cat-track, or both, and practice periodically starting to straight-line from higher on the run. Remember always to do this without other traffic around, and yield to traversing or slower-moving traffic. Find areas of the resort with undulating terrain and/or ‘pump tracks,’ as many exits from backcountry terrain require some comfort with this movement style.
Choosing Slopes to Maintain Momentum
Choosing a sufficient slope angle depends on snow surface conditions and current forecasted avalanche problems. And not all areas share the same rules for when skis or boards will slide.
Generally, the wetter the snow and the more unconsolidated it is, the steeper a slope needs to be before skis or splitboards slide. In my experience, snow considered wet AND unconsolidated requires a slope angle of at least 30 degrees to move. This can create a challenge concerning avalanche risk management, as AIARE instructors will tell you to generally avoid slopes of 30 degrees or more in the backcountry.
Thankfully, in drier intermountain snowpack climates (the Selkirks/Monashees of BC, Tetons, Utah, etc.) or continental climates (CO, Canadian Rockies, etc.), downhill travel on shallower slopes of 15 to 20 degrees becomes possible. Couple this with the region’s typically more challenging persistent slab avalanche problems, and avoiding avalanche danger becomes far easier, as the process of avoiding steep (greater than 30 degree slopes) can be utilized.
Common practice is to stick to shallower 15-20 degree slopes when persistent type avalanche problems are on the bulletin, as terrain choice, and especially staying off of, underneath, or attached to terrain steeper than 30 degrees will expose you to avalanche hazard.
I mainly live and work in the maritime snowpack of western Washington, where managing the challenge of building momentum while avoiding avalanche terrain can be challenging. But going back to wetness: the wetter a snowpack is, the quicker bonding between layers and interfaces occurs, so we often have our avalanche problem, which generally is composed of near-surface instabilities, bond faster than in comparable more continental, snowpack climates. With that knowledge in mind, my strategy to manage risk effectively while maximizing fun is often to ride in the resort immediately, during, or within 24hrs after a significant storm event (any storm with critical loading rates, such as 1″ of water within 24 hours or greater). I then venture into the backcountry after bonding between these interfaces has occurred and/or the snow has dried out enough to ride lower angle (less than 30 degree) slopes.
Be conservative when choosing to venture out into the backcountry after a storm event to ride avalanche terrain, as confidence in snow stability assessment is key. Take an avalanche course and/or hire a guide in your local area to learn these skills if you need to gain experience.
Keep Your Board Freshly Waxed
One key strategy for maintaining momentum is to wax your board. At my busiest, I’m in the field 5-6 days/week. During this time, I’m usually waxing my board every two weeks at the minimum. Fresh wax, especially wax that is temperature specific, can dramatically improve glide. As a rule of thumb, re-wax your board every 10 to 14 riding days for best downhill performance.
Strategies for Anticipating Terrain While Out in Field
Avoid Regrouping Below Benches
A strategy many guides use is stopping on top of benches while regrouping in the middle of a run. This often reduces group exposure to avalanche risk and positions the group out of harm’s way. This strategy is even more critical to splitboarders. Once we stop below a bench, we need to move back uphill either by transitioning to skinning, or post-holing, neither of which is very efficient. Previewing the run you ride, noting where benches are, and coupling that with maintaining momentum through the flats leads to a successful tour as a splitboarder.
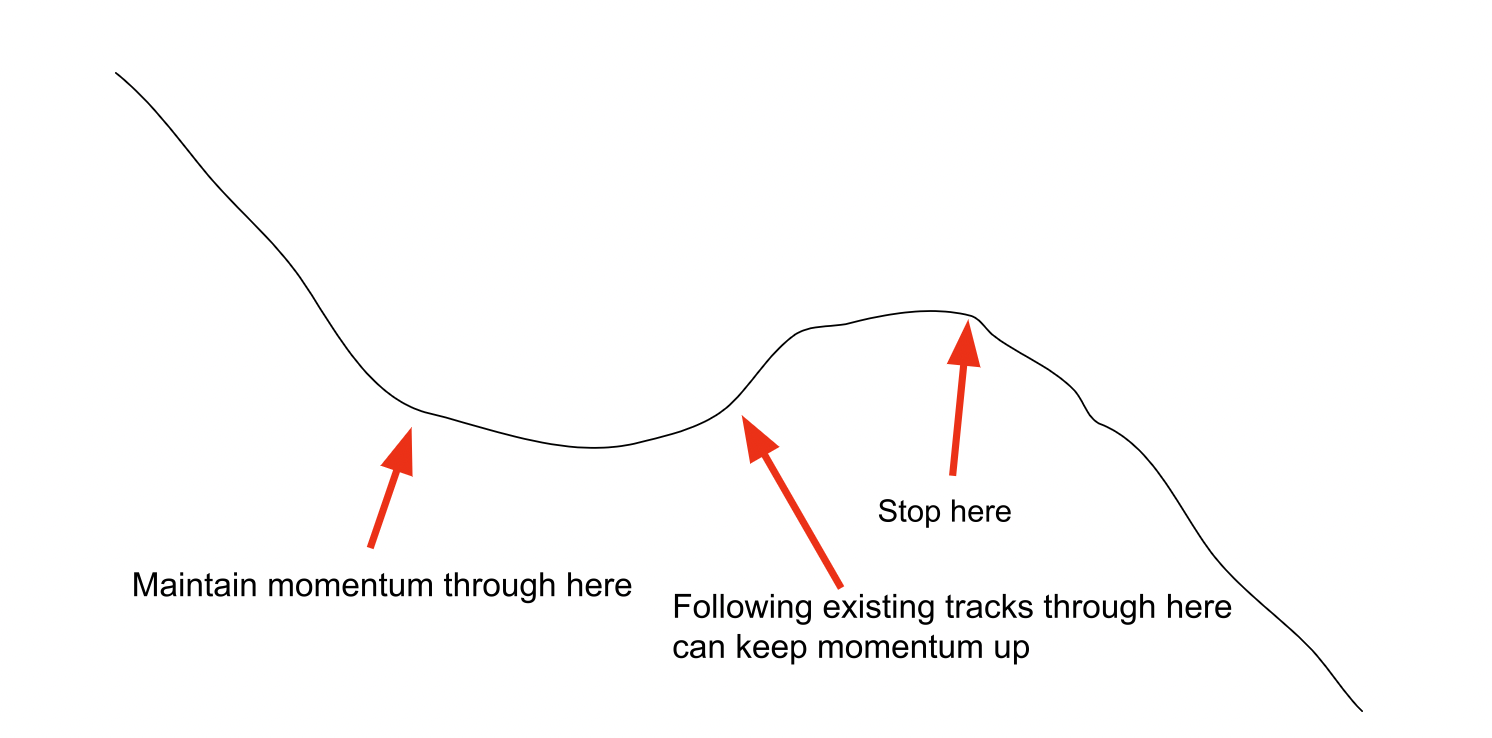
Diagram showing various techniques to use based on where on the slope a rider is located. A strategy many guides use is stopping on top of benches while re-grouping in the middle of a run. This reduces group exposure to avalanche risk and gets the group out of harm’s way. This strategy is even more important to splitboarders.
Take Note of Critical Micro-Features on Your Ascent
Depending on the terrain you’re in, some micro-features, like benches, may not be visible during the planning phases of your trip, such as looking at maps or digital tools. For example, consider a map with 20′ wide contours; any feature less than 20′ will not be noticed, including a 15′ tall cliff, bench, etc. Many ski guides mention the phrase “reading between the lines” of a map to highlight this limitation. One of my favorite strategies to manage micro-features is previewing terrain that I plan to ride, and dropping GPS waypoints of any specific micro-feature I plan to avoid or ride on the way down. This can be a great strategy to ‘ground truth’ your planning process, helping create exactly the line you want while avoiding undetected hazards.
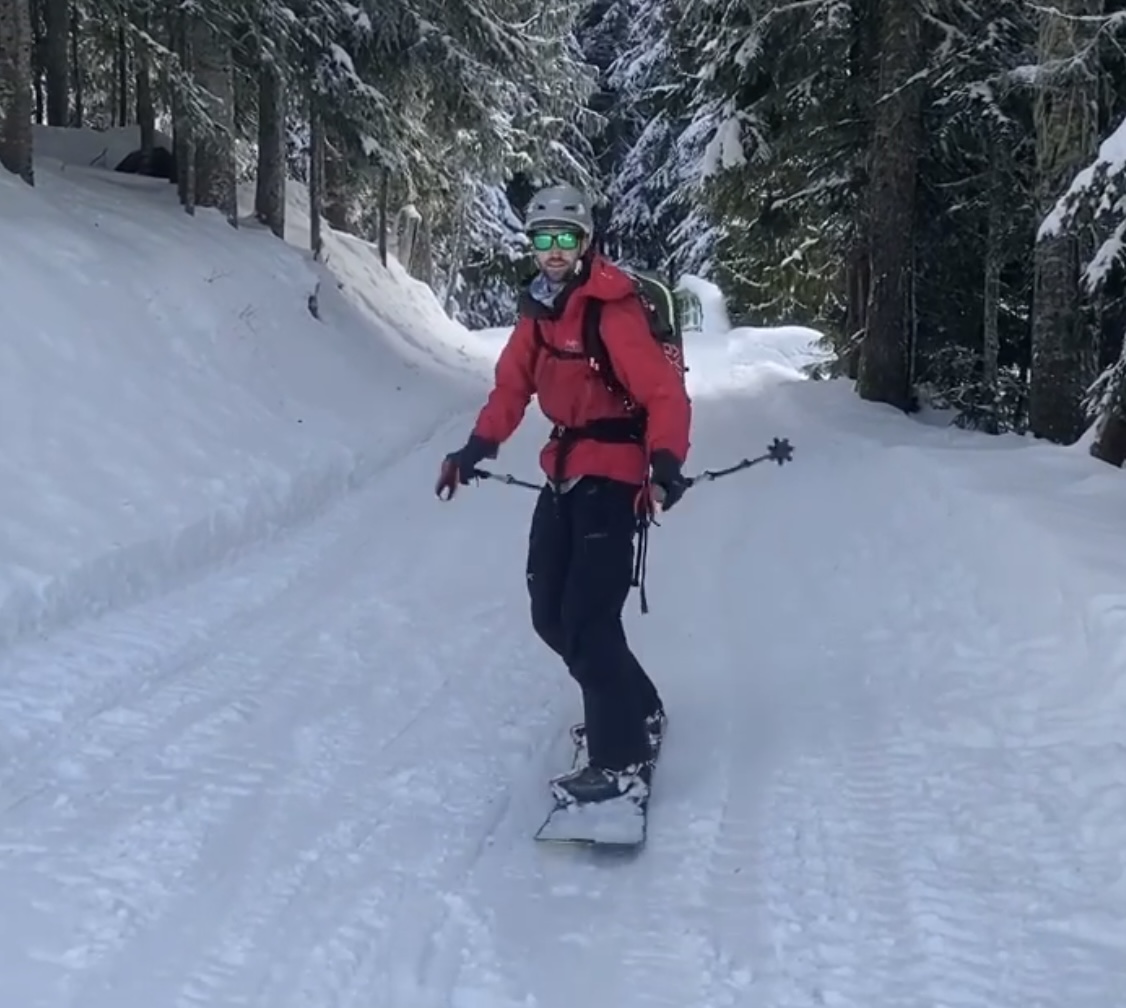
Having poles at the ready allows a splitboarder to maintain momentum when exiting a backcountry run.
Ride with Poles Out, or Be Ready to Deploy Them
I like to ride with my poles in hand on any terrain less than 35 degrees and has any variation in slope shape (e.g., a small flat area). The only exception to this may be straight, planar slopes without any variation until you transition. Holding poles will feel weird at first. But fear not; this is another perfect skill to hone at the resort. Keeping your poles in hand will be key to pushing through small terrain undulations and ensuring that any momentum generated can be maintained.
Setting your poles to an adequate length is also key for efficiency. Similar to cross-country skiers, long poles improve ‘pushing throw length,’ which will impact overall efficiency, especially on traverses and lower-angle pieces of terrain.
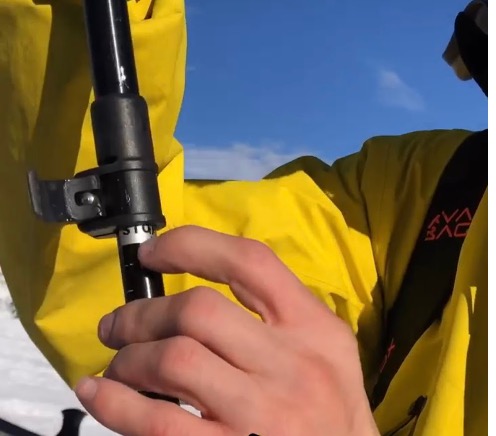
Extending one’s poles to their fullest extent will maximize pushing potential.
Movement Strategies for Managing the Weird
Split-skiing Strategies
Even with proactive tour planning strategies, splitboarders can encounter weird terrain that needs to be managed. Having some fluency and comfort with skiing your splitboard can be critical in these moments. Similar to all new movement modalities, practice these things in the resort if you have the means to do so. It’s a fun way to enjoy the mountains if the snow is crummy because it’s best to practice these skills on low-angle groomers (greens or blues max). There are three main movement strategies for splitboarding, which I’ll cover below:
—Split Skiing With Skins: For those new to skiing entirely, this is by far the most controlled strategy. The downside is that it’s quite slow, and only marginally faster than walking.
—Split Skiing w/ One Skin: This hybrid approach can be awesome on long, snowy logging roads or in places where there is deep, unconsolidated snow with a slight downhill pitch. I prefer to have a skin on my dominant leg’s ski. The key is to transfer most of your weight onto the ski without the skin and push with the skin side ski. This system improves balance and momentum. It feels weird initially, but give it a go on a green run at the resort.
—Split Skiing w/o Skins: This technique is quite tricky and requires a good amount of practice to feel competent enough to use it. It can be best in places with deep snow, and/or slight downhill pitches. I recommend using this technique in places with deep snow, as one can move into fresh snow to manage speed (go into fresh snow to slow down, go onto compacted surfaces to speed up).
Split skiing is not a natural movement pattern, especially for folks who prefer sliding down the mountain sideways. Hiring a certified splitboard guide to assist with these movement patterns can be useful, and practicing them in a resort on a green run can increase your comfort with the skill.
Follow Existing Tracks
While we all go into the backcountry to find fresh tracks, moving over low-angle terrain can sometimes be more challenging on a splitboard. In these cases, following existing tracks can be easier to move, coupled with maintaining momentum while pole pushing. If you’re in a freshly tracked area, sending your skier friends first (if they’re in the group) can provide an opportunity to have a track to follow to ensure the snowboarders don’t get bogged down. If there aren’t any skiers in the group, whoever is most confident with split-skiing can also lay a track for others to follow.
Favor Toe Edge Traverses
Often exits from the backcountry will follow existing hiking trails, especially in densely forested terrain where choosing the most fall-line run may not be an option. In these cases, it’s significantly easier to hold an edge on one’s toe side when compared to traversing on one’s heel side. With this in mind, choosing tours with toe side traverse exits will be most favorable; however, some fluency with riding switch can also help if the terrain isn’t suited for a toe side traverse.
Summary
There certainly are challenges to moving on a splitboard in various backcountry terrain features. Usually, these challenges present themselves moving through flatter terrain or on traverses. Gaining some familiarity with the techniques I’ve discussed in this article, ideally in the resort, can dramatically improve your efficiency while out in the mountains and make it possible to do longer, bigger objectives with a higher degree of safety.
Like anything, there’s no substitute for getting out there, practicing on your equipment, and learning through highly skilled mentors. These techniques I discussed are merely a foundation, and there are many useful skills that I didn’t mention in this article. Talk to a certified splitboard guide in your local area if you want to learn more and seek qualified instruction.
Zack is one of less than 15 Americans to have gone through the entire AMGA ski guide pathway on a splitboard. He’s a huge advocate for promoting splitboard use in the backcountry and believes anyone can achieve their dreams with this tool. He lives in North Bend, WA, where he guides primarily with Mountain Bureau LLC and is a leader in the splitboarding & snowboarding community in central WA.