
Depending on the terrain, a heel hit with a riser flipped over the pins might offer the most efficient mode for ascent and transitions.
Riser options — the debate rages on. Let’s agree that personal preferences are ok when it comes to riser heights. And to build efficiencies at transitions, sometimes it makes sense to skin with a riser flipped over a tech binding’s pins.
There’s a lot of arcane background skiing knowledge to learn. Some of it comes from years of experience and learning about suspect snow slopes and your ability to make wise decisions. Other aspects of the sport, like gear, shouldn’t be so complex. In this binding primer, we’re focusing solely on tech bindings possessing some racing DNA and efficient use of those heel units.
The passing of the race DNA to some hybrid offspring doesn’t require a Punnett Square. We’ll break it down and keep it simple.

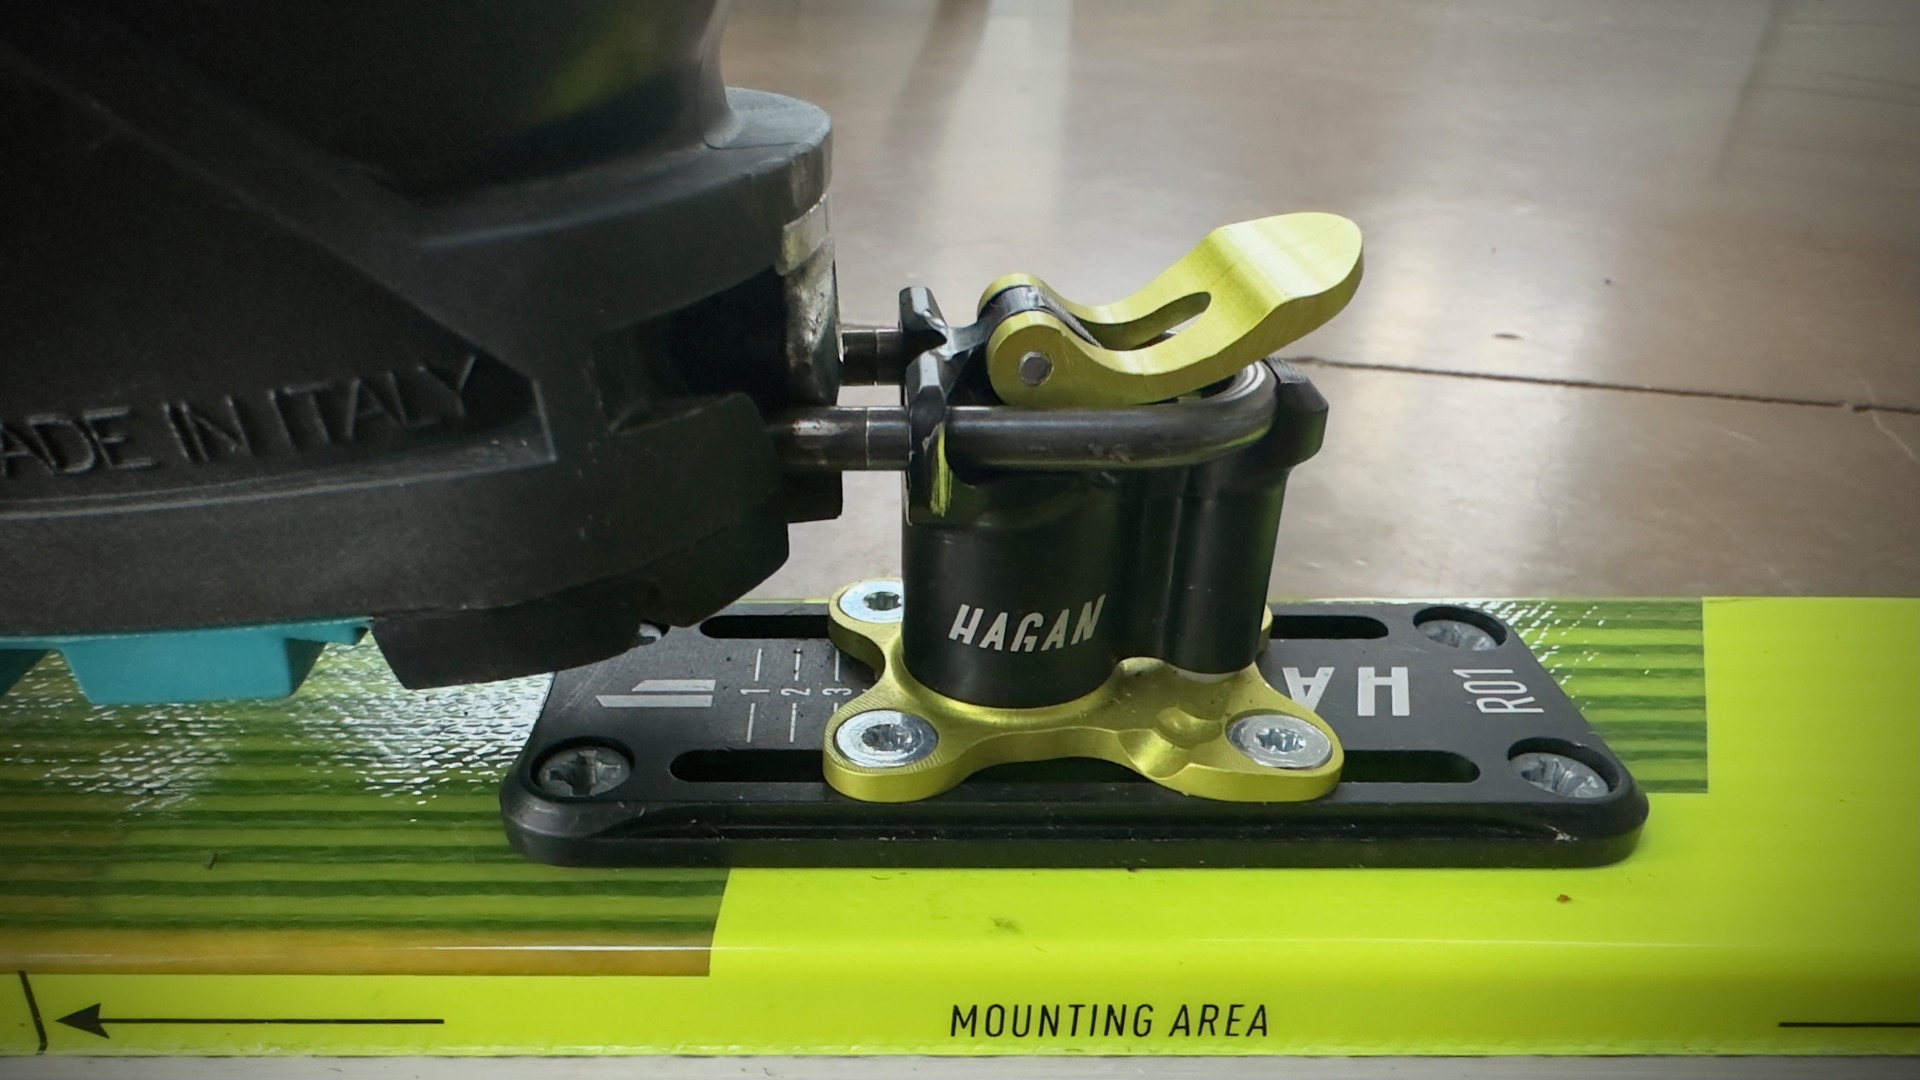
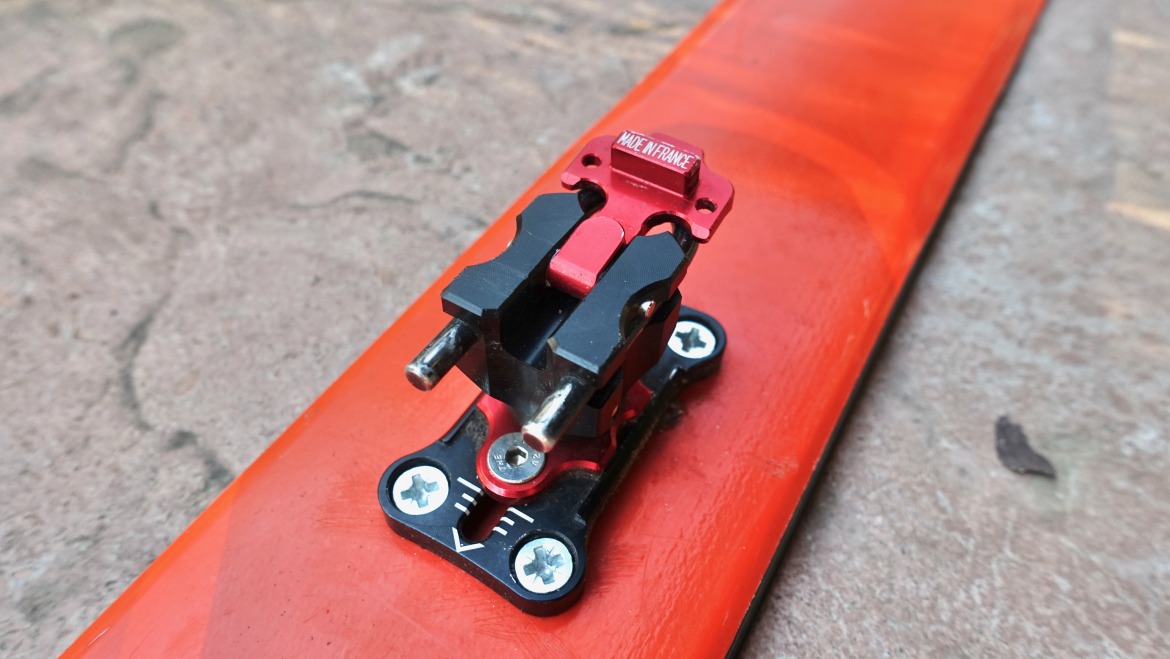
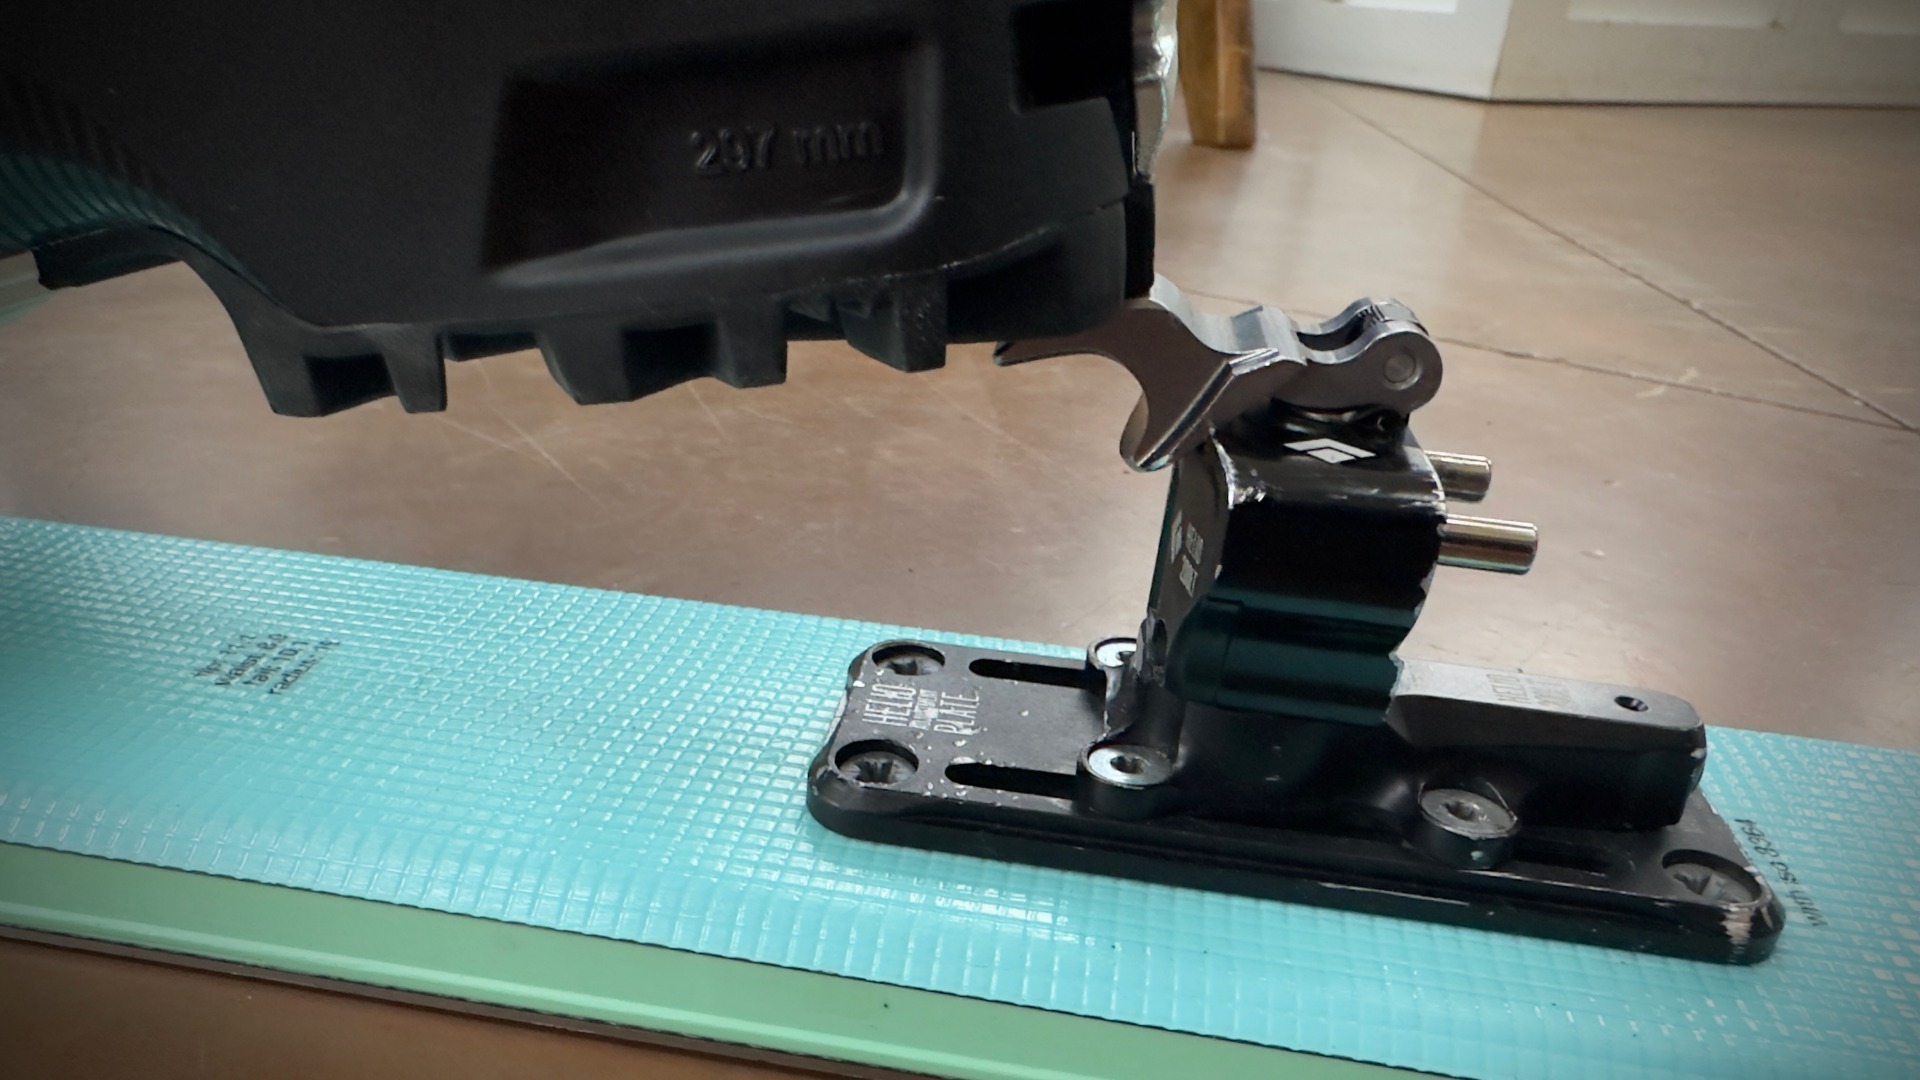
The boot heel, when pushed down, will snap into the pins. Shown here is a Hagan Ultra WC race binding. A model made by ATK that is very similar to their race offerings.

The heel of the Hagan Ultra WC is set in the pins forward position with the lone riser flipped over the pins.
Race bindings are light. Some weigh nearly 100g (toe + heel). We’re interested in tech bindings with a bit of a bump in weight, the 170g to 220g range. The added weight often means a more durable binding. And since we are talking about using this binding way way way off-piste, we want some durability.
Race bindings offer a limited, but oftentimes sufficient, set of riser options. Usually, this means a single riser that flips over the pins providing roughly +25-30mm of added height.
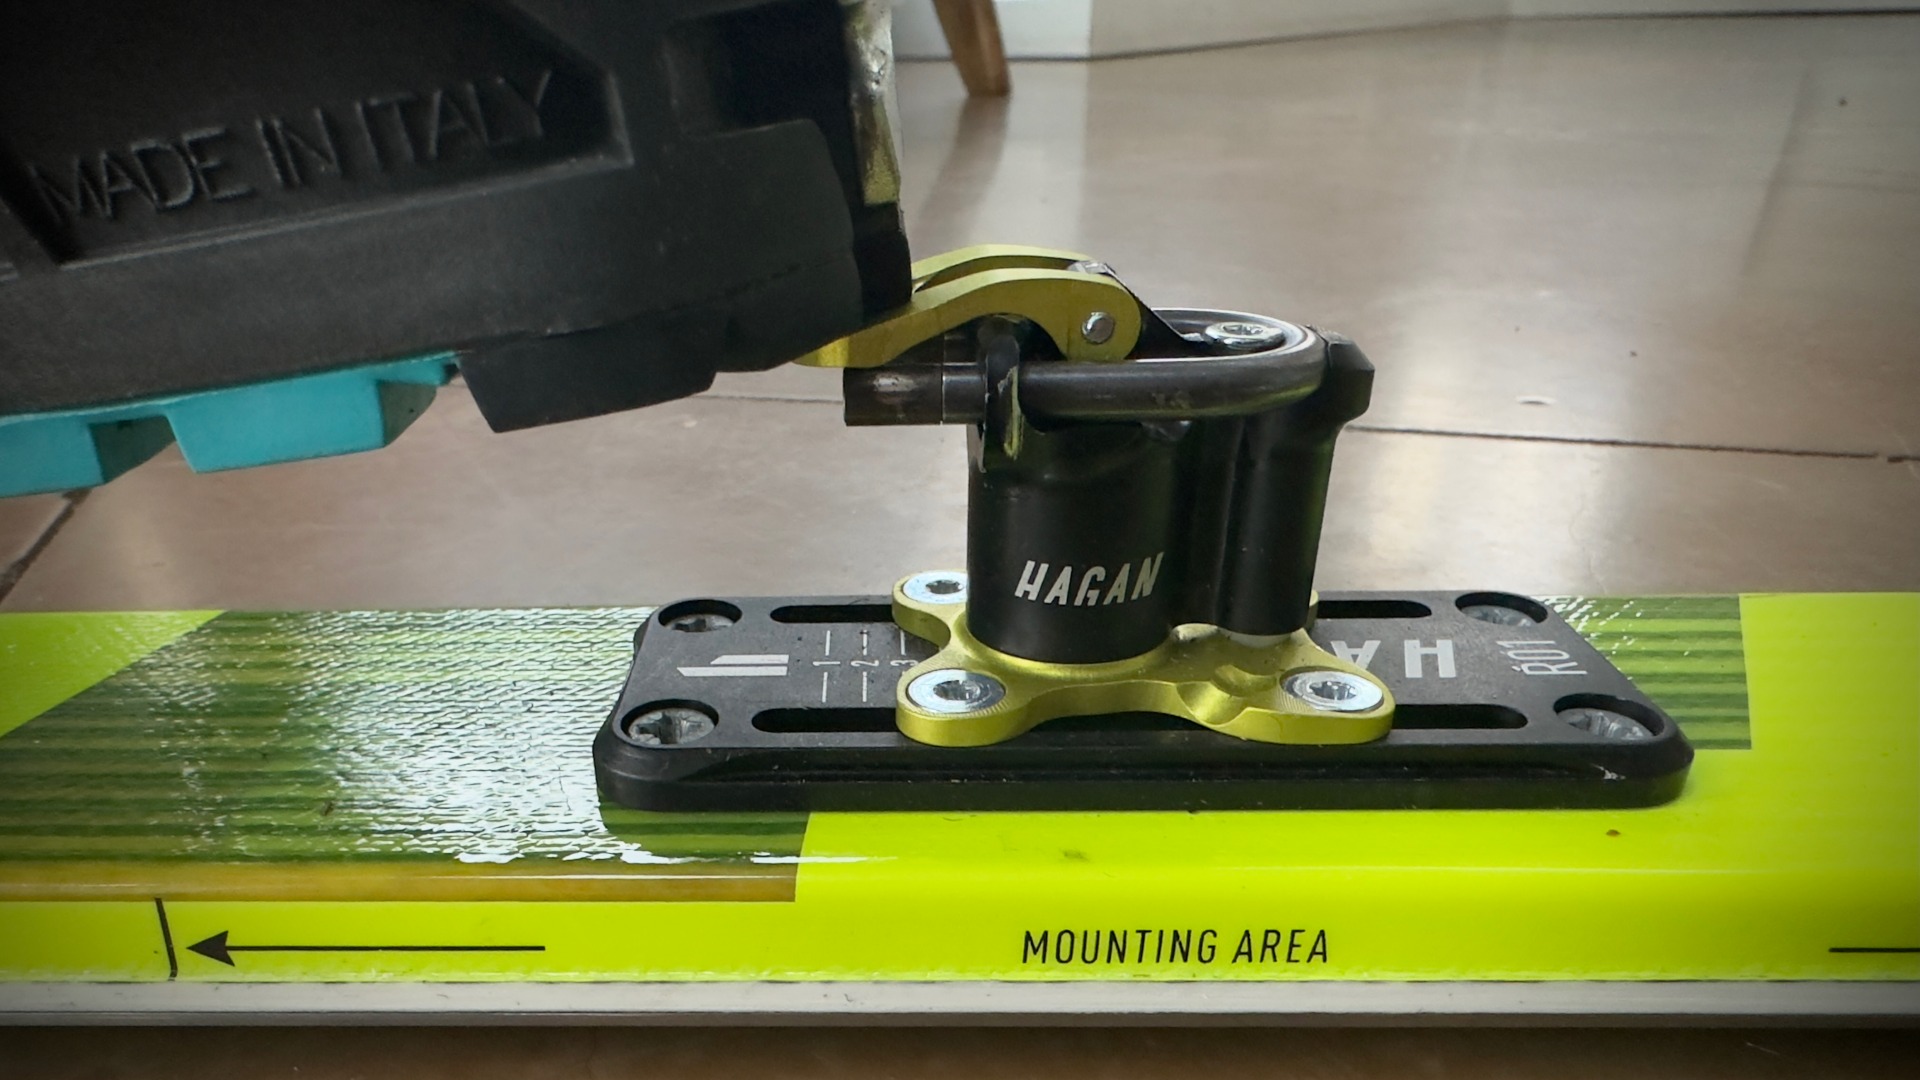
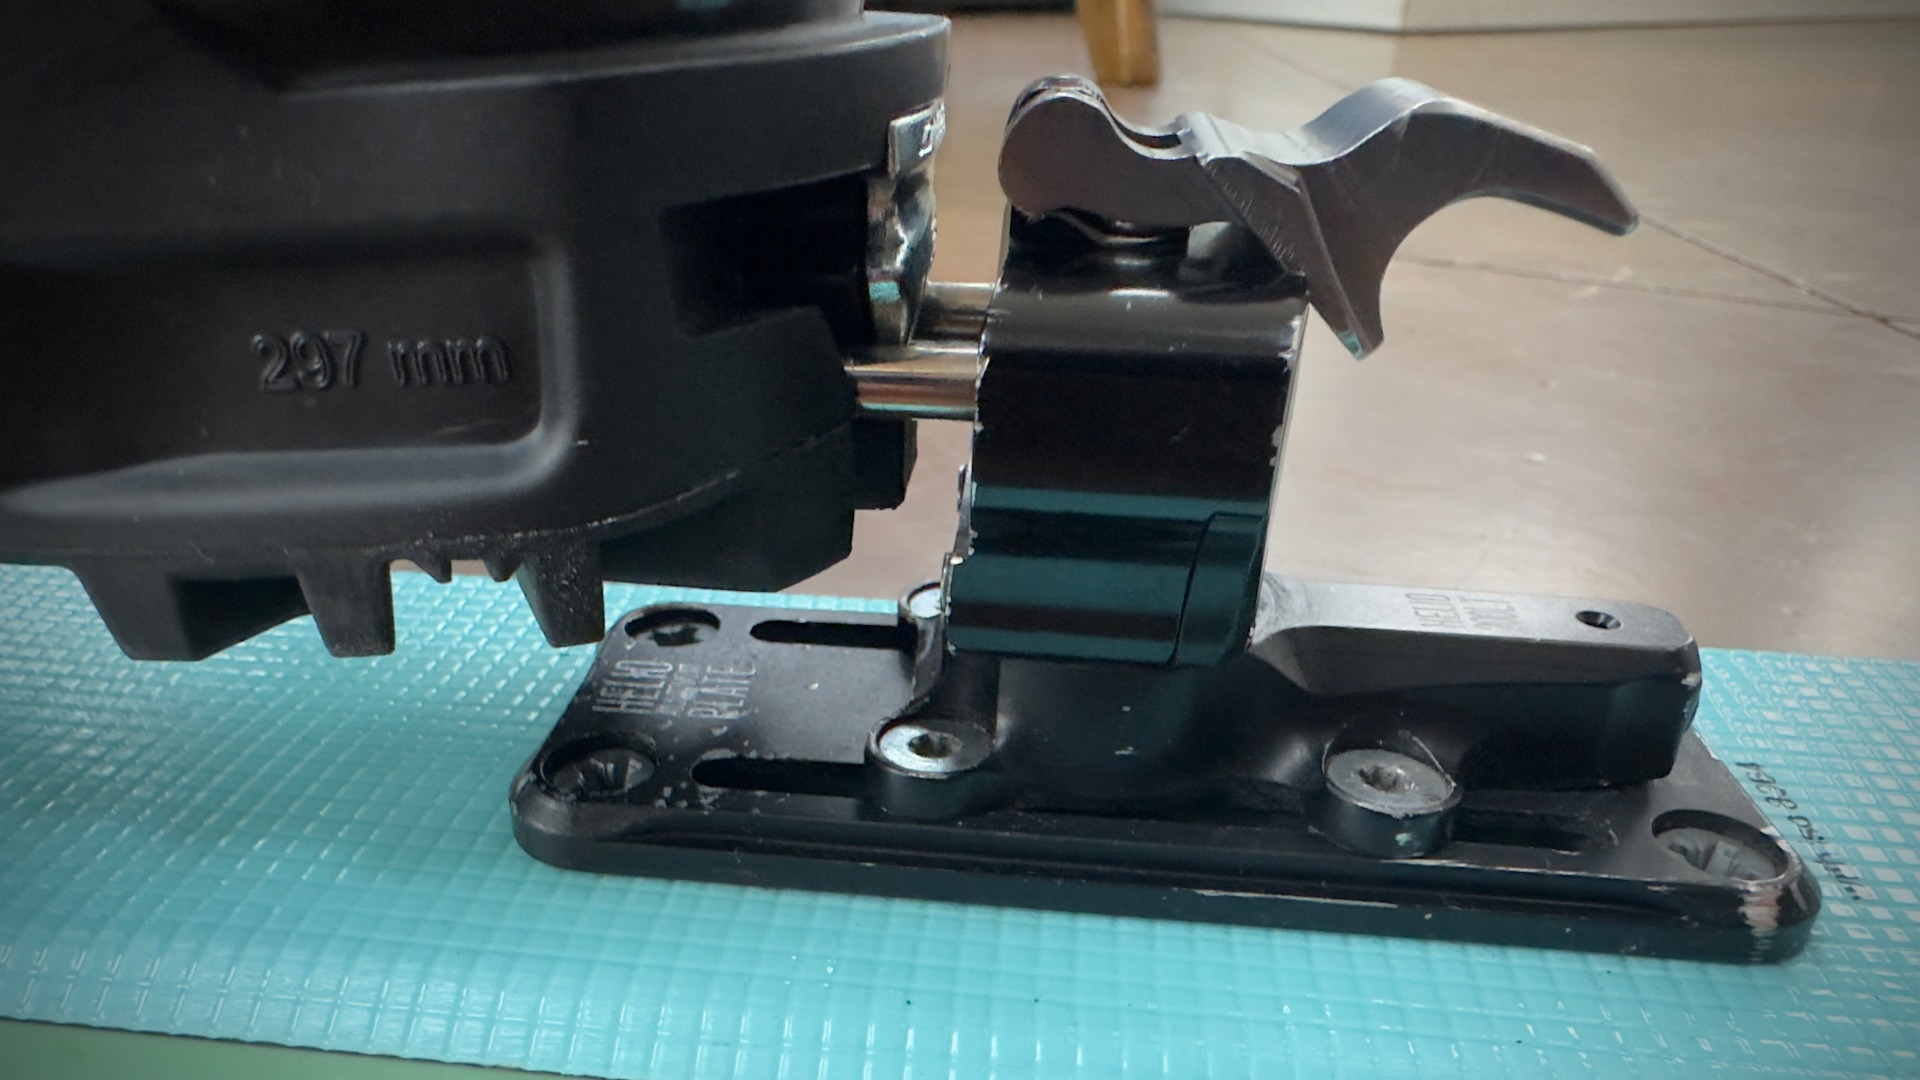
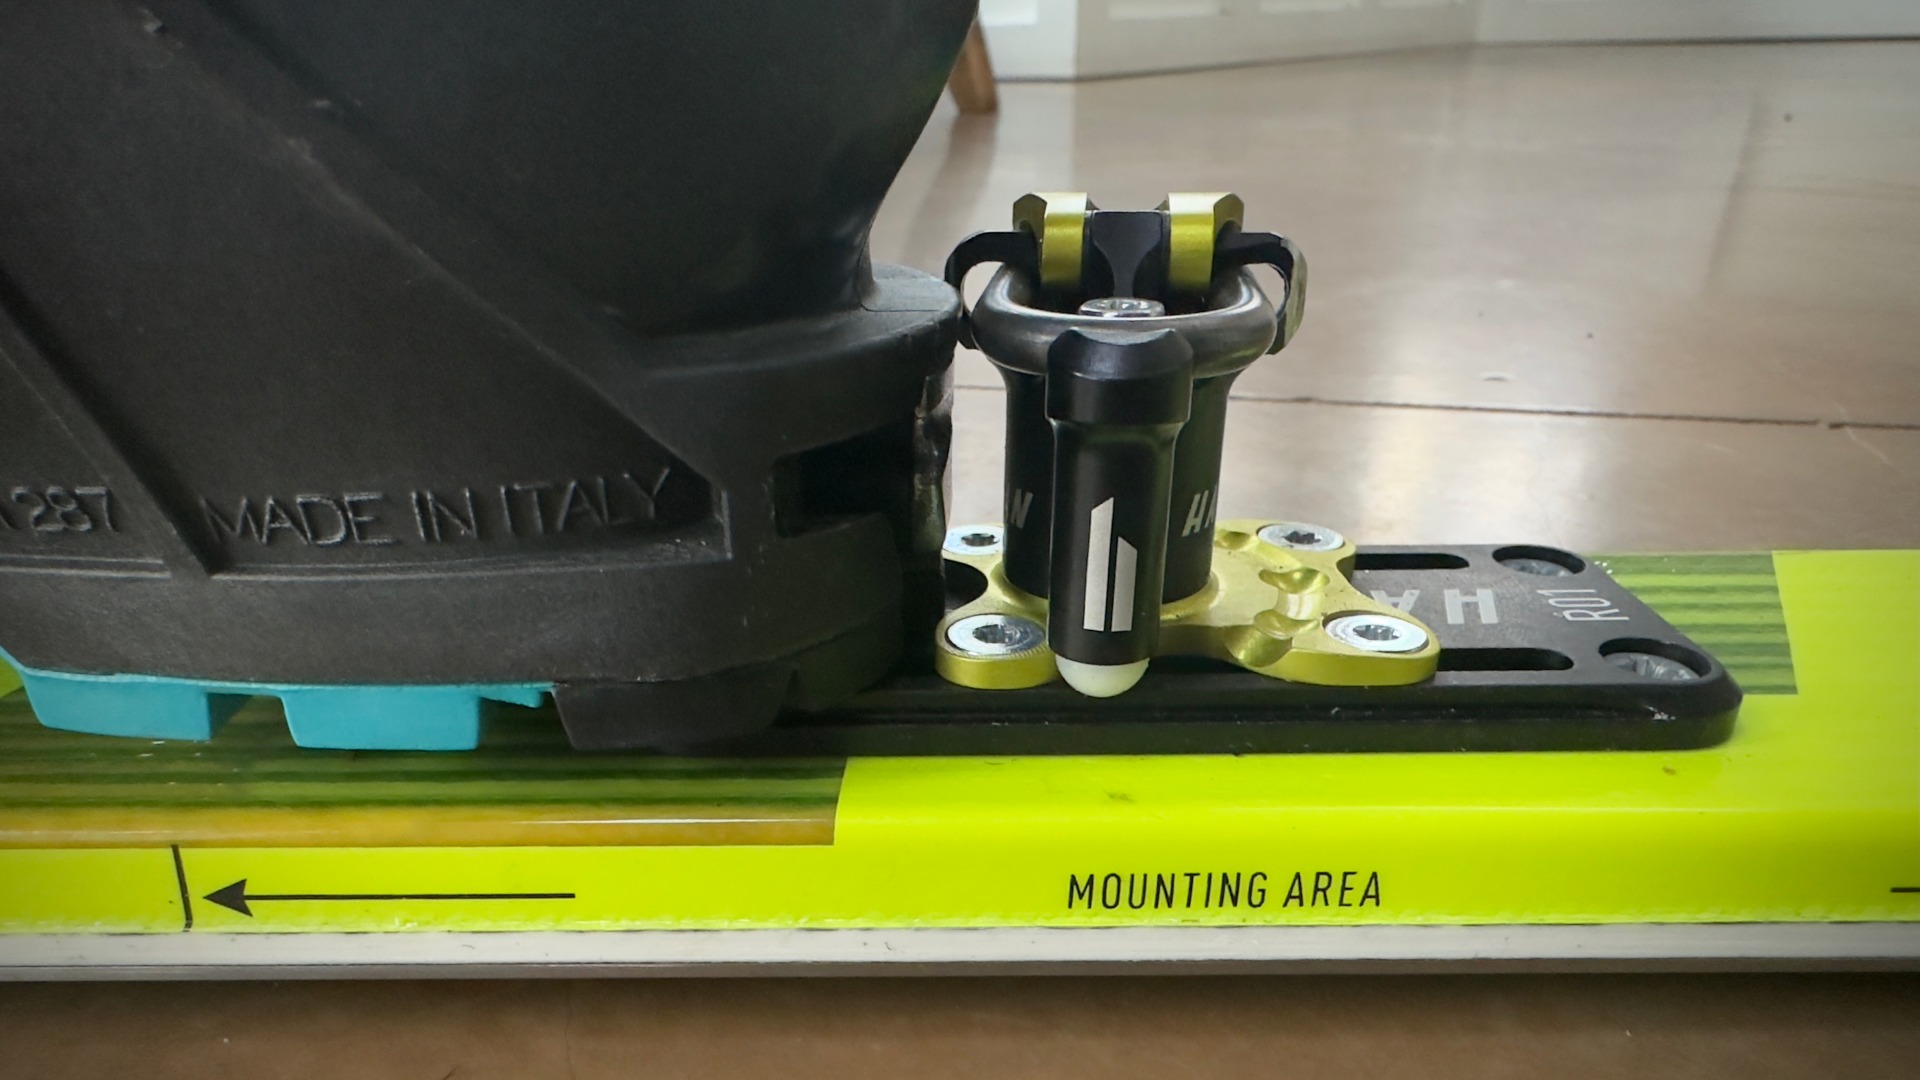
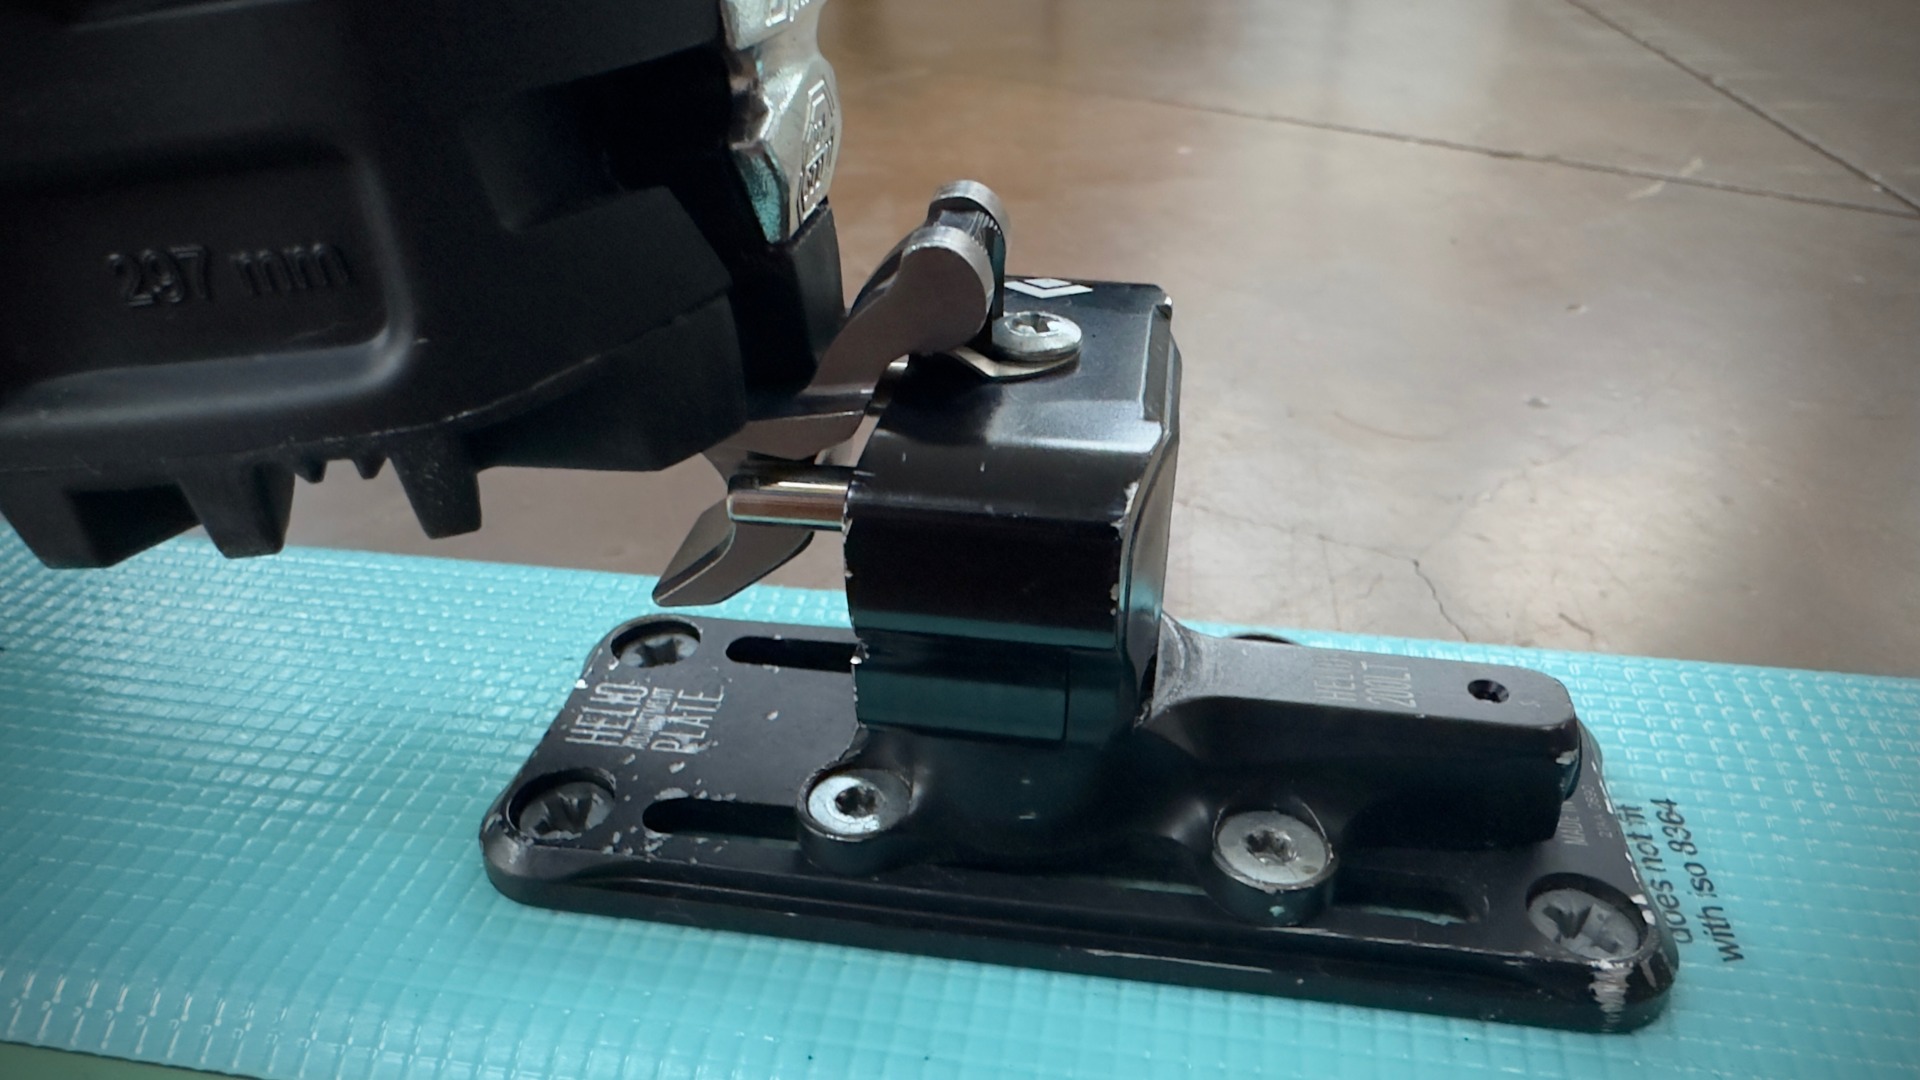
A sky view of the Hagan Ultra WC race binding. In this orientation, the heel is rotated into flat mode.
Several companies market their race bindings as including a flat mode. Engage this mode when the binding is rotated 90 degrees from pins forward. In our experience, these flat modes can be finicky; there’s not a ton of clearance between the boot’s heel and the binding when lowering the heel. For example, the recommended heel gap on an ATK World Cup is 4mm. The tolerances in flat mode are pretty tight. Most times the heel gap needs to bump out a mm or so to 5mm to avoid any boot-binding interference as the skier drops their heel.
Minimizing Heel Unit Rotations
Tech bindings have come a long way. Dynafit’s storied and often mimicked TLT Speed or Turn bindings (we’ve seen a renaming of this binding model many times) required spinning (call it turning too) the binding heel to engage the pins, low riser, flat mode, and high riser, respectively. That’s a lot of heel rotating if you are on rolling and varied terrain.

The Dynafit Speed Turn binding, a reliable classic built on the chassis of older Dynafit models. The heel unit must be turned each time to engage pins, low riser, high riser, or flat mode.Photo: Lou Dawson/loudawson.com
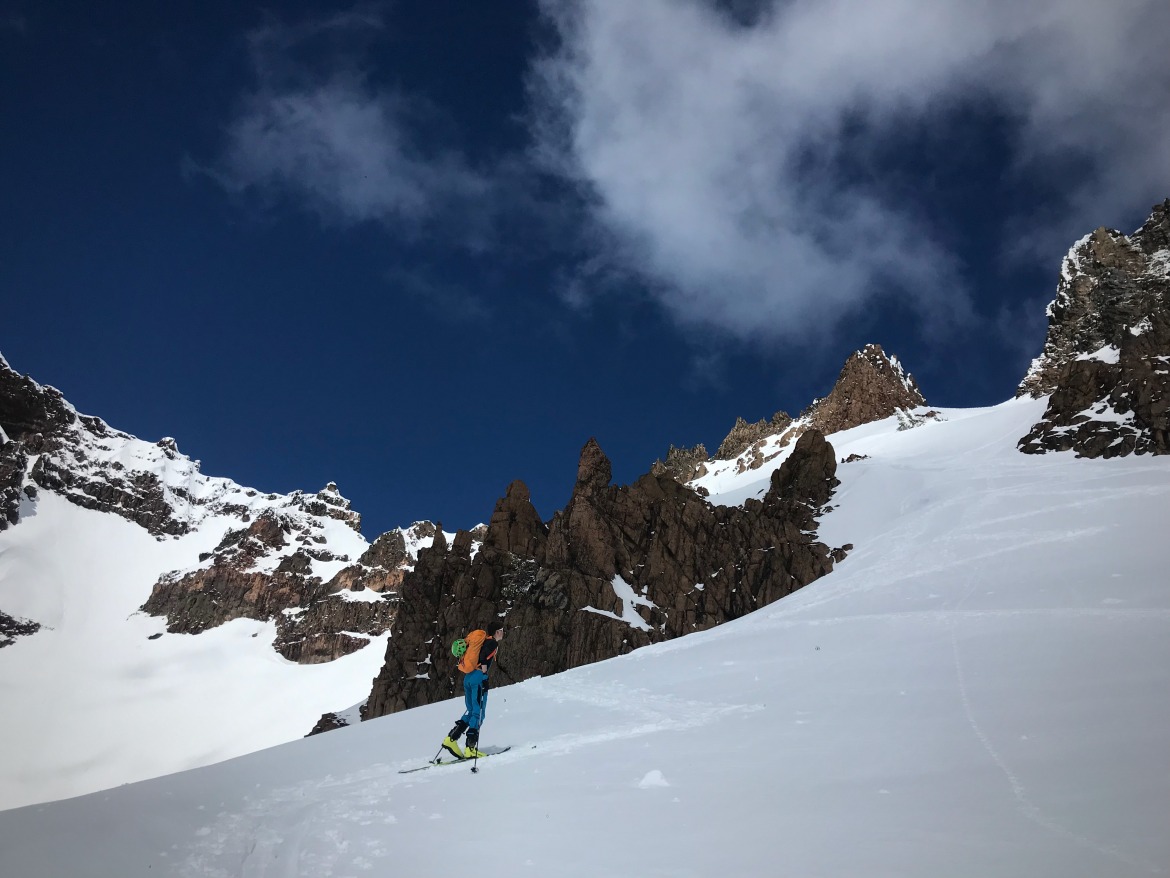
Ski-mo racers look for efficiencies in transitions. They are racing after all. Backcountry skiers, hopefully, aren’t racing the clock or that other guy’s Strava segments. But efficiencies while transitioning are always welcome.
Nowadays, all binding companies offer a speed touring binding (not a pure race category binding) with similar heel unit features as their race cousins.

The PLUM R170 heel unit, pins forward. With this race inspired binding, turn the heel into three different orientations to use the low, flat, and high riser modes, respectively
Some race hybrid bindings like the PLUM R-170, the Dynafit Superlite 150, and the Kreuzspitze GT 2.0 require turning the heel into three orientations to use the low, flat, and high riser modes, respectively. Other slightly heavier iterations of the race hybrid binding, like the ATK Haute Route or the BD Helio LT 200, require a single 180 degree heel unit turn to use the low-riser (over pins) or the flat mode with the option of deploying the higher riser.
Why Skin with Pins Forward?
At the bottom of the slope you’ve just skied (or maybe you are just starting out), pop the ski off and apply skins. There’s no need to rotate the binding, just flip the riser over the pins, step in, and pull up on the toe lever (this secures the toe unit more firmly when skinning). Do this for the next ski, and start skinning. The riser used in this orientation is often not too high. Ok, skin to the top.

The BD Helio LT 200 (rebranded ATK binding with similarities to the Haute Route 10) with the low riser flipped over the pins.
In this scenario, with the riser over the pins, it helps to have a boot with a large range of motion: something, say 60-degrees and greater.
At the top, rip the skins. If you can do that without removing your skis, you’ll find this next move saves a bit of time at transitions. Skins are ripped, flip the riser back and stomp down into the pins. Adjust from walk to ski mode on the boot (usually a flip of a lever), secure the buckle, BOA, Twistfit, powerstrap…you get the drift. Repeat for the other foot. Then descend.
The upside: Fast transitions. And there’s no binding rotation at the top (or bottom of the run) in the riser-over-the-pins orientation. Quick transitions don’t mean this is a race. It can mean less time fiddling with skins, boots, bindings and time to take a sip of tea, take in the view, or another means of decompressing.
The downside: without rotating the heel unit, you are limited to a lower riser with some bindings. With the right boot, this is not such a downside.
Why Start in Flat Mode?
Oftentimes we transition at the bottom of a run where the slope angle decreases significantly. By beginning in flat mode on a binding like the ATK Haute Route, you can ease into the skin track with longer strides. As the angle kicks up, it’s easy to flip the high riser into place.

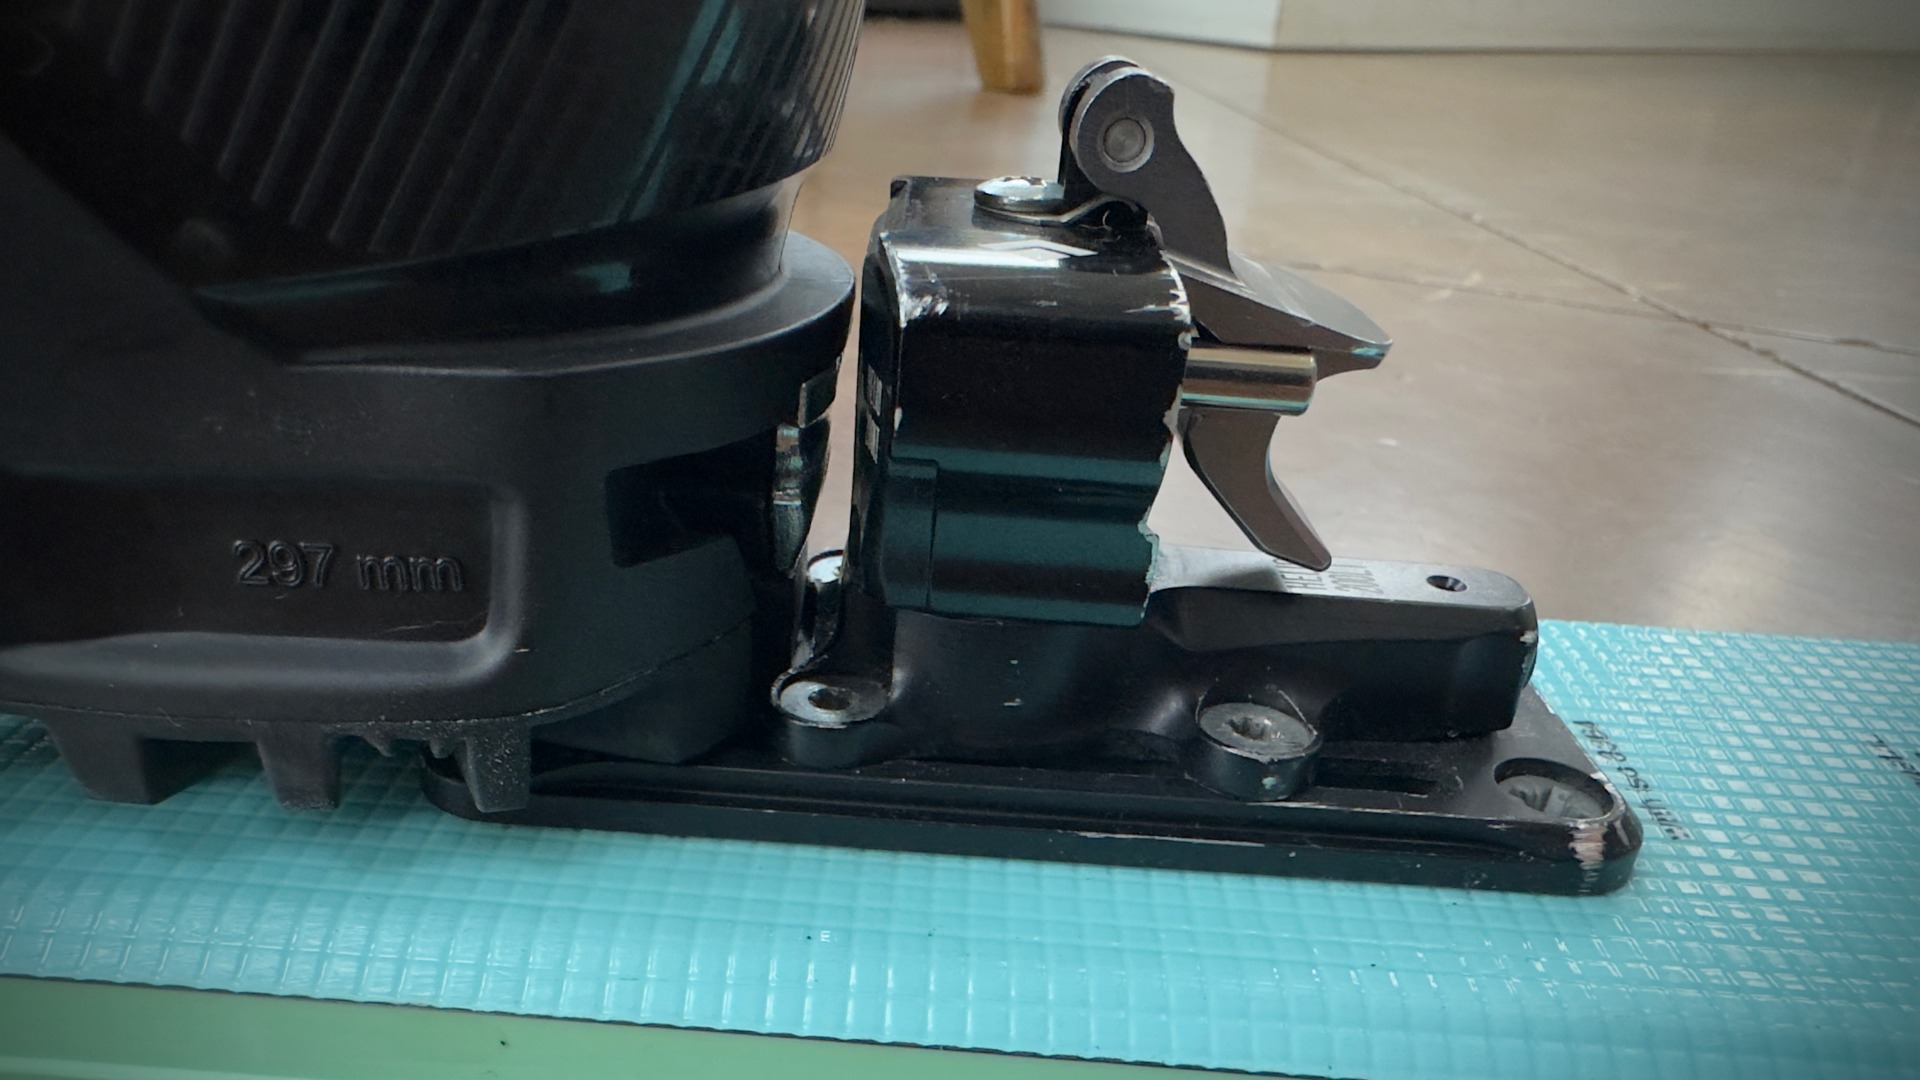
The BD Helio LT 200 rotated 180 degrees from pins forward. In this position the skier has access to a flat mode and a high riser.
The upside: It’s super quick to transition between flat and high riser mode (the high riser on this binding isn’t that high). In rolling terrain or on a long traverse where setting a lower-angle skintrack is possible, moving between flat mode and a riser is truly fluid— which is more efficient.
The downside: If you are wearing a sizable pack, like on a multi-day traverse, bending over to twist the heel when you are transitioning to descend can be a pain. Most often, I tend to pop my ski off, twist the heel to pins forward, de-skin, and prep for turns.
Find what works for you. But pins forward with the low riser flipped over the pins can make transitions part of the flow state. Maybe that’s hyperbole. But it will make transitions faster.
Jason Albert comes to WildSnow from Bend, Oregon. After growing up on the East Coast, he migrated from Montana to Colorado and settled in Oregon. Simple pleasures are quiet and long days touring. His gray hair might stem from his first Grand Traverse in 2000 when rented leather boots and 210cm skis were not the speed weapons he had hoped for. Jason survived the transition from free-heel kool-aid drinker to faster and lighter (think AT), and safer, are better.
21 comments
Hey Jason, I understand that this style of transition works well for some. I like to go for long tours, I never start a tour with a riser, always in flat. Eventually I deploy a riser but often times I resort back to flat while skiing between descents or between objectives of the day. I have been hesitant to move on from dynafit rotation style bindings to anything lighter because I am able to use the butt of my pole to rotate the heel unit from a more comfortable angle then reaching all the way down. Then skis stay on, skins come off and off you go. Do you know are there any bindings in this weight class that you could execute this style of transition with? I don’t mind not having a super high riser, I think the loss of flat mode is what has held me back from trying anything lighter than a zed so far. Thanks!
Hey Alex, I think you’ve got several options out there. But what comes to mind is a binding with flat mode, with an easy-to-flick-into-place mid/high riser. This is not a comprehensive list and is a small sample size. I’ve had luck with ATK bindings, such as the Haute Route and the less expensive (rebreanded) Hagan Pure 10 (no brake). Like the Zed, you’ll have to rotate at least once to go from flat to pins. But, while touring, you can pretty much stay in flat mode (with the single riser option) all day long while ascending. Hope this helps.
I used to miss the old Dynafit speed turn with the tower you could twist with your pole tip. The Plum Guide copied this design I believe? Not sure it’s any lighter though.
The Atomic/Salomon tour heel just needs a 90 deg rotation to go into flat mode and the 2 heel risers are more similar to the height of the Dynafit’s even with less ramp angle. I believe the high riser is one of the highest available. Then after ripping skins without removing skis you can use the grip of the pole and lightly whack the heel piece back to pins forward. There’s not a lot of resistance in the spring so it’s pretty quick and easy to turn that way, you don’t have to bend down to twist it like with a Zed. Weight is under 300g without brakes. It’s not as adjustable as the Dynafit for releaseability though, like all U-spring bindings.
I recently mounted some Plum R170s, and while I like the simplicity, The MTN/ Backland Pure still wins in design for ease of use with transitions from flat mode to risers. The toe piece is very strong. I’ve skied some teeth rattling re-frozen slopes and never had a pre-release.
I was rotating my Salomon MTN tour heels the same way yesterday. Rotate the large tail end of the heel binding to the outside on both skis for skinning. Then at transition, bang the the heel piece, with ski pole handle, to pins forward. Stomp into the heel pins. Next lift up tail of each ski , to rip skins, all with your skis still on. Easy, Peasey.
I too have done some hi-speed groomers, in France with this binding. Never got a pre-release.
Jason do I read right that you (sometimes) rip skins (without removing skis) while still in walk mode? I have always set my boot and binding to ski mode first, before grabbing the skin and ripping.
Slim I can’t find the video that was running around social media of someone ripping skins (tail to tip) and almost sends their ski down a cornice because their toe piece disengaged. But that’s a reason for ripping skins with the walk mode still on IF you’re ripping TAIL to TIP. If I’m racing/ ripping TIP to TAIL (race style skins) then the ski mode goes on when you bend down once to do everything for the boot/biding transition.
This may be the video you are thinking off and looking for https://www.instagram.com/reel/CVO0sZeprVv/?utm_source=ig_embed&utm_campaign=loading
This best is the way for skins with tail straps…. bend over, tighten boots, unlock toes, flip heels, stand up, stomp, raise your knee, rip.
Slim, you are correct for skins that strip off from the tail of the ski. Super-easy to lock the heel with a flap over front facing heel pins. Flip the flap with a pole and stomp the boot heel onto the pins.
Going back to walk mode doesn’t require picking up the ski. Release the toe with a pole and kick the flap back over the pins, then step back into the binding, all while standing tall. The less bending over and fiddling, the better. As you age, this becomes clearer.
Aha, yes, forgot about tip rip skins.
Haha Jason, although I have aged only as far as middle age (48) I am 6’5” and have tight hamstrings and a lazy disposition, so I am certainly in the ‘less bending over camp’.
I have not worried about the transition to skinning, since I have not heard of a way to attach skins without removing skis, so I have the bindings right at my finger tips at that point.
Sometimes, Slim, with flat or low angle terrain and/or slow snow you need to free your heels without sticking skins on. It’s nice when bindings make it quick and easy. On this point the telemarkers are smiling and waving.
Skimo racers stick their skins on without removing skis. So do some Canadians. I’ve seen this, but I’m not a Canadian (or a skimo racer); so I did not even try. My excuse is that I need to see whether ice has built up.
I’m def. not 6’5″. But I too have super tight hamstrings. Mid-winter I’m on 183+cm skis with brakes that I could, but will not, fiddle with, so I can rip skins quickly. The extra minute at the top, mulling my existence, taking skis on and off, etc….has become welcome. That said, the shorter spring skis with the skin-tips, do allow me to rip skins. The other piece is that since I’m so tight, I like not locking my heel in before ripping, it seems to add some more range when it comes to bending and reaching the skin tip. I’m sure there are better ways, but I’m settling into this way for the time being. Maybe it is time for Yoga.
It would be nice if a binding manufacturer would make a modern style flip riser heel WITH an easy to use flat mode but have the flip risers not rotate. So you could use the “over the pins” style riser if desired or start with the binding in flat mode and just flip the risers back and forth as needed.
Last thing though, very important. Have some little doodad on the heel; maybe somewhat like the old style dynafit binding to make it easy to change from flat mode to ski mode without bending over.
My favorite binding for changing from ski to walk and back *without stepping out of the toe piece* is the Fritschi Vipec.
They are heavier than the others named here at about 550g without the brake, but I use them on my traction pattern Voile Hypervectors since you can tour in rolling terrain almost like tele. There’s a lever that you push down with your pole to slide back the pins from your boot heel, then when you want to go into ski mode you raise that lever with your grip and lock your heels down. The old G3 Onyx did this also but was quite a bit heavier.
I agree that the Vipecs are good in many ways, except that one way. They weigh way too much.
SHWILLYBILLY: I think the Salomon MTN achieves what you’re asking
Heh. I’d seen those before but had forgotten. Must of been unconsciously thinking of them.
Still no way to change from flat back to ski mode though.
skimo racer here, need to clarify a few things:
1) we definitely remove skis to apply skins (and definitely rip skins from the tip with skis on our feet)
2) i use the plum 170 for touring and i’m pretty sure a high riser in an optional accessory that must be installed
3) the last time i skinned 6 flat miles across jackson lake (to access mt moran), i remembered to turn the plum 170 heels 90 degrees to use the flat mode but on the egress at the end of the day, i forgot (just used the flap over the pins) and didn’t notice til getting to the car (in other words, a true flat mode isn’t that important)
4) as mentioned in the article, having a boot with great ROM is key to enjoying the simplicity of the single riser life – either the pins are covered and you are skinning or the pins are exposed and your ready to stomp in and ski!
5) lastly, if the skin track is steep enough that you want a high riser, its too steep (https://skimo.co/skinning-slope-angle)
Tp piggy back a bit on Andrew’s comment, I just spent a week on my first-ever guided trip (loved it). A few things struck me: the excellent skin track set by Nino and Rob. The fact that in six days of touring/skiing, I was in my low riser on only a few occasions, amounting to say an hour total, was an ah-hah. Mostly, like 95% of the time, I was in flat mode. As Andrew notes, boot ROM helped: I used the Fischer Transalp Pro. I am a bit OCD about pure flat, I did notice when my low risers were in use and the terrain flattened out. Bindings used: ATK Crest 10, and the Kreuzspitze GT 2.0.
Shout out to Lou for the Rat Tail! Peel from the heel without yoga. Tried and true for decades. This old dog ain’t changing that hat trick.