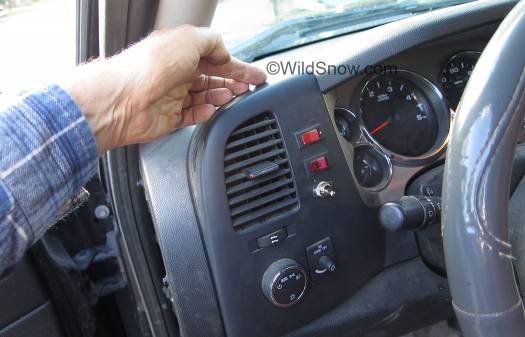
Our dash panel to left of steering wheel, with driving light switches and the door lock bypass toggle switch. The switch is a single-throw double-pole that turns two circuits on/off independent of each other. This panel is easily pulled out for access such as mounting these aftermarket switches.
Our 2009 Chevrolet Silverado has a nice engine (Duramax) and a nice tranny (Allison). On the other hand, some idiotic team of designers tried to make the truck think for you. Result: everything from confusing light switches to door locks that snap closed at nearly every opportunity. It’s like a MAD computer is trying to take over your life!
This is a work truck. We sometimes shift in and out of drive and park dozens of times a day. We don’t need the door lock actuators snapping up and down like the remote operated locks at a max security prison, every time we shift, wearing themselves out and costing upwards of a hundred dollars and six hundred swear words each to replace (they’re entombed in the doors like a royal Egyptian burial and take hours to DIY swap). This is also a basic model vehicle, without a lot of user configurable “DIC” options. (Even if the door locks are programmable, do you really want to sit there fiddling with your “DIC” every time you want to configure how your locks behave? A simple toggle switch is much nicer.)
Time for a hardware hack. Sorry digital age — sometimes a toggle switch is better.
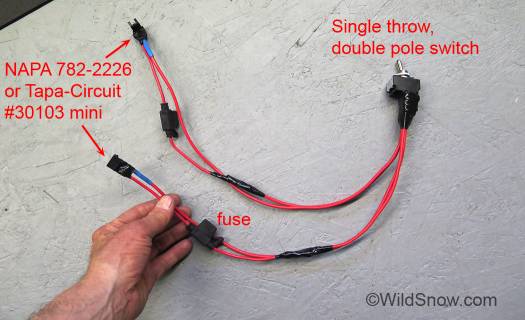
The process is simple. ID the fuses on the automatic door lock circuits, bypass with a switch. Challenge is making a couple of bypass harnesses for the mini ATM fuses. If you want to spend upwards of $100 you can buy a couple of Blue Ox bypass harnesses, but they’re not as nice as what we made here — and our DIY is much cheaper.
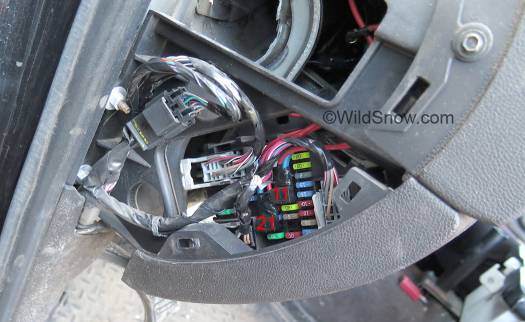
1. ID which fuses are on the automatic door lock circuits. In our case with 2009 Silverado 2500 HD, the fuses were easily located using the owner’s manual; they’re in the cabin fuse panel on the left side of the dash. Experiment by removing fuses and seeing how the locks behave. Give it some time, as you don’t want to spend money and hours with this mod unless you’re sure it’ll do what you want it to.
2. If you’re in a hurry, head over to your auto parts store and get a couple of “Tapa-Circuit” mini ATM fuse taps, you can build this system pretty easily with those.
BETTER, get a couple packs of CT6100 Fuse Socket Connectors, linked at right.
With the CT6100 simply connect your wiring harness with a couple of spade connectors, finish with heat shrink tube. The CT6100 isolates both sides of the fuse socket without any fiddling around. (Remember to add fuse holders into your harness since you’re eliminating a fuse here to create your connection).
POSSIBLE, connector alternative is the Fuse Buddy linked to right. This is a brilliant option as the Fuse Buddy includes fuse socket _and_ attached wires you could quickly connect to a switch making the whole build happen quickly. Only problem is the FUSE BUDDY STANDS TOO TALL AND HAS TO BE MODIFIED to fit under fuse compartment lid.
If you’re in a hurry and can only get the Tapa-Circuit, trim away a bit of plastic on the lower pair of fuse sockets (use your continuity checker to figure out exactly what you’re doing here which is simply utilizing the pair of sockets in the Tapa-Circuit that allow you to interrupt or complete the circuit with a switch). Cut off the wire lead coming of the tap. Tear apart a couple of ATM fuses, tin the prongs with solder, use them as connectors to insert in the fuse tap, then solder a couple of wires to the prongs. Be sure to use an in-line fuse on one of the wires. Make two of these bypasses, each with a fuse.
With the CT6100 fuse socket connector linked above, simply attach two leads using spade connectors, add an inline mini ATM fuse, connect to switch.
3. Hook each fuse bypass up to one single-throw double-pole switch so that they’re individually controlled on-off. Just buy a 110 volt switch at the hardware store; you’re not dealing with a lot of current and it’s intermittent — so just about any switch will be fine. The switch I got is item number 31505 at Ace Hardware. Idea here is you don’t want to mix up the circuits which could cause havoc with the Silverado computers.
4. Pull the appropriate fuses in the fuse panel, and plug in the two bypasses. Mount switch in dash. (If you don’t have this exact truck, in my opinion it’s ok to experiment by pulling lock control fuses then simply using the truck and seeing how things behave). After some experimentation you’ll know exactly which fuses to remove and replace with the switch.
With the switch set to disconnect both circuits, our 2009 Silverado doors will stay unlocked until we manually lock them, use the fob, or lock using the door handle controls. They will not lock when we shift or drive. I set my switch so when it’s pointed to “on” the locks are bypassed.
I’m delighted with how this hack turned out, but only glitch is if you leave the doors bypassed and unlocked, sometimes opening a door will trigger the car alarm. We’ve not had that happen while actually using the truck, only when we’ve left it sitting for a while. It’s a minor problem and well worth eliminating the hassle of the “stupid intelligent door locks.” The beauty of having a switch is you can leave things set to “normal OEM” most of the time, and just disable the locks when necessary and appropriate — with the flip of a switch.
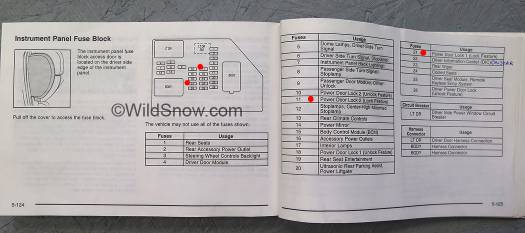
Manual makes it obvious which fuses-circuits to control with switch. In this case it’s circuit number 11 and 21. I tried them independently but needed both turned off to disable the automatic locks on all 4 doors.
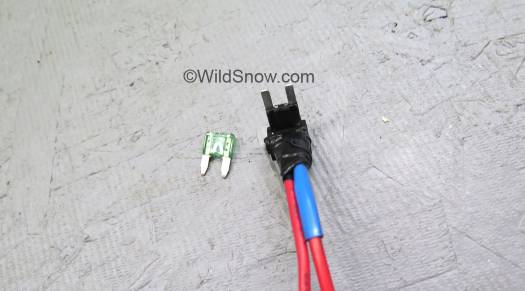
Hacked fuse tap. Check everything with a continuity tester to make sure you don’t have any shorts or otherwise unpredictable glitches. (If you’re using a Tapa-Circuit you’ll need to cut off the tap wire and insulate any resulting exposed wire, another reason why the other fuse tap options here are probably better.)
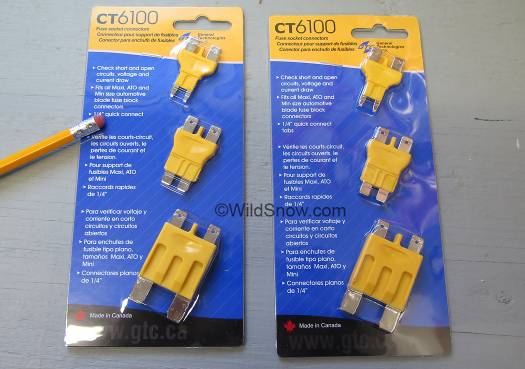
These guys off Amazon are the ticket, but unfortunately you’ve got to buy two packs. But if you can wait a few days this is a clean way to create a fuse bypass switch. Also consider the Fuse Buddy I linked to above, which is possibly the best option as it’s already a bypass with its own built-in fuse.
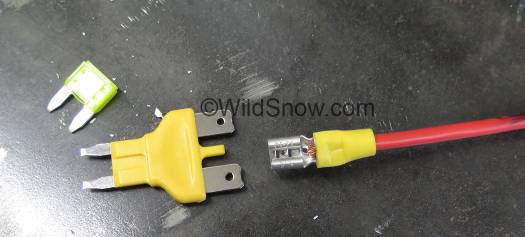
Wire into the fuse bypass connector with spade connectors, don’t forget to add a fuse holder. Super clean.
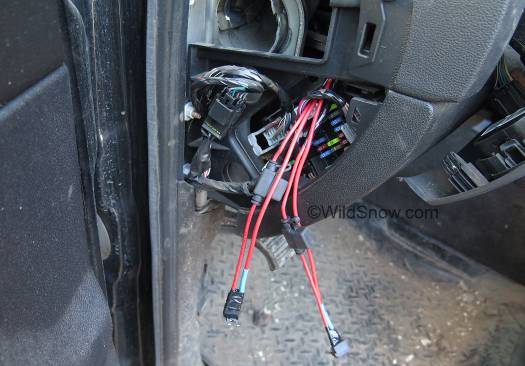
Routing the custom wiring. Note the fuse holders mounted on the DIY harness; don’t forget those! Using the Fuse Buddy shown above in Amazon link includes a fuse and is much cleaner than solution pictured here.
WildSnow.com publisher emeritus and founder Lou (Louis Dawson) has a 50+ years career in climbing, backcountry skiing and ski mountaineering. He was the first person in history to ski down all 54 Colorado 14,000-foot peaks, has authored numerous books about about backcountry skiing, and has skied from the summit of Denali in Alaska, North America’s highest mountain.

