While browsing the vast sands of the WWW we’ve seen quite a few folks asking how to run efficient computing systems off 12 volt vehicle or PV power. Doing so is something individuals who ski tour might be interested in, as it’s common for backcountry recreators to be ensconced in a van or cozy in a cabin — places where you might want internet or at least a computer system that doesn’t suck your batteries dry. So, to help out folks doing backcountry PV projects and van builds, here we go.
Lots of ways to skin a cat with 12 volt computering (sorry PETA). Many folks just run a smartphone or tablet off a car adapter plugged into their dash or lashed to a battery and are done with it. Others wire up inverters and run a big laptop or even a desktop system off the computer’s residential power supply “brick.” Inverter driven systems are okay in a van or RV camper when you can simply start the engine or generator if you need more more power. You can also get nice dedicated 12 volt computer systems, but they’re pricey and not suited for location-mobile computing (transfer from house to cabin, traveling, etc.)
In our case, while off the grid at our tiny house cabin I still need a “real” computer system due to jobs such as photo editing and website administration. But I need it simple, portable, and not too expensive — with low power demand. Following is my latest build of a miserly 12 volt “cabin” computer system. (Our electricity is nearly 100% solar, with occasional help from a small backup gasoline generator. Goal is of course to keep the “genny” turned off.
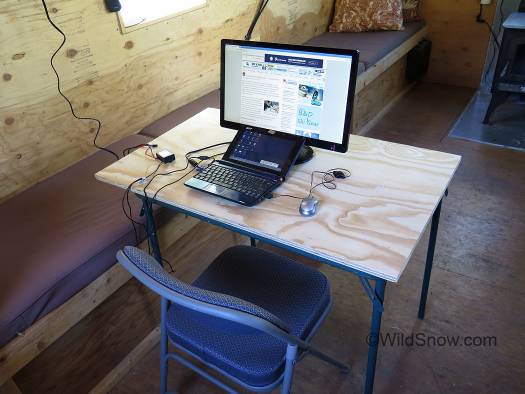
WildSnow Field HQ Backcountry cabin computer system, configured to use the least electrical power possible while still having dual monitors. System can also be run using only the netbook. I built the tiny house desk using card table legs I got from the Habitat store for $7, cut down the top size, and affixed the plywood. Chair is an Amazon special. Everything needs to fold up for storage, so the chair and table are best compromise I could do for comfort vs stowage. This photo shows system still in experimental mode, see below for final wiring using Anderson Powerpole connectors.
Ever since we’ve had Hughes Net satellite internet up here at the WildSnow Field HQ tiny house, I’ve been playing around with how to get the most bang for the least amps. Hughes in particular is an electricity hog. To power the sat-net on our 12v PV system I have to run a 600 watt (5 amp at 12 volts) pure sine wave inverter that bumps up voltage to 110, then the Hughes power brick knocks it back down to 12 and 48. Ridiculous. I tried to build a more efficient “direct” power supply for the Hughes system but got stuck on the voltage regulation. So I bit the bullet and just use the inverter (link below for inverter, it’s been working quite well.)
Computers and monitors, on the other hand, can be more forgiving of electricity supply than the proprietary Hughes Net junk show. I’ve run Acer Aspire One netbooks for years in backcountry and mobile situations using car “cigarette lighter” adapters that bring voltage from 12-13 up to 19 volts (used a number of times during Alaskan expeditions, for example.) Converting up from 12 to 19 is still inefficient but better than a big hog inverter bumping voltage up to 110 AC and then stepping that back down to 19 DC with a power brick. In other words, the auto adapter/converter only does one conversion step, while running a power brick off an inverter does two steps.
You can get “vintage” Acer Aspire One netbook with Windows XP or 7 at under $200, I’ve even seen some on Ebay for around $100. Swap in some extra RAM and a small SSD hard drive, result is a sweet little rig that’s amazingly cheap and efficient. Like I said, I’ve been using these bomber little units for years and my wife has as well. Yeah, a $1,000 Surface Pro could be nice, but I can get my work done on the Acer, so?
Challenge with the netbooks (and smartphones, and tablets) is their small screen. The vintage ones also draw quite a bit of power compared to newer models (hints: remove battery so charging isn’t demanding any electrons; charge battery later with computer turned off; note that later model Aspire netbooks are more efficient; upgrade to solid state “SSD” drive if possible; and run any devices in efficient “green” modes).
Thus, to avoid excessive squinting at my tiny netbook screen, I was soon asking myself if running a 20 inch monitor would be possible on our little backcountry solar system? I tried to find something that would run on 12 volts but struck out due to the difficulty of figuring out power supplies from online specifications. As a lark, I headed down to the Habitat for Humanity overpriced junk store and what do you know, found an Acer LED monitor that uses the same power supply as our netbooks!
Now I’m here at the ski touring cabin, with the Acer S200HL monitor and Aspire netbook both running off a single 12v to 19v DC-DC converter hooked directly to our PV system. If you’re looking for a monitor that’ll draw minimal power and can easily be adapted to a 12v computing system, I’m seeing S200 monitors going for around $80 online (Amazon, Ebay). Habitat price was their standard $25 — overpriced for a beat up unit with unknown hours of use, but better than $80! (I’ve seen some 12 volt “automotive” and “marine” monitors here and there. They’re expensive and I strongly suspect run on 12 volt by having an internal DC-DC converter that does the same thing we’re doing externally with a voltage converter.)
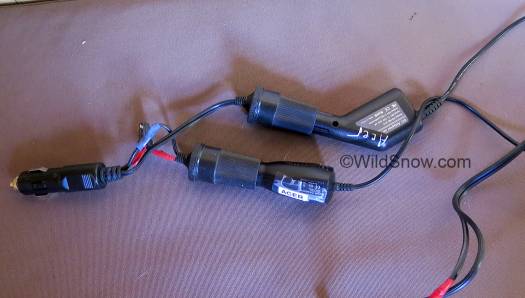
To begin my build, I first used 12 to 19 volt automobile adapters for Acer netbooks and monitor. These don’t handle higher voltages very well and it seemed inefficient to run two adapters making the same power. So I got on Amazon and acquired a single converter (links below) that takes anything from 12 to 15 volts and makes it into 19. Apparently these adapters are what you might find hard-wired into RVs and boats to run low voltage computer systems.
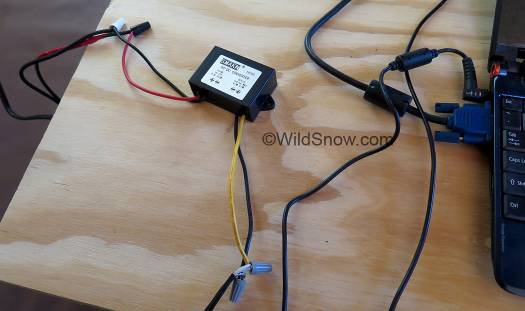
SMAKN DC-DC converter lashed up for testing. Connections will be swapped to cleanly installed Anderson Power plugs and permanent soldered splices once I decide on the best DC-DC converter. The SMAKN got a bit hot after a while, so I figured a slightly larger converter with an aluminum case could be better. All depending on current draw.
A few links if you go with the 100% Acer system like this one:
For your Acer barrel connectors just cut them of OEM or equivalent 110v power supplies you can get for about $7.00, that way you end up with the exact connectors on a nice long pigtail, and a couple of power bricks you can keep around as spares (they do quit on occasion). The barrel connectors are 5.5 mm outer diameter x 2.1 mm inner, but they’ve got what appears to be a somewhat proprietary plastic tip that makes them fit snugger; one website I found specified the Acer connectors as 1.7 mm inside diameter. Confusing. I found some third-party pigtails with a similar connector at around $6.00, but figured spending the extra couple of bucks was worth the certainty of having nice snug connectors to the monitor and laptop. AC Adapter/Power Supply & Cord for Acer Aspire One
Using a couple of automobile adapters wasn’t enough to satisfy my urge for efficiency (and fear of needing to spend more money on a bigger solar electric system). Amazon yielded a nice little 3 amp 12-19 DC-DC converter that I thought could bump up efficiency as a supply for both monitor and computer. As the first part of figuring out this system I wired in the Smakin, it got hot and I later found out why when I measured currrent: it was supplying 3.5 amps when only rated for 3! Whoops.
So rather than the minimalist 3 amp Smakin converter linked above, the following 8 amp converter has more capacity and a heat conductive aluminum case. Why not just use automobile adapters? When fully charged our PV system shows more than 14 volts, while some of the auto adapters don’t do so well with high input voltages much above 13v, and no way to know which do okay and which don’t. One of our automobile adapters gets too hot to touch when input is above 14 volts, and eventually quits charging. The converters I link to here are rated for a higher voltage input, much better.
IMPORTANT: So you don’t have to, I bought and current tested both these converters. They both draw virtually the same amperage (3.5 amps at 12 volts, or 42 watts) while hooked up to my computer system. Thus, running the larger 8 amp “buck” linked to the right and below is what I’d recommend (would push a larger monitor or computer, since my system is only using about half of what it’s capable of). Indeed, considering the smaller converter is rated at 3 amps and I was asking 3.5 from it, no wonder the little guy was heating up!
Lesson, if you get serious about configuring these sorts of systems get yourself a “clamp” type current meter and use it religiously. Doing so will prevent component damage and heartache. You’ll also save money because you’ll buy and use everything from the correct size wire to the proper size voltage converter. The Southwire linked to right works ok for me, though a higher quality unit could be better. Problem with Southwire is that it doesn’t zero in DC current detection mode, it always shows something like .5 amps in the 40 amp range. I’m not sure if this particular unit is defective or if this behavior is common. Investigation is ongoing. I’ll edit here when I figure it out.
DC-DC Boost Buck module 12V to 19V 8A 152Wmax power supply converter
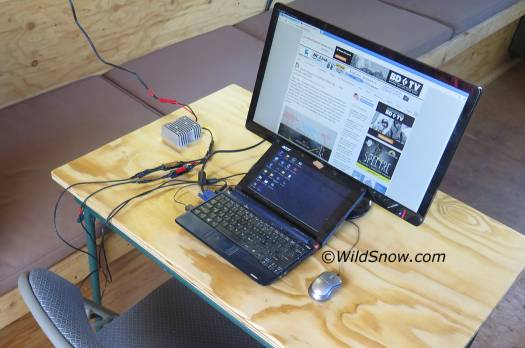
Final configuration using 8 amp buck voltage converter to power both laptop and monitor, drawing 3.5 amps. All connections converted to Anderson Powerpole for easy hookup and mods.
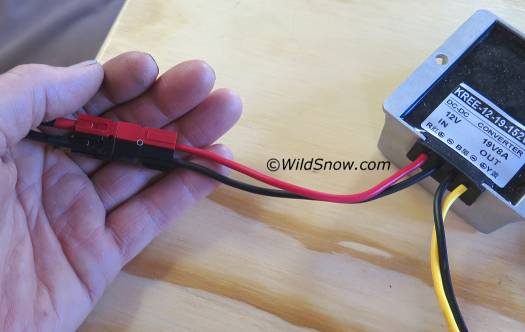
I’m converting most of my 12 volt connections to Anderson Powerpole, including eliminating many of our cigarette lighter plugs which are incredibly unreliable.
More about our power system at WildSnow off-the-grid field HQ. This past summer I hard-wired a battery charger hooked up to a small gasoline generator. When the PV panels are sunlit they run everything fine along with the batteries holding a charge. But once the sun’s off the panels, due to the Hughes Net inefficiencies I’ve got about 3 hours of sat internet juice before necessary shutdown to keep from damaging the batteries. Thus, if I’m feeling inspired or have a deadline I just fire up the gasoline power and keep on keeping on. “Genny” is good for cloudy weather as well. Another solar panel and battery would be nice, but costly. Without the Hughes stuff turned on the system has plenty of power for the computer equipment. Configuration of these systems probably never ends. What have I learned? When it comes to your PV system, always go big with panels and batteries. More, take your time rigging everything to be efficient rather than simply going bigger bigger bigger.
Cost estimate:
Monitor $80
Netbook $200
Donor power bricks for connectors, $16
Buck voltage converter, $25
Misc connectors, $10.00
Total $331, not bad!
Here’s a bonus to help with another common dilemma for folks running Acer monitors. The control interface for many of these rigs was most certainly designed by the some of the most idiotic geeks on the planet. For many folks, it’s nearly impossible to figure out. Most common question seems to be “how to adjust monitor brightness?” as the default settings on S200 (and many other Acer monitors) are like having a spotlight three inches from your retina. Adding insult, with the S200 the stupid control buttons are on the bottom edge of the screen bezel, literally operated by braille. I figured out the following after an embarrassingly long session of pretty much random button presses: The far right button is the power on-off (I did figure that out right away). Counting to the left you have button 2, 3, 4, 5. To adjust monitor brightness, hit button 2, then 4, then 4 again, then 2, then 4, then the 2 or 3 which invoke the right-left arrows to go brighter or darker. Most if not all Acer monitors have this lame system, though some have the buttons on the front of the bezel instead of underneath (winner, Mensa award!).
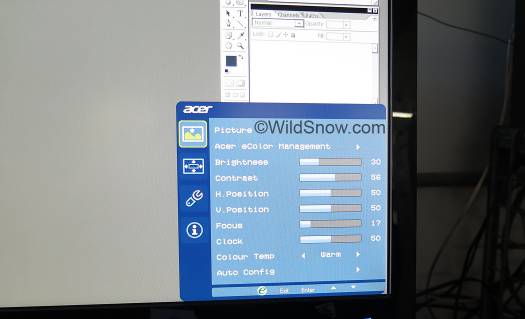
The Acer monitor user interface has resulted in more swear words over two years than the curses resulting from stubbed toes over two centuries. Don’t believe me? Wikipedia doesn’t lie.
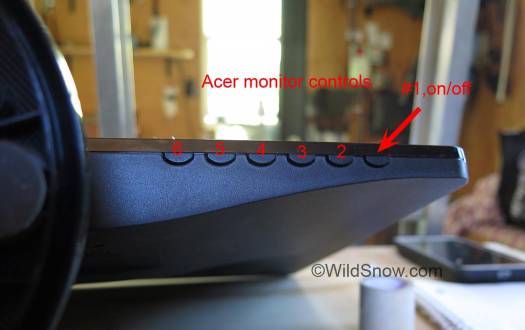
Acer display monitor control buttons. What does this have to do with ski touring? Well, if I had a minute for every second I’ve fiddled with these things I’d have an extra week of skiing.
WildSnow.com publisher emeritus and founder Lou (Louis Dawson) has a 50+ years career in climbing, backcountry skiing and ski mountaineering. He was the first person in history to ski down all 54 Colorado 14,000-foot peaks, has authored numerous books about about backcountry skiing, and has skied from the summit of Denali in Alaska, North America’s highest mountain.
