Update September 2014: Fritschi has improved the binding. See this blog post.
Update January 11 2014: Fritschi recommending Loctite 263 if you can’t find Loctite 2701. Post below is updated to reflect this.

What's the deal? It has to be done 100% correctly or you'll get 100% failure. Luckily most should work with factory settings, but it'll depend on your boots.
Anyone involved with tech bindings and related consumer issues could see it coming. Include a critical adjustment feature with virtually no room for error — issues will arise. Such has been the case with the adjustable threaded toe pin on Fritschi Vipec backcountry skiing bindings. Challenge is that the adjustable “pin” has to be nearly perfectly set, as well as the pin’s lock nut being torqued per specification along with correct use of thread locker chemical (Loctite 2701 or 263). While virtually all Vipec bindings sold will have the pin pre-set for nearly any tech bindign compatible boot, it may have to be adjusted. Read on for details.
If the pin is out of adjustment you will experience one or more of the below:
a. Have a boot that doesn’t safely release from the binding (and/or doesn’t step out of the binding easily).
b. Have extra play in the boot binding interface.
c. Have a binding pin that eventually fails due to steel-on-aluminum threads being destroyed.

Fine tuning the fore aft adjustment for the heel piece for Vipec binding fit and DIN is easily done in the parking lot. Adjustable toe pin width, not so easy, but super important.
Partial solution is that Fritschi will now deliver all Vipec bindings with the adjustable toe pin pre-set, with thread locker (Loctite) on the threads as well as the lock nut properly tightened. This will be good for most tech boot fittings being sold. These bindings will be marked with a green colored patch on the pin.
Even with the factory adjusted fittings and verified boot/binding interface performance, anyone (DIY or dealer) must ABSOLUTELY check the torque on the adjustable pin’s lock nut before going on snow with this binding, as the slightest movement in the steel threads of the pin, which ride on aluminum, will result in irreversible damage to the binding. (Note, while checking lock nut torque be careful to not break any existing Loctite bond unless necessary.)
Fritschi sent out some service bulletins and such, I’ll try to relate things below both in my own words or quoting Fritschi:
Below is the intro communication from Fritschi, dated January 22, 2014. Main point here is that the toe pins will now come from the factory pre-adjusted and locked, and should work for nearly all tech fittings out there. How to tell if they work? Basically, test on the bench that your boot can enter the binding as with nearly any other tech bindings, and that it can release to the side at the toe. Testing can be more methodical and a bit more complex, but that’s the basic idea. Added notes from me are in double parenthesis.
Dear Dealer,
During the launch of the Diamir Vipec 12 we have received some feedback concerning the wing width adjustment and that if not tightened as instructed, the adjustable pin can loosen while touring.Due to this feedback we have decided to deliver the next bindings with a factory stock setting that covers 90% of commercial AT boots and does not require adjustment (WildSnow note: essentially, this means Vipec will fie virtually all Dynafit and Scarpa boots as well as most other brands, though be advised that any tech fitting can be defective, and there is no real manufacturing standard for tech fittings). This width is torqued and set with Loctite 2701. Bindings with factory stock setting have an insert pin marked in GREEN.
Bindings WITH stock factory width setting (green): Should you need to adjust this stock setting, break the Loctite bond (WildSnow note: heating helps break Loctite bonding), remove the pin, and insert a fresh PIN
(WildSnow note: in other words, if the pin in the new green marked bindings becomes loose through whatever means, it needs to be replaced with a new one. Do not re-use original pins. The original sales run of Vipec bindings, without factory Loctite, do not need a new pin after you loosen the pin, but they do need to be Loctited. See below.)
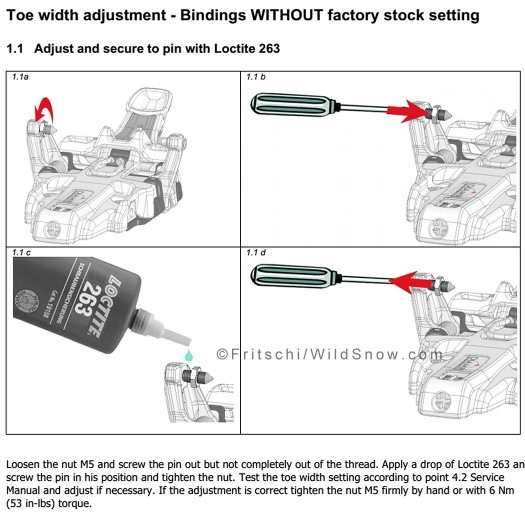
Regarding existing bindings WITHOUT stock factory width setting. (WildSnow note: meaning earlier retail and demo bindings not marked with green on the adjustable toe pin.)
The adjustable pin has to be secured with Loctite 2701 or 263 after checking proper width setting and securely tightening the M5 nut to 6 Nm torque. Do not over-tighten or risk stripping the nut.
In the Service Manual please review the detailed instructions for adjustment settings.
Best regards, Fritschi AG Swiss Bindings

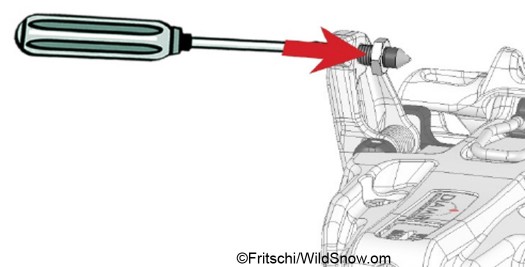
Fritschi illustrated instructions for toe pin adjustment. This will come pre-adjusted from factory, but may still require adjustment in about 10% of situations. Note this set of photos doesn't show the lock nut being tightened, which is critical. Loctite 2701 is tough to find in North America, equivalent recommended by Fritschi is Loctite 263. Any Loctite of the 'red' variety is ok in my opinion so long as the parts are cleaned with solvent before re-assembly. All red Loctite products need to be heated for dis-assembly to avoid possible damage to components, as they create a 'permanent' bond.
Okay, there it is, a possible critical adjustment. But how do you do it? We’re not supposed to copy the service manual verbatim from the Fritschi website (fair enough, since it’s bogus to have multiple versions floating around that confuse things if Fritschi wants to make change). So below is my edited and simplified version, upon which we can do an ongoing clarification once we have our evaluation bindings being tortured in Colorado or elsewhere.
Adjustment of Vipec to the boot toe “pintech” “tech” fittings — re-written by Lou
Boot heel “tech” inserts behave virtually identically between manufacturers, whereas the toe inserts may differ. That’s the reason why the Vipec has adjustable distance between the front pins and may require adjustment to specific individual boots. If this adjustment is done incorrectly it will result in damage to the binding and incorrect operation. In my opinion giving this well engineered binding this feature may not have been a wise move, as chasing poor manufacturing standards (of the boot tech fittings) by adding mechanical complexity to the binding is likely to cause more problems than it solves. Indeed, don’t be surprised if Vipec version 2 sheds the adjustable toe pins (and perhaps a miracle will occur and boot tech fittings will be ISO/DIN standardized). Meanwhile, back at the ranch, read on:
After mounting on skis, first step is of course to adjust the binding for your boot length.
This has to be done with the ski FLAT, not with the ski suspended on an elevated vise system. This is because the length adjustment is critical and the slightest flexing of the ski will throw it off.Back off the length adjustment screw till the heel unit starts to come back itself. In this position bring the heel unit back by rotating screw another ¼ turn. What you want is a gap from 0.5 to 1 mm between your boot heel and the binding (a “mini tech gap is what we’d call this here at WildSnow.com”).
To check boot length adjustment, simply check how the boot steps in to the binding to downhill mode as well as how it does some simulated touring strides at various heel lifts. And double check that you have the “mini tech gap.”
Once your backcountry skiing boot fits the binding in terms of length, check lateral release. This is where you many have to tune the toe pin width adjustment.
Important: Adjustment must be made at RV value of 6.
1. Place boot in binding by simulating how a user would enter the binding (toe first, then snap down heel). Change the Easy Switch Toe lever to position SKI.
2. To check the lateral release push sideways on the carriage (the toe part that slides to the side) to simulate elastic behavior while skiing, and let go so it can hopefully return back to center without your intervention. The carriage should come back into the initial position by itself due to it being spring loaded. For this to happen correctly, there will always be a small amount of play in the system so don’t obsess on that.
3. If the carriage does not come back into the initial position by itself, the distance between the toe pins is probably too small and has to be adjusted as follows (This is the critical toe pin adjustment that adds to the complexity and possible user or dealer caused problems with Vipec):
a. Remove boot from binding. Loosen the M5 hexagon lock nut at the toe pin unit. If your binding is one of the factory adjusted an Loctited versions, marked with green, you will need to replace the pin with a new one after you loosen or remove it. If the binding is an early version without Loctite, you do not need to replace the pin but you do need to Loctite it before tightening the locknut, after adjusting to boot. In either case, you must apply Loctite to the pin threads. In Europe, use Loctite 2701, in North America Loctite 263 is recommended, or in WildSnow’s opinion any “red” variety “permanent” Loctite will work fine provided you clean the parts with solvent before assembly.
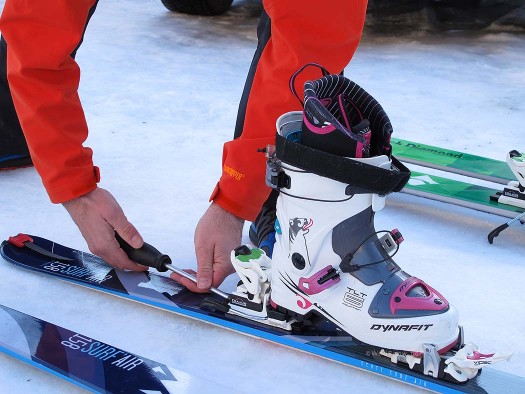
b. Place boot back in binding, in alpine mode. Carefully loosen the adjustable toe pin until the pushed-to-the-side carriage comes back into the initial centered position on its own, without your help. This will usually require only tiny adjustments. Apply Loctite to the threads of the loosened pin.
c. Remove boot from binding taking care to not rotate the loose adjustable pin you have now carefully positioned. Hold the adjustable pin with a slotted screwdriver as you tighten the lock nut. When you tighten the lock nut, you must do so with either the instinctual torque of an experienced mechanic, or use a torque wrench. The torque specification is 6 Nm, or what I believe is 4.4 foot pounds. A firm push on a short wrench for the experienced mech is all that’s required.
4. If the system has too much free play (audible) at the toe pin unit, the toe pin width is probably too big and must be adjusted as follows (somewhat the same procedure as above):
a. Remove boot from binding. Loosen the hexagon nut M5 at the toe pin unit (lock nut). Apply Loctite to the threads of the loosened pin.
b. Place boot in binding in downhill skiing mode. Tighten the adjustment screw at the toe pin unit left until the pushed-in carriage doesn’t come back into the initial position itself.
c. In small steps, loosen the adjustment screw at the toe pin unit until the pushed-in carriage comes back into the initial position itself.
d. Remove boot from binding. Hold the adjustment screw with the slotted screwdriver as you tighten the hexagon lock nut M5.5. Once all is done, check again if the carriage comes back into the initial position itself — what English speaking skiers frequently call “return to center.”
After that, be sure the shape of your boot toe isn’t going to make mischief with the binding toe. Step-in and put the Easy Switch Toe lever into the SKI position. Swing the boot forward simulating what would happen after you release vertically at the heel. For safety, while in ski mode, when the boot swings forward the boot toe should impact on the Easy Switch Toe in a way to open the binding and to release the boot. If not, exchange the Color Clip Toe (basic) with the Color Clip Toe high. Then check again.
WildSnow.com publisher emeritus and founder Lou (Louis Dawson) has a 50+ years career in climbing, backcountry skiing and ski mountaineering. He was the first person in history to ski down all 54 Colorado 14,000-foot peaks, has authored numerous books about about backcountry skiing, and has skied from the summit of Denali in Alaska, North America’s highest mountain.
