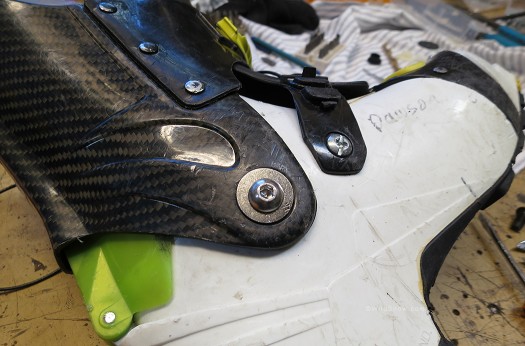
Be sure to check out the excellent aftermarket pivots made by B&D.
It turns out Dynafit made no change to the cuff pivots on TLT6-P compared to TLT5-P. Given high mileage on either boot, expect slop to develop. Hopefully this off-the-shelf hardware store gumby fix will inspire the gnomes of Montebelluna to do better. More, Dynafit customer service does have some ways of helping you out with this issue. But if you’re handy with tools and have worn out pair of TLT5-P with the cuff so sloppy it appears ready to fail, perhaps give something like this a go. After all, you might have a $1,000 pair of boots sitting there that would be good as new if only the cuff didn’t move around like jello.
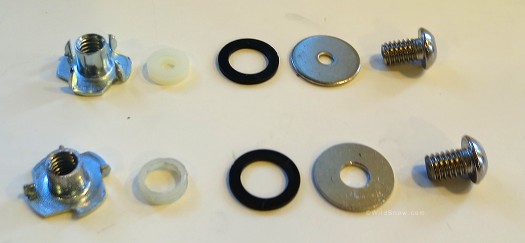
The parts, all obtained from our local hardware store. Stock parts above, modified parts below. You could probably do better online, but I wanted to keep this ultra basic for now. See below for parts list with required mods.
Parts list, for one bushing system (x2 per boot). I started this project with metric parts but found the SAE T-nut and associated parts were easier to find in SAE. Due to using SAE, all specs are in inches. From left to right:
1. 5/16 course thread 3/8 x 7/8 long-prong T-nut, shortened .045 inch by grinding with rotary disk grinder, prongs snipped off to 0.1 inch so they don’t protrude through boot shell material, could be slightly shorter depending on how aggressively you set the T-nut into the boot shell.
2. Small nylon “spacer” 0.5 O.D., 0.124 thick. This is the most difficult part, as you make a bushing out of the spacer by drilling the center out to fit tightly over the T-nut shaft. See photos below.
3. Nylon washer, 0.5 inch I.D., 0.750 O.D., 0.060 thick (basic from the hardware store fasteners bins), no need for modification.
4. Stainless Steel “1/4 inch” fender washer, drilled out to 0.300 inches to accept 5/16 machine screw.
5. Button head cap screw, 5/16, to fit T-nut. Stock length 1/2 inch, shorten to 0.400.
6. Silicone grease or binding grease, the type that doesn’t attack plastic.
7. Loctite – blue
First, prep the boot by removing the cuff rivets then grinding the shell bosses off:
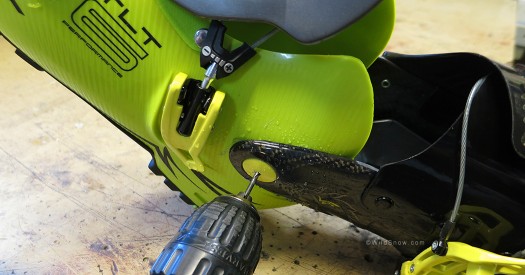
I remove cuff rivets by first drilling a centered pilot hole with a fairly small drill bit. Yes Virginia, I took apart my TLT6 as well to verify lack of improvement in the cuff pivot system, as well as replace with removable fasteners to make boot fitting projects easier. Expect wear, as there is no discernible difference between how the TLT6-P cuff attaches as opposed to TLT5-P. See bonus shots at bottom of post for more on TLT6-P
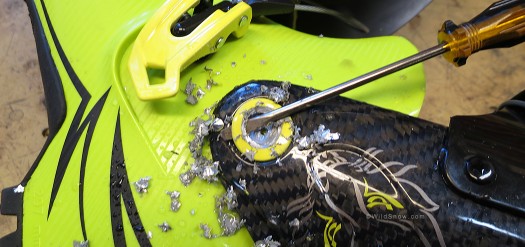
Being ultra careful, you remove just enough material to be able to pop the rivet head off with a screwdriver blade. I prefer working from the outside, more space for tools.
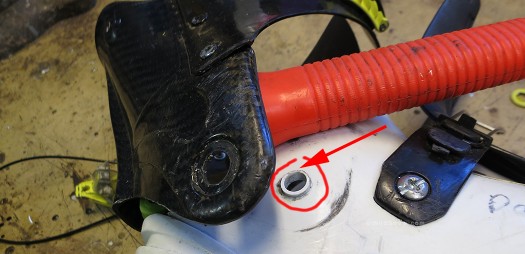
Aha, back to the venerable TLT5-P, cuff removed showing the scaffo boss that the carbon cuff wears down into thus creating slop. Wear area indicated by arrow. Mine were moderately trashed, I've seen some that were amazingly sloppy that this mod would 100% fix.
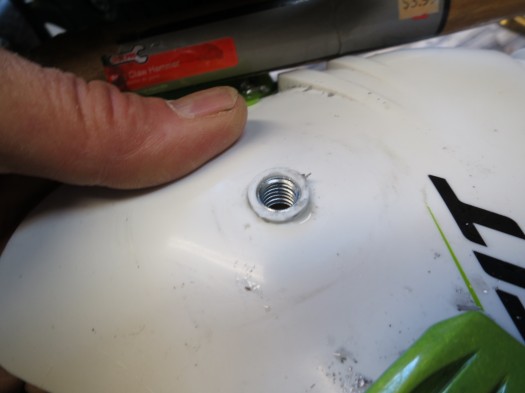
This is the miracle that makes it all work. Hardware store T-nut is 0.376 inch OD (9.5 mm), which is virtually the same ID as the OEM hole in the boot shell! Yes, there is a God.

1/4 20 stainless machine screw in the T-nut. The white boss (rim) around the hole is removed for our bushing mod -- but could be left intact if you just wanted to replace rivets with user serviceable fasteners (as I did with my TLT6-P).
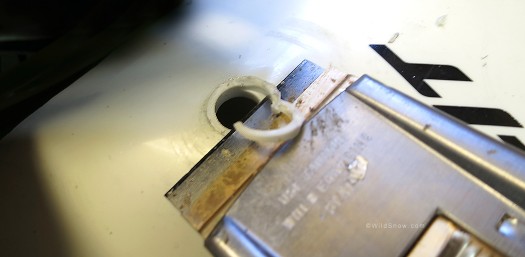
I tried using a grinder with a sanding disk, but using something like this razor blade scraper is a better way to remove the boss without damaging the shell. Careful. One tiny cut could cause later cracking.
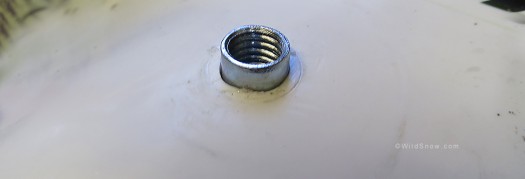
Trimmed hole with T-nut fitup (this is not the shortened T-nut). The T-nut shaft should press firmly into the hole' if not, during final assembly place a dab of JBweld in there or something like that. Any play you'll get is minimal, but you don't want the T-nut moving at all or you'll run the risk of it wallowing out the hole.
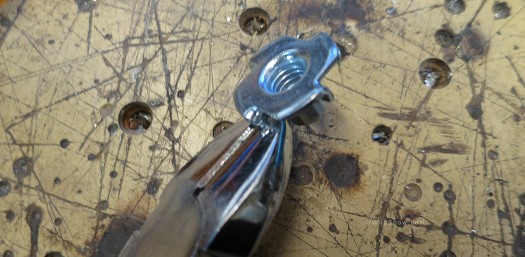
Prep the T-nut by snipping off the prongs so they don't protrude through the boot shell when you seat it. Also, shorten the T-nut and de-burr (see specs at beginning of post).
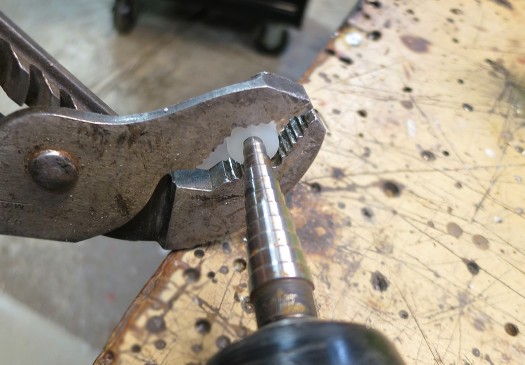
This is the tricky part; making a bushing out of a tiny nylon spacer. Drill out with a step bit until it fits snugly over the T-nut shaft. You want it to stretch a bit when installed on the T-nut, but only a tiny bit. If it expands too much it won't fit in the hole you'll be making in the cuff.
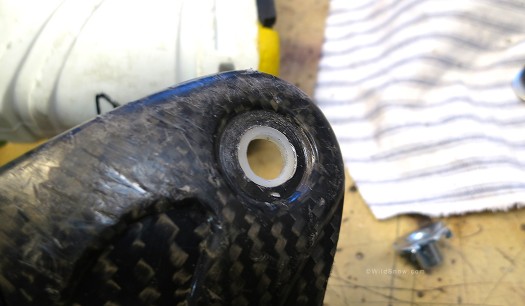
Next, using your step bit drill the cuff hole out to 0.5 inch, being careful not to wobble the bit or over-drill, as the bushing needs to fit snugly. Key here is how the bushing fits over the T-nut. Play around till the bushing fits tightly enough over the T-nut so it expands a bit into the cuff hole when you put everything together, thus eliminating all slop and play. The nylon spacers are inexpensive, so experiment till you get it right. During final assembly, place a tiny bit of binding grease on the T-nut to encourage the bushing to move on the steel rather than wearing inside the boot cuff hole. There is probably a much better way of boring out the spacer to make the bushing. Ideas appreciated on that.
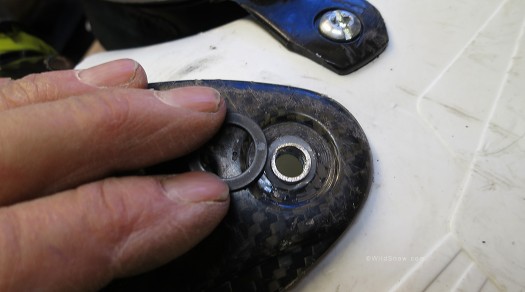
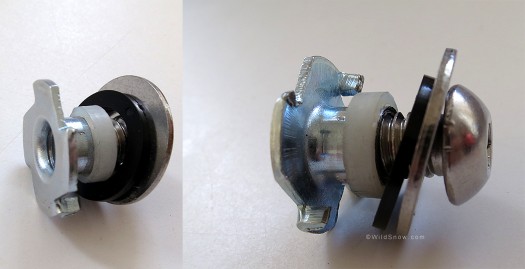
Begin assembly. Here the shortened T-nut is inserted in the boot and has been pressed through the homebrew bushing. We're sliding the nylon washer/bushing into place. The idea here is you don't need to be too aggressive with seating the T-nut, as that will happen when you tighten the cap screw.
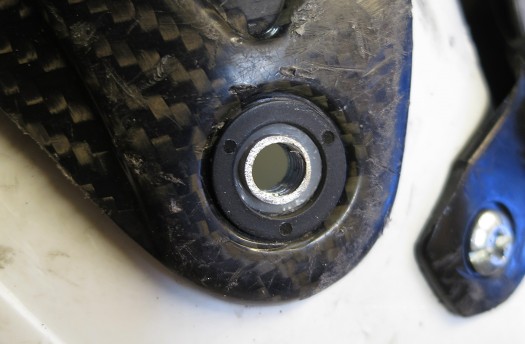
Black nylon washer/bushing in place, centered by virtue of the white nylon bushing protruding slightly above the boot cuff surface.
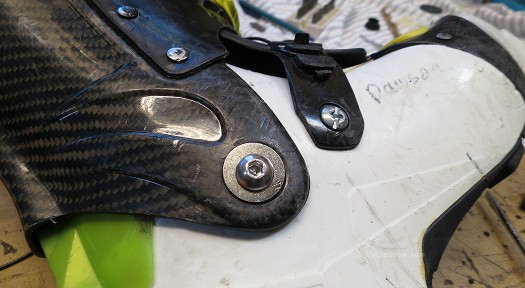
Cap screw inserted, with stainless steel washer which was drilled out to tightly fit the cap screw. Once everything fits together, heat the boot and T-nut up from the inside then aggressively tighten the cap screw to seat the T-nut. After seating the T-nut, back the screw out a bit, dribble Loctite from the inside, then re-tighten fairly firmly so you feel some resistance while moving cuff, but don't over-tighten. The idea is to keep everything firmly sandwiched together so the T-nut stays seated and so forth. If the system is loose, the T-nut will wobble or rotate, either of which would be a disaster.
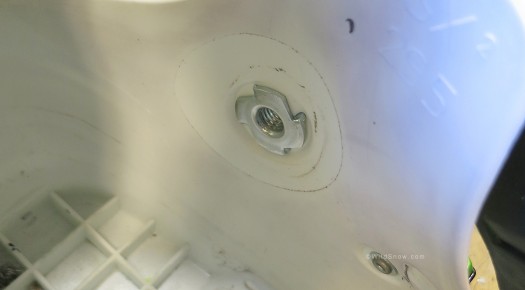
Seated T-nut. You could slightly melt the nut into the plastic by heating with a soldering iron, but I don't recommend doing that since the TLT models 5 and 6 scaffo plastic is so thin. DANGER here is the nut starting to rotate and the prongs basically cutting a circular disk out of the boot shell. To prevent that, next version of this I do I'll leave one prong at full length, pre-press the T-nut into the shell, and then from the outside I'll bend the prong over with a hammer and punch. Also, once everything is done cover inside with a chunk of Gorilla tape. When doing final assembly, use a small amount of blue Loctite. Tighten firmly enough so you feel some resistance while moving the cuff. This will keep the T-nut seated and eliminate excess play. Before and after every day of skiing inspect the bushing system for loosening, and carry spare parts in your repair kid. During final assembly use small amounts of silicone grease on surfaces where you want movement, such as the interface between the black nylon washer and external stainless steel washer as well as between the tiny white nylon bushing and the steel of the T-nut shaft.
Notes:
– I don’t recommend this mod for larger aggressive skiers. To much is unknown about strength issues of the shell as well as danger of T-nut rotating.
– Be certain what parts you want moving and lubricate sparingly so the lube doesn’t migrate and attract grit. Sparingly means tiny.
– One improvement I’ll be experimenting with is to place a neoprene washer under the black nylon washer, so it frictions with the boot cuff and thus uses the stainless steel washer as a bearing surface.
– You want to “cold press” the T-nut, but while doing so warm the boot up enough so it’s hot to the touch, but not as hot as you’d do for punching/fitting projects.
– During disassembly, danger is the T-nut rotating. Press the flat of the T-nut firmly with your hand from the inside of the boot while rotating the machine screw. In future iterations, I’ll drill a couple of small holes in the T-nut that can be used with circlip pliers to hold the T-nut from rotating.
– This project is obviously a 10 on the Wildsnow 10-wrench difficulty scale.
– Cripple Creek Backcountry will do this mod for $1,500 a pair. Send ’em over.
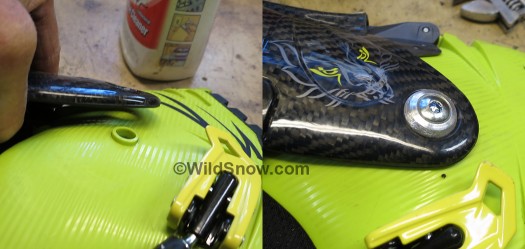
Ok campers, back to the Dynafit TLT6-P. As you can see, no difference between how its cuff attaches as opposed to TLT5-P. Anticipating wear, I removed all 4 of my OEM rivets and replaced with a removable system so I can easily swap in a bushing system, as well as removing cuff from scaffo for boot fitting projects. This removable system was developed using Scarpa threaded cuff pivot rivets sourced as repair parts from Scarpa customer service. I'll perhaps do another blog post to show how it's done.
Be sure to check out the excellent aftermarket pivots made by B&D.
WildSnow.com publisher emeritus and founder Lou (Louis Dawson) has a 50+ years career in climbing, backcountry skiing and ski mountaineering. He was the first person in history to ski down all 54 Colorado 14,000-foot peaks, has authored numerous books about about backcountry skiing, and has skied from the summit of Denali in Alaska, North America’s highest mountain.

