Dynafit Tri-Step binding began retail sales in 2001-2002, and defects became obvious. Most importantly, the binding would inadvertently release due to the boot toe pressing on the toe exit mechanism. After various “in-line” fixes detailed below, on March 19, 2003, Dynafit announced that they were bagging the inherently defective Tri-Step ski binding. The binding would be discontinued and replaced with the “Comfort,” which had toe mechanism similar to the tried and true TLT (see general Dynafit FAQ for TLT info), combined with a re-badged Tri-Step heel. In terms of history, the subsequent and excellent Dynafit Comfort binding was a landmark in the development of tech bindings. Sometimes it takes a few tries to get things right — evolution of Tri-Step to Comfort binding, then on to later Dynafit grabbers such as Vertical and Radical is a case in point.

2002-2003 Tri-Step. It looks similar to the previous freshman offering, but is significantly re-engineered. (Heel has logo lettering, which somehow was blocked by a reflection in the photograph.
What are the changes for the Tri-Step Binding, winter 2002/2003?
In October 2002 I received a 02/03 Tri-Step binding on a demo board, and subsequently received several other pairs of bindings for evaluation, mounted them on skis, and tested them for several months. I also receive dozens of emails about people’s experiences with both the TLT and Tri-Step, and incorporate those emails into these FAQs. While I can’t name all those individuals, I thank them.
Dynafit Tri-Step binding changes for winter 2002/2003
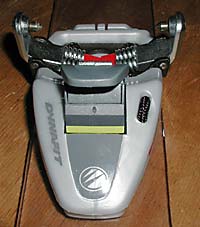
New 'model' Tri-Step, front view. The yellow bar indicates full lock in touring mode, eliminating any doubt on the part of the user.
– Yellow indicator graphic shows when the binding toepiece tab is locked in tour mode.
– Toepiece is redesigned, with metal piece to prevent unintended release in tour mode. This is the big one, as last winter’s “fixes” from Life-Link and Dynafit were not the kind of engineering excellence we’ve come to expect from Dynafit.
– Locking to tour mode may be more positive.
– Heel adjustment screw changed to posi-drive and slot-head screw instead of allen head, allowing you to carry one less tool in your repair kit.
– Hidden metal plate in heelpiece that contacts ski top is now clearanced so it has less friction during for/aft adjustment.
– Plastic toe housing is beefed with internal structure. (This and new toe lever add .7 ounce to weight of binding.)
– Screw hole in toe lever is clearanced to make mounting easier.
– Binding now sold with or without brakes, if bought with brakes they are attached to binding (installing brakes at home is a moderate hassle).
– Overall weight increase of approximately 1 ounce per binding (Tri-Step is about 28% heavier than the TLT binding).
Changes listed above solved most of the issues that Tri-Step had when first released. Ongoing issues were: ice formation within plastic housing, release of binding in touring mode when a foreign object such as an ice chunk catches between boot toe and binding lever, difficulty of pulling touring lock tab up to total lock position, continued problems with larger skiers inadvertently ejecting from the binding while in touring mode, and more.
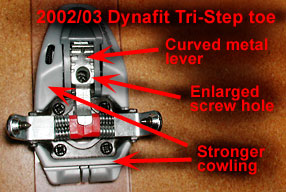
Overhead view of the last and best production Tri-Step toe. The curved metal lever is designed to eliminate the hazard of your boot bumping the binding and unlatching it from your boot.
Lou, come clean, do you recommend the Tri-Step or not?
Now that the Tri-Step is ancient history and replaced by many subsequent ski bindings, I do not recommend the Tri-Step. This FAQ is an attempt to clarify all issues with the Tri-Step binding, which should now be considered a novelty or collector’s item, not a viable ski binding (though the heel unit is identical to that of early Comfort model bindings and can be used for spare parts or mixing/matching to create binding sets).
What’s the main difference between the Dynafit Tri-Step and earlier binding models?
In most ways the the Tri-Step works the same way as any other Dynafit binding or “tech” binding, and is nearly the same mechanically.
Among other differences, Tri-Step has a cowling over the toe for a more streamlined appearance, and has a wider range of adjustment for different boot lengths than previous Dynafit bindings. Tri-Step raises the boot higher off the ski than previous Dynafit bindings.
The pins on the Tri-Step that insert into your boot heel are longer than those of earlier Dynafit bindings. In our view at WildSnow.com this resulted in better elasticity for less possibility of prerelease — and is one of the historic improvements that Dynafit implemented and has since seeded to most tech bindings on the market.
Tri-Step is 28% heavier than the TLT model.
Tri-Step has a heel post that is easier to rotate with a ski pole tip. History note: Tri-Step was the first Dynafit model to use the “red volcano” plastic column for a heel lift and for heel rotation. Over subsequent years, the infamous volcano was known to easily break off the binding if used incorrectly. While easy to fix or even ski without, later bindings eliminated the volcano in favor of more durable heel lifts and ways to rotate the binding heel.
When in touring mode, I walk out of or pop out of the Tri-Step binding toe, what’s the deal?
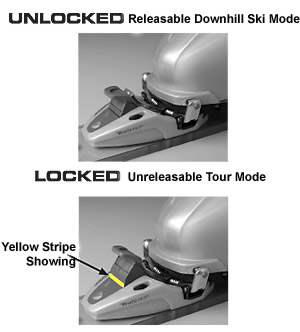
To Lock -- Pull Toe Lever up until yellow "locked" stripe is fully showing. If you cannot pull the lever far enough up to see all of the yellow stripe, hook the shaft of your ski pole under the lever and pull up with both hands on ski pole.
TRI-STEP BINDING Toe Piece Directions
For those who have not used Dynafit bindings: To enter the binding, you place the toe of your boot on the toepiece with the holes in the boot lined up with the small pins on the “wings.” You then press down, triggering a set of small springs that close the wings on to your boot, with the pins in the holes. For downhill mode, you then weight your heel and drive your boot down on to the heel latch pins. For touring mode, you leave your heel unlatched, but you must reach down and pull up the small gray plastic tab on the toe, which locks out the release so you won’t pop out while touring. If you try to tour without the toe “locked,” you’ll soon release out of the binding when you try to walk. If this lever gets accidentally pressed down while you’re touring, you will walk out of the binding.
The above causes a nomenclature problem. When you are reading this FAQ, be clear that that the words “latched” and “locked,” for example, could mean simply latching the touring lock lever, or actually removing or attaching the binding to your boot. I’ll try to be as clear about this as possible, and attempt to use the words “locked” and “unlocked” to exclusively mean the use of the touring lock lever, as is done in the illustration to the right.
When the Tri-Step binding was first released in 2001 users immediately reported they were walking out while touring, even when careful with the touring lock mechanism. This led me to believe that the 2001 Tri-Step binding needed more evaluation and testing, and possibly improvement, before I would recommend it. As it turned out, early bindings during the 2001/2002 season were indeed shipped with a design flaw which did certainly cause skiers to pop out while in touring mode. For the record this debacle is explained more at the end of this FAQ. This specific problem was somewhat fixed with the new model release for winter 2002/2003.
Unfortunatly, even with the “in-line” changes, some users still walked out of the binding…
I believe I use the Tri-Step binding correctly, and I still pop out while touring, ideas?
I have torture tested the Tri-Step and had no problems with inadvertent release while touring. Several other experienced ski alpinists also report using the Tri-Step and having no problems with this. Nonetheless, I do receive reports of this problem and my conclusion is that it is a true problem with the Tri-Step, especially for larger skiers, and is probably why it was discontinued. Nonetheless, In most cases something is awry with your use patterns if you consistently release from the Tri-Step while touring. Things to check:
Before you step into the binding, clean any packed ice and snow out from under the visible toe-unit springs. Junk packed in the deep pocket under the springs will keep the binding from closing properly. The plastic cowling on the Tri-Step exacerbates this problem, and is one reason I prefer the TLT.
The sockets in your boot must be clean, and the binding fully closed on your boot after you step in. It’s easy to overlook this, as you can walk away with the binding partly closed, with the pins riding on ice or dirt packed in the boot sockets. Carry a 16d nail for cleaning out the sockets, or use the awl on your multi-tool.
For walking/touring mode, the touring lock lever (the gray plastic tab up front) must be pulled up firmly after you’re in the binding. Make sure you can see the yellow lock indicator before you start walking. It may take quite a bit of force to pull the lock tab up to the point where you see all of the yellow bar (see more about this above and below). If in doubt, try pulling the lever up by placing a ski pole crosswise underneath it and yarding up on the pole with both hands and significant force.
Once the binding is closed and locked, swing your foot and ski a few times to work the pivots and make sure they are seated. Stomp and torque your foot to the side and make sure it feels locked.
Bench testing shows that the touring lock lever (the gray plastic tab up front) may be ultra-sensitive to being pressed downward and thus being switched from the locked mode to alpine mode. One of my test bindings easily switched from tour lock to alpine mode by gently pressing down with a finger. Using a scale, I measured that it only took 6 pounds of force to switch it. What’s more, compared to the TLT binding it is in a position that is much easier to hit downward with a ski or other object. Thus, it could easily be switched to alpine mode if you hit it with your other ski during a kick turn, set your pack on it while taking a break, or doing something else that presses down on it.
Remember your technique. Avoid wild moves on steep terrain. Don’t jam your boot forward to the point where the toe-box impacts the binding. Dynafit bindings are incredible, and used by hundreds of thousands of ski mountaineers. But this might not be the best binding for inexperienced ski mountaineers, as it certainly requires more care and feeding than bindings such as the Fritschi Diamir.
The binding may release if you get a chuck of ice or hard snow packed in front of your boot toe, and jam your boot forward. This can be demonstrated on the bench by placing a soft object between the boot toe and touring lever, then raising the boot heel. Try using a rubber eraser for this experiment. Reports of touring release while breaking trail in deep snow, or bushwhacking, might be the result of this.
Some boots may not have a thick enough sole under the toe to push down on the toe-unit and cause the binding to snap closed. If you use the Laser boot, be extra sure to check this. Fix by building a small pad of duct tape on the binding so the boot has something to press on.
Users frustrated by “surprise release” have told me they suspect their boots might be defective — perhaps with the wrong dimensions, or something like that. The Dynafit fitting molded in the boot is a solid steel block with the sockets machined at each end. Thus, the sockets are always the correct distance apart. Could the fitting be molded in crooked? Perhaps, but I don’t see how this would cause release in touring mode.
While touring, glance down at your bindings occasionally and make sure your touring lock lever is still up in the locked position. I’ve stepped on mine a few times during a thrash or while taking photographs, and ended up walking out of the binding.
All new users should torture test their bindings at home, on carpet. Practice getting in and out. Practice pulling up the touring lock lever. Practice rotating the heel lift. Try dropping to your knees and observe how doing so may pull your boot out of the binding.
If you put in a few days on the binding, do all the above, and are still frustrated by touring release, it could be wise to cut bait and use a simpler binding.
If all the above fails, perhaps you have defective bindings or boots. The only way to figure that out is to try another pair — a good reason to buy your bindings from a dealership committed to customer service, ditto for boots.
More about making sure the Tri-Step is locked into touring mode
In some cases, it is difficult if not impossible to pull the Tri-Step touring lock tab up to the point where it makes a satisfying click, and shows all of the yellow bar painted on the front of the toe lever. I had this problem with a recent pair of bindings. After many hours on the bench, including reverse engineering almost the whole toe piece, I found that a small metal part appeared to be slightly too large, and blocked a pin from sliding crosswise along a slot. See illustrations below:
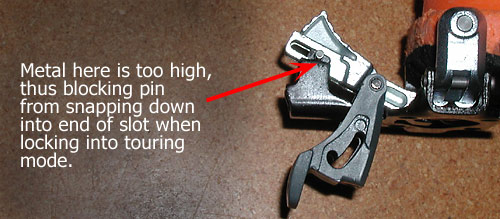
Above is a view of the binding toe without cowling, and with some parts removed or moved aside for easy viewing. The metal part that's too high is of a much softer metal than the pin. Thus, if you have a problem with your bindings being hard to lock, try this: Place on a workbench, put a boot in the binding, then lock/unlock touring mode several hundred times. This will cause the hardened steel pin to ease a land in the metal that blocks its path. You must do this with the boot in the binding, as they usually work fine without the boot (due to a change of internal angle in the mechanism caused by the boot between the pins of the binding wings).
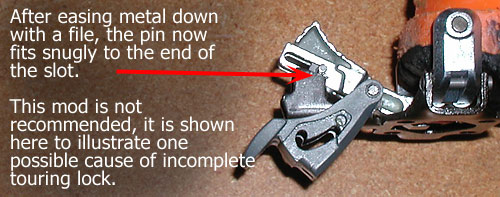
Tri-Step after experimental modification.
After taking the binding almost completely apart (more than shown above), I was able to file down the dark metal a small amount, perhaps 1/64 inch. Doing so made a huge difference. The binding I filed now easily locks into touring mode, shows all of the yellow bar, and takes quite a bit of pressure to force down out of touring mode (as it should). I do not recommend doing this modification as it involves pressing a pin out of the binding, and removing a precise amount of metal. Instead, if you have problems with your bindings locking, place boot in binding and go from lock to unlock several hundred times. Do so with a good amount of force each time. This should allow the hardened steel pin to wear down the softer metal under it. Trying to fix your binding this way won’t void the warranty, as taking it apart and modifying it surely would
It’s said the Tri-Step is easier to click into than previous Dynafit models, is it? Why do they claim this?
The boot pins on the Tri-Step binding toe unit are about 3/16 inch closer together than the TLT (when open and ready to receive boot). Also, the trigger under the toe of the boot, which when pressed causes the wings to close on your boot, is more sensitive on the Tri-Step than on the TLT. It’s also said that the heelpiece is made in such a way that one can use it to align their boot for entry into the binding.
These factors might make the Tri-Step slightly easier to click into, but in my real-world testing I noticed little, if any, difference in this. As with the TLT binding, the trick is to get one pin in a boot socket by slightly tilting your boot sideways, then step down at the toe to click in, while keeping the boot aligned to the sockets. Reality is that doing this can sometimes be difficult. Practice at home if you’re new to the binding. And remember that the boot sockets must be clean for positive engagement with the toe unit pins. Make a pin-hole cleaning tool out of a 16d nail.
I heard some Dynafit Tri-Step users were having problems with the front part of the binding icing up, and that the cowling on the front prevented you from removing the ice. Has this been a problem? Is it fixed with the 2002/2003 model?
There are no changes we know of in the 2002/2003 model that would make any difference with icing issues. While such ice is not a problem for most people, I have heard of this happening so it’s something to consider. After all, many of us who use the TLT much have had ice form in the pocket under the toe wings, and had to remove the ice to get the binding to work. Thus, this could also happen with the Tri-Step. Again, more testing and comments from users will make it clear what the situation is with the icing question. The guy/engineer side of me likes the TLT without the plastic. I spend a lot of time cutting extra junk off my packs, automobiles, and clothing — are my bindings next? (Actually, the cowling is part of the binding’s mechanical system, so it probably has to stay).
Does the Tri-Step give more reliability for aggressive skiing?
It’s been obvious for some time that the TLT binding, when used with a severely flexed and soft ski, may not allow enough for/aft movement of the binding in relation to the boot. While this is not a problem in average backcountry skiing, it’s well known that if you jam a soft ski into a bump trough or other declivity, your boot may pop out of the binding, vertically at the heel. Indeed, what may cause this could be demonstrated in the workshop by aggressively flexing a soft ski with attached boot. Do so, and you’ll notice how the boot heel can jam against the binding. Conversely, if a soft ski was heavily “cambered” or reverse flexed, it could pull the pins out of the boot heel. I’ve had that happen when a bunch of slush piled up on my skis, and I went for a wild jump-turn.
The latter occurrence is easy to replicate indoors. Latch a boot into the binding, flip the ski upside down, and suspend it between two solid supports at tip and tail. While pulling the boot heel down towards the floor, aggressively press down on the center of the ski to induce exaggerated camber. You’ll be surprised how easily the boot pops out when the pins pull out of the heel fitting. The longer pins of the Tri-Step help with this problem, as they allow extra distance before they pull out of the boot fitting. With either the TLT or Tri-Step, be extra sure the specified space between boot heel and binding is no larger than spec. With either binding, my opinion is that the pins should be longer, with a deeper pocket in the boot heel. Just a few millimeters would make a huge difference.
Said again: The Tri-Step and Comfort binding’s heel pins are several millimeters longer than those of the TLT, and the Tri-Step heel lacks the mysterious bump that reduced clearance even more with the TLT. Factory spec for heel clearance on the TLT is 4mm, while it’s 6mm with the Tri-Step, a significant 50% increase! Perhaps this will eliminate tendency for “pop out,” in alpine mode, or make is so rare it’s a non-issue, but when testing in the shop, I found the de-camber type of pre-release is still remarkably easy to replicate with the Tri-Step. In the field, I found the longer pins made a significant difference, and have tested the binding with aggressive skiing in double black diamond terrain, with good results.
I tested the effectiveness of the longer pins by removing them from the Tri-Step binding and swapping them into a pair of TLT heels. This resulted in a VAST improvement in the performance of the TLT when using them for things like aggressive bump skiing or doing jump turns in heavy slush. Thus, I can say with confidence that the Tri-Step should be even less prone than the TLT to any sort of prerelease If you care to try swapping the longer pins into the TLT, remember that doing so throws off the DIN release setting numbers, and you’ll have to set your binding tension by trial and feel (don’t we all do this anyway?
Do the Dynafit TLT and Tri-Step bindings use the same mounting screw hole pattern?
Yes. What’s more, the Tri-Step comes with the screws inserted in the correct holes, a nice touch that eliminates confusion about where the different shaped screws are supposed to be used. With this in mind, the Dynafit demo-rental plate would probably work with the Tri-Step. This plate gives a huge range of boot length adjustment, and more rise.
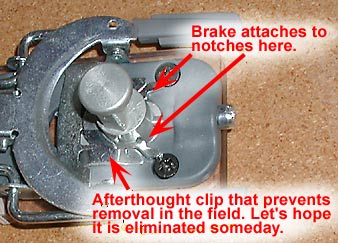
Dynafit heel internals, with cowling removed. This is how brake is removed and attached for this and most subsequent Dynafit bindings.
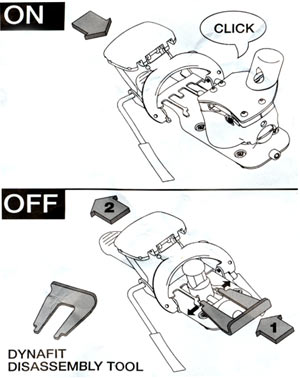
The new Tri-Step brake was designed to be field removable with this little tool, but it came off too easily and must be installed with an extra part that obviates the convenience of removal and replacement in the field. Expect this to be fixed in the future. The drawing I scanned came with a set of brakes I received in 2001.
I’ve heard that the Tri-Step ski brakes were designed to be field removable and field attachable, but now they come with an extra part that makes them permanent, what’s the deal?
Indeed, the Tri-Step brake was originally designed to ingeniously slip on to the heel post, then lock into two notches on the heel post. You used a small tool for removal (illustrated to the right). This was an ingenious development that unfortunatly did not work in reality as well as it appeared on paper. Problem, the clipping action of the brake was weak, and it popped off too easily in the field.
Dynafit’s solution to this was a small metal clip that locks the brake on the heel unit, but sadly obviates the field-removable feature. In other words, you must take the binding apart to attach and remove the brake. This design change has promulgated through all subsequent Dynafit bindings. Astute users and good technicians had no problem with the clip retainer system, but the part was easy to forget to install, and also did fall out on occasion. So in 2013 Dynafit began to sell bindings with permanently attached brakes that had to be removed by cutting away a metal part or using a special tool to take the binding heel apart. Many users found this development to be quite disappointing, though the folks at Dynafit customer support were probably delighted since they fielded dozens if not hundreds of queries that went something like “my brakes came off my bindings, what do I do now?”
My ski brakes jam under my boot sole lugs, should I be concerned?
Yes, this can compromise your safety release! See the general Dynafit FAQ for info, as this can happen with either model.
For history’s sake, what was the deal with the (in)famous toe plugs on the first release of this binding in 2001?
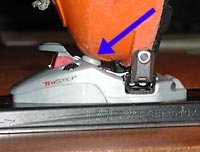
Binding with old plug, note how boot impacts plug. This causes instant ejection from the binding.
FOLLOWING OFFERED FOR THE HISTORICAL RECORD. THIS SHOWS THE TRI-STEP BINDING FROM 2001/2002, WHICH REQUIRED THE RETROFIT “PLUG” IN THE TOEPIECE.
In my opinion this “plug fix” was somewhat unacceptable (depends on exact use), more, the original production Tri-Step, without the modified toe plug, was utterly worthless because of the boot ejection problem.
Even after installing the retrofit plugs, some users still reported that they walked out of the binding while touring.
This perhaps proved that the binding had an inherent flaw and is possibly why it was discontinued.
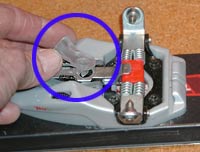
Tri-Step toe plug mod just before installation.
I have two theories about this: One is that some boots have toe-box shaped in such a way that it impacted the front of the binding and still caused ejection.
Another theory was that snow or ice would build up on the binding or boot, then cause the boot toe-box to push down the lever and cause ejection.
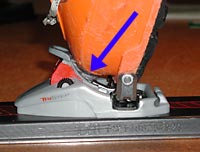
Binding with plug, boot presses down in a way that does not cause ejection.
Whatever the case, this unfortunate episode is now history. Enough years have gone by to consider the Tri-Step a discontinued classic-antique that should not be used for skiing. If you’re a collector and you find this binding on the used market, the later more functional generation is the version with the yellow stripe on the toe lever (see above). Use the photos in this article to ID your bindings. The 2002/2003 model has a beefy curved metal toe lever, and a yellow stripe on the front that shows when it is locked in tour mode.
Press Release from Dynafit, edited: March 19, 2003 The Dynafit Tri-Step binding has been redesigned and improved for Fall 2003, and will ship in its new form and under its new name, the TLT Comfort Binding (WildSnow note: Comfort was an excellent binding). Many who tried the Tri-Step were happy with certain features, such as the ease of rotating the heel unit, but found that the Tri-Step lacked the reliability and ease-of-use that the original TLT toe provided. “The consumer wanted the intuitive and simple toe piece of the original Tourlite Tech (TLT) binding, but they also wanted the easy and comfortable to use heel piece of the Tri-Step binding…now they can have it all in one binding,” said Tim Kelley, Life-Link / Dynafit Product Manager. The New TLT Comfort Binding will offer all the best features of the Tri-Step heel piece including being adjustable to three shell sizes, the easy to install ski brake system, and the tube shaped climbing step for comfortable position changes while touring. The new toe piece of the TLT Comfort will feature the simple, effective, audible, locking toe-piece found on the original TLT binding. Dynafit will continue to offer the tried and true TLT binding. For more information and a sneak preview of this binding, stay tuned to www.life-link.com, and check here at wildsnow.com for objective testing and reviews of this latest attempt to make the Tri-Step work as good as the TLT. We’ll see if it lives up to this press release… For extensive information about the incredible Dynafit bindings check the Dynafit TLT and Tri-Step FAQs here at Wildsnow.com.

Dynafit Tri-Step thumbnail.

