(NOTE: THIS FAQ HAS TWO PAGES, SEE PP 2)
First viewed by the public in winter of 2012-2013 and beginning retail in winter of 2013-2014, Dynafit Beast “16” ski binding.

The Beast. PR is that Beast has 'amazingly smooth and progressive release and retention values that exceed those of many alpine bindings.' We would tend to agree, though we question how many individuals need to make the weight sacrifice required to haul the beast uphill. In any case, this is an exciting iteration of the tech binding platform that demonstrates fascinating mechanical engineering.
What’s the official name of this binding?
“Beast 16” with the “16” referring to maximum release value. While writing about it we’ll usually shorten name to just “Beast.”
Other coverage of Beast 16 binding here at WildSnow?
Video and photo details
Exclusive first look at European Press Event, winter 2012-13
Thoughts about certification of tech bindings.
How does the Dynafit Beast ramp angle (delta) compare with other tech bindings?

Dynafit Beast set up for measuring various parts, old but still viable ZZero 'Green Machine' boot inserted. Click image to enlarge.
First, for the sake of understanding this review and FAQ let’s define ski binding ramp angle, or as it is sometimes called, delta. The terms simply mean at what angle, usually heel higher than toe, the binding supports your boot. Since the actual angle would change according to the length of your boot, any specified ramp angle greater or less than zero would be an approximation, perhaps done for the standard sample size boot of a mondo 27. (Bear in mind that ski boots also have ramp angle, but here we’re usually discussing binding ramp.)
In the case of tech bindings, we feel the best way to communicate ramp angle is as a comparison between bindings, using the difference in height between toe and heel pins. In this respect, Beast binding has a heel-toe difference of 6.67 mm, which translated to real life means it has a ramp of somewhere between 0 and 2 degrees with average length boots. Dynafit Radical bindings have about twice as much ramp, with a heel-toe difference 7.33 mm greater than Beast (14 mm total heel-toe difference. (All measurements to center using a variety of tools, some measurements are difficult, accuracy is probably about .5 mm).
 angles, boot sole length 313, early Scarpa last used for example.")
Beast binding delta (ramp) angles, boot sole length (BSL) 313 mm, early Scarpa last used for example. Note how the visible ramp angle as well as that of a line between toe and heel pins is nearly zero (about 2 degrees). But factor in the typical ski boot with built-in ramp, and the angle increases. Built-in boot angles are one reason ski bindings don't need a huge amount of ramp for modern skiing. In ancient days, more ramp as well as more cuff-lean were sometimes required to pressure the ski tips for turn initiation. Too much ramp is hard on your knees, and may conflict with how modern skis are designed to be turned.
Nearly any tech binding will have higher heel pins than it does toe pins. So don’t assume all tech bindings have a bunch of delta. Once you get a boot in a binding, that’s what demonstrates your actual delta. For example, place a boot in the Beast binding and you’ll observe that it visually has very little delta. Nonetheless, once your foot is inside nearly any ski boot, the boot will introduce delta to your stance in addition to that of the binding.
The numbers, measured to center of binding pins NOT BOOT SOLE:
— Beast 16 binding toe pins are 38.89 mm above ski, heel pins at 45.54. Heel thus 6.67 mm higher than toe.
— Radical binding toe pins are 35.40 mm above ski, heel pins at 49.44. Heel thus 14.04 mm higher than toe. That’s a significant difference with the Beast having <> 50% less delta than the Radical (and as stated above, being a nearly 0 delta binding).

Dynafit Beast binding heel unit places boot about 4 mm lower to ski than Dynafit Radical. Distance from ski top to center of pins is 45.54 mm, Radical pins are located at 49.44 mm
— Important, note that Beast places your boot heel LOWER on the ski by 4 millimeters. Beast toe is higher than Radical for reduced ramp, but overall it could be said that Beast places you “lower on the ski.”
— Dynafit Speed binding toe pins are 28 mm above ski, heel pins at 43 mm. Heel 15 mm higher than toe.
— Plum Guide toe pins, 30 mm above ski, heel pins at 48.30. Heel is 18.3 mm higher than toe.
Most ski boots have a built-in ramp angle, so you’ll hardly ever get to a true zero delta. In fact you probably don’t want a fully 0 delta binding. The correct amount of delta in both boot and binding creates a strong ergonomic interaction between your leg, ankle and boot. Further, binding delta allows you to ski downhill with delta and forward lean while still having less boot delta when you’re in hiking mode (since the delta is in the binding only when you’re in skiing mode).
In other words, if you have a 0 delta binding and add delta to your boots, the extra “lean” in your boots may feel uncomfortable while touring or hiking, especially on low angled ground.

Measuring actual working delta is an important part of evaluating boots and bindings, as well as solving mysterious problems you might have when switching gear.
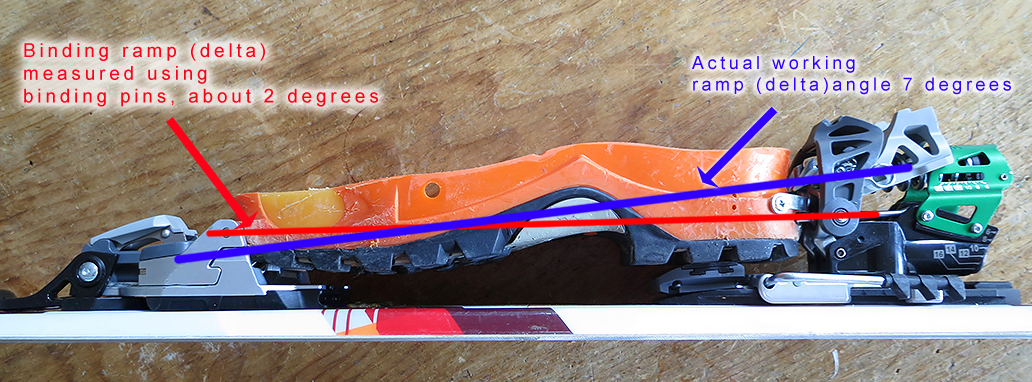
For comparison I measured the boot delta with a Dynafit Green Machine shoe inserted in both the Dynafit Radical and Beast bindings. Boot delta in Beast is 7 degrees, in Radical it tilts up to 9 degrees. The angle in Beast is excellent if not a bit low for my taste, angle you get in Radical is extreme for modern skiing, and may be hard on your knees. In my opinion, the older Dynafit TLT bindings had the perfect built-in delta, with the difference between heel and toe pin height being 10 mm (more than Beast and less than Radical), attributing yet again to Fritz Barthels amazingly perfect original binding design.
It is possible, sometimes even quite easy, to adjust binding delta by shimming up the toe or heel units. For example, a Dynafit Speed binding can be mounted using toe plates from a Radical FT for a rise of 6.5 mm, thus changing difference between toe and heel to be 9.5 mm, essentially the same as as the venerable TLT. Another option is to use the shim plate available from B&D Ski Gear for a rise of 6.7 mm. (Bear in mind that increasing toe height reduces the effective height of our climbing heel lift — and remember you’ll need longer screws as well as a plate.)
Beast is obviously wider than most tech bindings, how much wider?

Beast is wider, yet some of the screws remain on same layout as other Dynafit bindings. We'd hope that would help eliminate extra drilling when swapping to the Beast. Click image to enlarge.

Radical toe base on top of Beast toe base, Beast toe is 14 mm wider, irregardless of screw layout.

Radical heel unit sandwiched on top of Beast heel base. Radical outlined in red is about 17 mm narrower than Beast (depending on where measurement is taken).
Does Beast binding need a “tech gap” between boot heel and binding?
Beast needs nothing like the big gap required by other tech bindings (about 5 mm, depending on brand and model), instead it uses a gap about the thickness of paper. Instructions on that can be seen below. In terms of the “tech gap,” by tightening this up Beast allows full insertion of the binding heel pins into the boot, thus adding strength (less leverage on the pins) and preventing accidental binding release due to the ski reverse flexing and pulling the pins out of the boot heel.

One of the most intelligent differences of Beast over other tech bindings. While heel pins are the same 10.5 mm length as most other tech bindings, combination of Beast boot fitting and heel unit allow pins to insert nearly their FULL 10.5 mm length into the boot socket, thus totally preventing any sort of problems when the ski is over cambered (reverse flexed), which with other tech bindings can cause unintended vertical release of boot from binding.

Comparison of Dynafit Radical and Beast bindings, rear heel unit pin lengths are the same. But Beast pins insert fully into boot while Radical pins do not, due to required gap between boot and binding.
How do I adjust Beast binding for boot length and forward pressure?
Adjusting the binding for boot length and forward pressure and boot length is easy. First, know it’s the lower rear screw that moves the binding fore and aft. Try it. Adjust back to the point where you can snap your boot into the binding without forcing it. Continue to adjust till you have a visible gap as indicated in the photos below, shown with paper inserted in the gap. As in the photo, cut a strip of paper, insert in the gap. Then while teasing the paper by pulling, crank the gap closed with your screw driver. Once you can’t get the paper out without tearing it, open the gap back up just enough so the paper slides out. That is it. Your “tech gap” is now the width of a piece of paper, and the spring loaded heel unit rides on a track to absorb ski flex and other nefarious forces.
Quick clarification: When adjusted properly and at rest, Beast binding heel has no “forward pressure,” instead having a tiny gap between boot heel and binding. But when your ski flexes the heel unit moves under pressure on its base/track, thus having “forward pressure.” The term “forward pressure” comes from alpine bindings and some touring bindings that are set with a pre-loaded forward pressure. It’s really a misnomer for Beast binding.

Incredibly sophisticated adjustment tool is carefully cut from paper, about a centimeter wide and used to set the nearly zero 'gap' between boot heel and Beast binding. While this adjustment is sometimes referred to as 'forward pressure,' it's really not. Pressure only occures when the ski is flexed and thus forces the binding heel unit against the boot heel. Heel unit of Beast is spring loaded to compensate. At rest, the heel unit is one paper width away from the heel of your boot.

Paper 'gauge' in Beast binding, tighten binding till you can't pull it out without tearing, then back off binding till the paper comes out without tearing.

Binding heel moves fore and aft by rotating lower screw as shown. To prevent damage to the screw head, unless you're confident in your power driver do so by hand with pozi-drive screwdriver.
A possible issue with this process is that a pair of boots could slightly vary in length due to manufacturing tolerances, but most people want their skis to be interchangeable between feet. To that end, after adjustment of both skis to one boot, try your other boot in both bindings. If the gap appears too tight open it up a bit so the paper test works (We’re talking in terms of paper-thickness here, not inches).
Beast heel pins look bigger and stronger than other tech bindings, are they?
They’re similar, but Beast pins have a trapezoidal cross section rather than circular, which makes them look thick and no doubt provides more strength. The pins are also spaced 1 mm wider in comparison to Dynafit Radical. Not a huge difference, but wider pin spacing = more stability and is a good trend.

Beast heel pins have a trapezoidal shape rather than circular as most other tech bindings.
What “DIN” release setting range does Beast provide?
First, remember that until the binding is certified it does not have “DIN” but rather “release values” (RV) that approximate alpine binding DIN settings. To that end, Beast is labeled as adjustable from RV 6 to 16. In field and bench testing we found the Beast safety release to be smooth, and the higher settings to be exactly that, very strong. The lower settings between 6 and 8 felt a bit stiff, but that’s in a pre-production test unit. We’ll update this FAQ when the production units are out.
Weight details?
Total weight for 2013-2014 Beast binding, with screws and crampon bracket: 34 ounces, 966 grams.
(Compare to Dynafit Radical FT or ST at 20 ounces, 566 grams with 110 mm brake, FT with connector plate removed, or Marker Duke, at about 47 ounces 1332 grams)
Heel unit weight, with screws and integrated brake: 20 ounces, 564 grams
Toe unit weight, with screws and crampon bracket: 13.7 ounces, 388 grams
Crampon mount bracket (can be removed): .3 ounces, 8 grams
(NOTE: THIS FAQ HAS TWO PAGES, SEE PP 2)