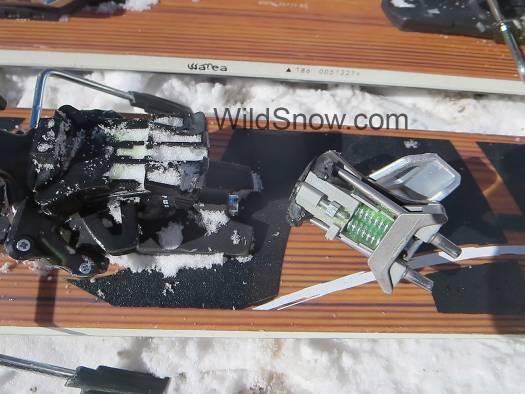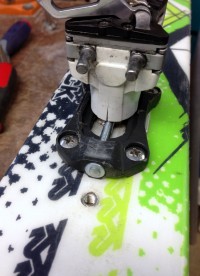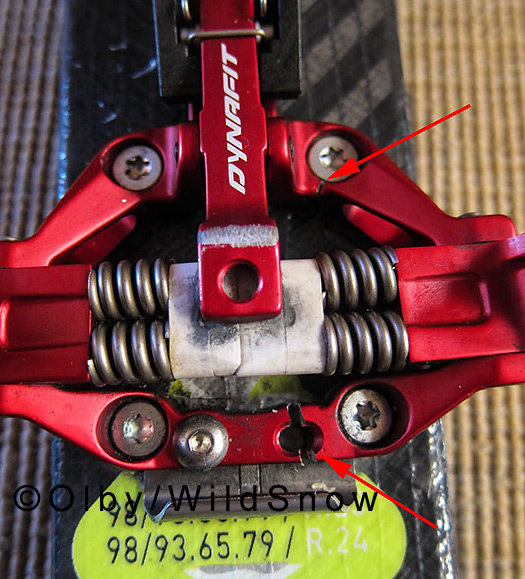
Known issue with Radical 1.0, one or two top plate screws probably get fatigued from all the movement and force from the heel lifters, then a screw breaks and the top plate gets ripped off. This is unfun and possibly even dangerous for backcountry skiing situations. Dynafit developed a solution during winter of 2015-2016 that involved replacement of the binding heel units. Details here.

Image above is a 2011 Dynafit Speed Radical. It developed cracks at the base, visible in photo. Good example of a location on any tech binding that should be inspected periodically. Much of the force of skiing the binding is concentrated in this area. Thanks S.K. for the photo. Click images to enlarge.
Despite their minimalist appearance, Dynafit bindings (and many other tech binding brands and models) have proved to be one of the most reliable alpine touring binding types available. Hundreds of thousands are in use worldwide — they’ve served as reliable steeds for everything from Mount Everest descents to record breaking randonnee skimo racing.
Even so, every machine made by man eventually wears out or breaks. A good example is the Speed Radical model to right. This 2011 version developed cracks at the base. Failure such as this could be the result of defect in the plastic molding (our guess), or from the binding being improperly adjusted. No way to know for sure. What’s important is to know all the failure modes of tech bindings, and periodically inspect your bindings for impending breakage so you’re not caught unaware in the middle of the backcountry.
We receive quite a few emails about this subject. Below is harvested from your emails, published to help all tech binding fans to get more out of this amazing technology.
|
The most common Dynafit wear scenario is when the heel unit develops play due to an internal bushing wearing out. This “thimble bushing” is super easy to replace. You just remove the cap over the lateral release spring, pull out the spring, then reach in with your finger or a right angle pick and pull out the bushing. Reverse procedure to assemble. Only gotcha is it’s possible to cross thread the cap while doing this, so be extra careful when reassembling. Lubricate parts with light lithium grease. (Procedure description.)
How to lubricate is another question that comes up frequently about Dynafit. Light lithium grease has been working for us, but OEM choice according to our WildSnow inside Dynafit sources is Dow Corning Molykote PG-75, but that stuff is very hard to find in small retail quantities. Perhaps the most available and appropriate grease is the binding lubricant sold my G3, which appears to be Molykote or something similar. The G3 grease may also be tough to find for sale, but calling G3 customer service will solve the mystery of where to buy it. Binding lubrication details here.
A less common Dynafit failure is when the screws holding the heel top-plate break. I’ve received several reports about this, all being high mileage bindings. What appears to happen is that the screws fatigue from use of the two heel elevated positions. Corrosion might contribute as well. If the top plate comes off you loose the binding internals and thus have catastrophic failure of the heel unit, this leaving you with free-heel touring mode but no latched heel downhill mode.
In light of this, my opinion is that if you’re using high mileage Dynafit bindings that are three years old or older, for long trips you should carry a spare heel unit in your repair kit. The minimalist way to do this is carry only the housing, with a cut down top plate. For big expeditions, bringing a whole spare binding would be wise (no matter what brand of binding you’re using). If your heel unit fails during a shorter trip, you can just ski home in free-heel mode.
|
Another failure point of Dynafit bindings is the crampon mount on the rear of the toe unit mounting plate. Before recent models were reinforced with a metal fitting, this part was easily broken while using Dynafit crampons. It’s better now, but continues to be a weak point. Failure in this are is not catastrophic — it only obviates the use of Dynafit ski crampons.
Perhaps the most common Dynafit breakage is that of the plastic “volcano” heel lift on the Comfort model. These are designed to fit a ski pole tip so you can rotate the heel unit with a ski pole. If you get the angle wrong and force this, you end up placing immense torque on the binding and something has to give. In a good way the volcano acts as a “fuse” when it breaks off before further damage occurs. On the other hand, it does appear to be a bit weak. More, sometimes the screws attaching the volcano are what break, probably due to metal fatigue. A broken heel lift isn’t catastrophic — you can usually continue your trip and fix it when you get home. But carry a spare (with screws) if you’re on a big trip.
Breaking the aluminum post the heel housing rotates on is rare, but does happen to the Comfort model. One guy who reported this to me said he didn’t abuse his binding, but said they’d been used for at least three seasons. I also received another report that claimed use of about 100 days before the post broke. Metal fatigue would be the likely culprit, along with the possibility that the binding received a hard blow from something like falling off the roof of a car. From what I’ve seen this is an unlikely occurrence but worth mentioning for the record and is detailed in the following photos and captions:
 |
| Broken Dynafit Comfort heel post. Photo courtesy kuchyna.net |
 |
|
| Comparison of Comfort heel post construction (left) with TLT (right). Notice how the TLT is solid at the base, while the Comfort is hollowed out and the amount of aluminum mating post to base is quite minimal. Moreover, note the brake fixation slots milled into the side of the post. Even with such minimal material these guys are strong. I tested a Comfort post to failure in my workshop and it took quite a bit of force to break it (as in yarding on a 24 inch lever arm with the unit held in a vise). With that in mind, I’d conclude that metal fatigue is probably what causes this type of breakage. Thus, this is not a concern if your bindings are low use. But if you’ve got a high mileage pair of Comforts, it might be worth inspecting the base of the heel post for cracks several times a season. That said, when experimenting in my workshop I dialed a set of Dynafit comfort bindings up to maximum DIN and noticed it took quite a bit of force to step the boot heel down into the binding, as well as an extraordinary amount of force to pull it up and out simulating a vertical safety release. This leads me to believe that using super high DIN settings (as in cranking both as far as you can) could indeed contribute to heel post fatigue and possible breakage in high mileage bindings. |
 |
|
| Another comparison of Comfort heel post construction (left) with TLT (right). Notice how the TLT post base is wider and has more taper where it mates with the base plate (and is also solid rather than hollow, as mentioned above). The Comfort not only appears weaker, but is taller and thus subject to more leverage. We repeat, breakage in this area is rare, but worth knowing about if you have high-use bindings. |
 |
|
| If your Comforts had a cracked heel post, it would look something like this. Again, a rare occurrence but worth checking for during routine maintenance and inspection. Photo courtesy Kootenayskier. |
Broken plastic, as pictured below, is another failure sometimes seen with Dynafits. According to sources, plastic molding is tricky and weaker batches sometimes sneak into the retail channel. Dynafit/Salewa North American is usually very nice about replacing such failures, even after the official warranty is done. They also sell replacement parts.

Broken Dynafit heel platform. This is where your heel rests at lowest touring position. Owner of these Vertical ST backcountry skiing bindings said he'd only toured five days and wasn't doing anything that created undue impact. We suspect defective plastic and recommended he get replacement parts from Dynafit. Thanks Henrik for the photo!
Another uncommon failure point is the rear pins, as picture below. Around 2007 a few poorly made pins made it into the retail channel and were subject to breakage. You’ll probably not encounter this, but if you do, the repair usually involves swapping both your rear heel units to a later version.

Dynafit heel unit with broken rear pin.

While it's fun to mount superlight race type bindings for general touring, be aware the superlight 'race' type bindings may not be suitable for heavy use. This one probably broke during a fall, but could have been fatigued from heavy use. If you want a lightweight binding system, we recommend using a stronger toe unit and combining with a lighter heel unit. Many tech binding brands allow such customization with a bit of home engineering such as riser shims and such.
HOW TO PREVENT TECH BINDING DAMAGE AND FAILURE
A few minor maintenance routines and use techniques will prevent most problems with tech bindings such as Dynafit, Plum, G3 and more bindings. If you have high mileage bindings, GENTLY tighten the screws holding the top plate, and in the case of the Dynafit Comfort do the same to the screws underneath the red volcano heel riser. The thimble bushing in all tech bindings should be lubricated and checked for wear every year or so. As mentioned above, you get to this by removing the lateral release spring cap (again, be careful not to cross thread the cap when you replace).
Be aware that any type of wear in a tech binding can cause a chain-reaction to failure. For example, if you wear out a thimble bushing the binding will develop excessive play, this leading to wear and wallowing out of the heel unit housing, in turn possibly leading to cracking or breakage.
Be aware of corrosion; when done with a trip store your skis in a place where the binding can quickly dry rather than sitting there damp. Avoid getting road salt into the binding (as from a rooftop rack or skiing a roadside plow berm). Salt eats aluminum. If you do get salt into the binding at the least wash them with fresh water. As for technique: With Dynafit Comfort and Vertical models, when rotating the binding heel with a ski pole do so with care — it should flip between positions with very little force. If you use ski brakes, squeeze the brake closed with your hand when rotating the heel unit from alpine mode to touring mode, as the upward force of the brake retractor is harsh on the binding.
Another important item regarding backcountry skiing binding longevity: Quite a few people have told me that instead of carefully setting their release tension, they just dial it up to maximum and don’t look back. Avoid cranking your release settings to the max unless absolutely necessary. A binding skied with a DIN of around 7 or 8 will release before placing much stress on itself. Crank it to 10 and the binding has to absorb an immense amount of force to effect a release. For that matter, your joint tissue might do better with some care about release settings — do you really want to add the POP sound of an ACL injury to the day’s soundtrack? Dynafit bindings and most other tech brands have a smooth reliable release and little problem with pre-release when adjusted correctly, so try using a DIN setting that’s not in the stratosphere. (Tip: some skiers will find they tend to pre-release more in upward (vertical) release than to the side. In this case dial up your vertical release setting a bit, but leave the lateral alone.)
Same goes for using the Dynafit touring release lock while in downhill mode. While this might be wise while extreme skiing in fall-you-die terrain, it’s most often unwise because you’ve effectively locked out your safety release in the event of a fall or avalanche ride. Not to mention the stress placed on the binding toe unit in such situations, as without safety release something will have to give.
Lastly, if you’re a large person and backcountry ski aggressively, we don’t recommend you use the Dynafit as a cliff hucking alpine style binding. Dynafits are tough, but not as tough in alpine mode as a crossover binding such as the Marker Duke — or for that matter an alpine binding. In other words, as with any other gear you use in your life, it’s wise to not expect ski equipment to do everything. Most tech bindings are purpose-built to be light and efficient for ski touring. They are not alpine bindings (though starting around year 2012 bindings such as Dynafit Beast began attempting to provide both alpine performance and tourability in equal measure.)
We have Dynafit bindings in our family that have seen hundreds of days use over four or more years, and are still going strong. Conversely, we’ve had a few problems such has the Comfort volcanos breaking off. Let’s hear your Dynafit stories — be they carnage or success. Comments on!
(More details about Dynafit in our famous FAQs and other web publications.)
Shop for Dynafit ski touring bindings here.
WildSnow.com publisher emeritus and founder Lou (Louis Dawson) has a 50+ years career in climbing, backcountry skiing and ski mountaineering. He was the first person in history to ski down all 54 Colorado 14,000-foot peaks, has authored numerous books about about backcountry skiing, and has skied from the summit of Denali in Alaska, North America’s highest mountain.


