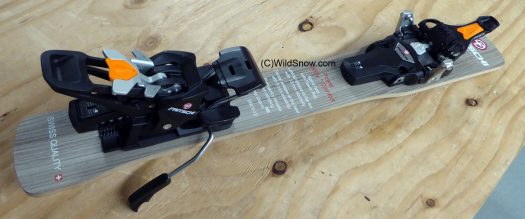
Our test rig. Tecton on Black Diamond Route 95.
Mounting Tecton seems easy at first, but get ready for a test of your mental cognition as you assemble the brake with the heel unit. This will definitely be worth a special blog post for the DIY crowd, though shop employees who get a few practice sessions under their mitts should have no problem.
The brake comes in three parts you have to puzzle together. I’d reverse the assembly right now for a video, but it’s so technical I’m afraid doing so could result in a situation like that first time I tried to rebuild my Jeep transfer case (result involved cardboard box, no more shall be said). I need to ski these things, not fiddle with pieces and parts.
(Upgrade note: I actually did swap my Tectons to a pair of planks that were hosting Vipecs, so I’ve got some experience. Tecton toe unit uses same hole pattern as Vipec or Vipec-Evo (indeed, it’s probably the same though we’re not entirely sure). Heel plate appears to be the same as that of the Vipec, but powers-that-be told me not to use the Vipec plate but to remove it and install the plate that came with Tecton. The Tecton plate I used had a different screw pattern than Vipec (same width but longer), so I drilled a new set of heel holes. I have not gotten clear on whether I have a demo plate and the regular Tecton plate uses same screw pattern as Vipec, or if you’ll always need new holes. When I clarify this I’ll update here and our Tecton FAQ.)

All hail, Tecton.
Setting Tecton forward pressure is confusing as well. Doing so involves first getting a rough boot length adjustment that allows the boot to snap in. You then set the adjustment screw so it’s flush with the housing. I wasn’t totally happy with that, so I suspended the ski to simulate flexing in a turn, and observed forward-back action of the heel unit as well as how the boot snapped down during step-in. A few half-turns of length adjustment got me satisfied.
No reason to get redundant. Below is the video we made last winter showing mode changes etcetera. Still does the job. Note how the binding is easily moved from downhill to touring mode, with the boot heel snapping the brake pad down. That’ll of course be sensitive to ice buildup. As always, I have to wonder if hardcore tour skiers might often be better off just running Tecton without the brake.
Out of the box weight: with 100 mm brake and screws, 678 grams. What’s that mean? Compare to another major brand “freeride” tech binding with brake but without the alpine-like heel, at 642 grams. Only 36 grams (1.3 ounces) for that impressive Tecton heel unit? That’s some mighty high-level engineering.
And, ta da, I whipped up a Tecton mounting template for you DIYers out there in radio land.
On to the testing:
I got out on the Tecton a number of times. As expected, they have that “heel hold” feel one comes to ask of a hybrid tech binding without rotating heel unit. I’m not sure this improves my skiing one iota, but it nonetheless couldn’t be bad (and of course eliminates a possible mode of accidental release). Major lateral travel at the toe (same as Vipec Evo) is beautiful. Combine that with the tricky tricky hidden nibs that insert in the boot heel tech fitting, as well as alpine-like heel clamp, and you have a binding that’s probably about as resistant to accidental release as anything else out there; alpine or touring.
First thing you notice with Tecton, in the field, is switching the modes and heel lifters seems way too complicated. At least at first. But after you fool around a bit, motivated by your wife jogging up the hill ahead of you, you’ll get it down.
Flipping the heel lifters requires the “personalized” methods most other bindings require. That is, you might have a ski pole with grip that does well, or perhaps a pole basket that’s just right, or perhaps you’re just fit and flexible enough to reach down and use your hand. Nothing new here.
As with all most recent of the Vipec binding persuasion, step-in at the toe is much improved though still slightly fiddly. You get used to it, and yes Virginia if you’re skiing sections of flat terrain totally inappropriate for a freeride binding you can switch modes between downhill and uphill (and reverse) without removing your boot from the binding.
How about the down? I’m still here with shoulders and skull intact after skiing at “normal” release values, so I suppose I didn’t pre-release. That type of reliability is what I expected. Beyond that, what’s to say? I’ll repeat, they skied solid; felt like an alpine binding.
Loaning the Tectons to a strong aggressive skier seemed like a good idea. You know, second opinion and all that… So I sent them out the door with Pete. His report:
“At first blush, Tecton appears rather finicky in appearance as well as in how they switch between modes (especially after dealing with simple tech bindings for so long). Messing with them on the bench at the WildSnow studio, I was thinking I’d never get these guys figured out but, like many things, once I was left to cognate on my own, it all came together quickly.
They uphilled nicely. Getting my toe in and secured was can-do-it-in-the-dark simple, and the big label WALK on the toe piece mechanism left me knowing I was very clearly locked and good-to-go.
Getting the heel piece in proper uphill position was rather easy, but wearing gloves while doing this might be advised as things do go “snap.” Managing heel lifters was easily done with a ski pole when pushing them out of the way to flatten my stance, but deploying the lifters with a ski pole required a dexterity I do not possess so I bent my over-worked body and deployed them manually (which without a glove on proved easy but if you’re wearing a mitten or heavy winter glove might prove not so pleasant).
Switching the Tecton to ski mode was easy, but as a rookie I had to pay special attention to the heel piece and remember it works like a standard alpine binding. That took all of two seconds. Stepping in was simple, skiing down felt very secure (set at DIN 7 lateral, 8 vertical) but never once did I think, as I cruised down pretty nice but at times chopping blue square corn at Snowmass, that I was at any risk of releasing.
I think for a side country or ski area binding Tecton will work well. They are clearly heavy, and complex compared to your basic tech binding (though weight competitive with the more complex “freeride touring” bindings). A lot to be pushing around the backcountry. As Lou alludes to above, you’ll have to decide if the downhill performance and possible additional safety of a Tecton is worth the significant weight penalty over basic tech bindings. Mainly, for the downhill skiing part of the equation they are very fine.”
Conclusion:
So far so good. Tecton delivers on the down, could be the holy grail of a tech binding that equals or surpasses an alpine binding in elastic travel, along with providing lateral release at the toe instead of heel. Brake concerns me not only because it’s tough to assemble during mount but because it seems a bit efforted in how it integrates with the uphill-downhill mode changes. That’ll be another blog post. For those of you who like to run without ski brakes, we’re assuming Fritschi will provide a stomp block. If not, the brake can probably be “trimmed.”

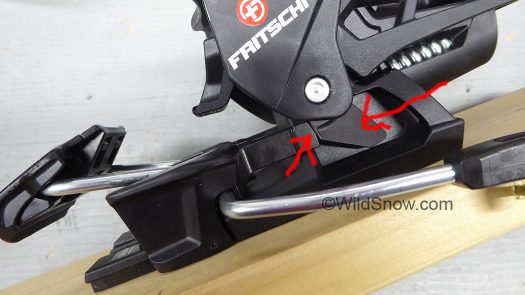
Tecton brake has a plastic prong (left arrow) that integrates with a cam (right arrow). This works with other pieces and parts to configure the brake for uphill or downhill modes. The brake stowage system seems like too much complexity and effort. If it truly works, through situations such as icing, dirt or heavy abuse, then shut my mouth. Otherwise, we’re hoping Fritschi will provide a no-brake option.
Tecton ski touring binding FAQ.
Tecton first look in our studio last winter.
Hanging out with Fritschi at ISPO Munich.
Tecton ski brake installation.
WildSnow.com publisher emeritus and founder Lou (Louis Dawson) has a 50+ years career in climbing, backcountry skiing and ski mountaineering. He was the first person in history to ski down all 54 Colorado 14,000-foot peaks, has authored numerous books about about backcountry skiing, and has skied from the summit of Denali in Alaska, North America’s highest mountain.
