Homebrew backcountry skiing binding install tricks and tips, mount the Marker Kingpin yourself!
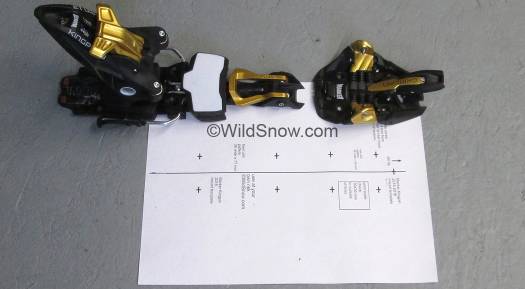
Marker Kingpin with WildSnow paper template. Instructions below may appear complex, that’s because we tried to be complete. Experienced mechs can do a much simpler abbreviated process.
Disclaimer: By using these mounting instructions and templates for ski touring bindings, you agree to not hold Wildsnow.com, its owners or associates liable for anything. We provide no support or help with using these instructions — you are on your own. Leave comments and questions below, but no guarantees for response. These instructions are based on using a paper template. Download and print at least 4 copies as you’ll scissor them apart in order to place on ski to locate binding heel and toe. If you’re new to ski work slow down and do a practice mount on a pair of dumpster skis or a 2×4.
The key with most tech binding mounting, including the Marker Kingpin, is to correctly set your distance between the toe and heel unit. Kingpin has a fairly large boot length adjustment range in the heel unit, about 3.5 centimeters. This makes the binding somewhat forgiving in where you place the heel unit, but you still need to get it within range. Instructions for doing so are buried below.
Tools and materials:
– Handheld screwdriver with #3 pozi-drive bit, mandatory, do not attempt to use phillips.
– Electric drill with sharp 5/32 inch bit or special ski bit (see notes below).
– Electrical tape, clear office tape, masking tape, and of course some duct tape.
– Sharp center-punch, with associated hammer.
– Straight steel or plastic “yardstick” type ruler.
– Tape measure.
– Fine point Sharpie type marker, color to contrast with skis.
– Epoxy, one-hour type prefered.
– Scissors, blank paper and paper punch
Wildsnow paper template (jig) for Marker Kingpin
Step 1 Make sure you know where the mounting mark (aka “sole midpoint”) is on your backcountry skiing boots. It’s usually a small vertical line, arrow, or triangle molded into the side of the sole about midway between heel and toe. If your boot isn’t factory marked, simply make a mark half the distance between toe and heel. Enhance the mark with your Sharpie.
Step 2 Find the boot mounting mark on the skis; usually a small triangle or line that’s at the midpoint of where you would imagine a boot sitting on the ski. Be sure you get the correct mark — if in doubt ask a shop rat or contact manufacturer.
Step 3 Using a marker pen (Sharpie) extend the boot mounting mark across the top surface of the ski. Eyeball this using a straightedge. If you feel challenged, you can align the skis with the edge of your work surface and use a large framing square to make the marks square to the skis. The idea here is to make an easily visible mark on top of the skis, for referencing the boot and paper template positions.
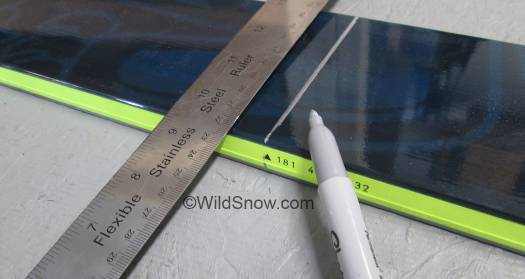
Find the boot position mark on your skis, intended to correspond with a mark on your ski boots known as ‘sole center,’ simply the point midway between boot heel and toe.
Step 4 Install a Marker Kingpin binding toe unit on a boot and place backcountry skiing boot on ski. Align boot sole midpoint mark with ski mark. Carefully press the binding toe down on the ski and mark the center of the front pair of screw holes (you are using the binding as a marking guide). Remove boot and binding from ski, make a couple of left-right marks across the ski showing the positions of the screw holes. Align your paper template with these marks. (THIS METHOD ELIMINATES THE NEED TO FOOL AROUND WITH MARKING THE “PIN” PIVOT POSITION, an ancient holdover from mounting nordic bindings.)
Step 5 Now the origami begins. Print the template (download links are at beginning of this article), and make sure it prints at 100% scale and that your printer doesn’t change it from 100% scale.
Scale of the paper template is easy to check. Print a template and simply set your binding on the paper, if the holes line up you’re good, if not, play around with your printer settings. Also check by measuring the scale check box printed on the template. Our templates are aligned to the ski by matching a longitudinal (tip/tail) center line you draw on your skis. Used correctly, it’ll result in a mount that’s more accurate than a mechanical binding jig.
Step 6 Make super-accurate center marks/dots (left/right) on your skis, about 12 inches forward and behind your binding toe and heel unit locations. These marks are important so take your time. You can make left/right center marks by eyeballing a ruler and double checking, or by using a drawing compass to measure from the edges, but our favorite method is to simply use folded paper as pictured belows:
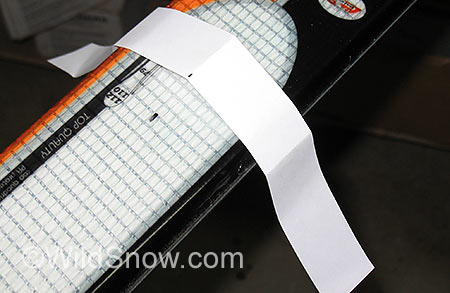
Using paper folding to find center of ski, left-right. To find center using paper, simply wrap a strip of paper around the ski, crease it over the sharp steel base edges, remove and fold in half using the edge marks as reference, then place back on ski and use the crease to locate center. While simple, work carefully (mainly, mark the spot on your ski where you place the paper, as moving it towards the tip or tail will throw things off because of the ski’s varied width.
Connect your ski center marks with a straightedge, Sharpie an accurate longitudinal center line. The idea is to create a long mark down the center of each backcountry ski in the binding mount area (in the tip/tail direction). Be sure this mark is long enough to go well past the mounting area of both front and rear binding units.
Step 7 Cut the sides off your paper templates so the screw location marks are near the paper edge, same for the template center line. The trick here is to align the paper with the marks you have on your ski. Line up the center lines, and line up the front screw locations. Take your time, and tape the paper securely to the ski.
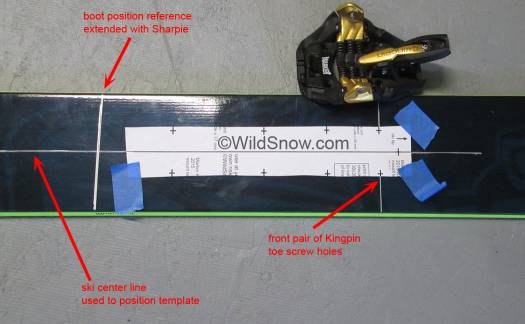
Template cut narrower and slightly shorter, positioned for front Kingpin screw holes. Arrow on template points towards the ski tip.
Step 8 Now the moment of truth. First, use a sharp finely pointed object to divot the paper template on the exact screw location marks, this mark helps locate your center punch by feel, as center punches are sometimes too thick to visually locate. Next, using your your sharp center-punch tool, lightly dimple the ski at the exact center of the screw marks. Remove the paper jig. Remove template from ski.
Step 9 Set the binding toe on the ski, use the screw holes as windows to check how your center-punch dimples line up. If they’re all good, punch them again. If necessary fudge a few by re-punching slightly off. Be aware you are depending on the paper template being aligned with the center-line you drew on the ski.
Chuck that sharp bit in your drill. (Using a sharp drill bit prevents the bit from wandering sideways while you drill.) Place a screw in a binding hole as if it were already in the ski, and use the protruding screw as a gage to to figure how deep you will drill. Tape a depth stop to the drill bit by wrapping tightly with electrical tape to create the stop. Drill the marked skis with minimal pressure, so you don’t mash the bit through a ski. If you’re new to the game, consider only drilling one pair of holes at this time.
Step 10 Lightly screw the toe unit onto the ski with two screws. Snug down the screws but don’t tighten aggressively, as you’ll be removing them again for final glue and tightening, (don’t use a power drill to torque screws unless you’re a tool ace).
Step 11 This step is a double-check. Snap a boot in the binding toe that’s screwed to your ski. Mark a center dot on the heel of the boot with your Sharpie, below the metal tech binding fitting, using the center of the tech fitting screw as a reference. Drop the heel of the boot onto the ski, and center the boot heel left-right by matching with the tip/tail center mark you drew on your ski in previous steps. (The idea here is to get the boot heel and binding toe-unit centered on your ski, mark everything well, and be able to keep rechecking it.) Carefully
Step 12 Remove the boot carefully without moving the binding toe. Study the screw holes. Several will usually line up perfectly. Install additional screws into those first. Do NOT heavily tighten the screws as you’ll be removing them again later for glue and final torque. Repeat. Snap the boot into the binding toe, drop the heel, and use the boot as a lever to nudge the binding so that the heel lines up with your center mark (while you do this, pull the front tab up to lock the binding in touring mode, so you can thrust the boot side-to-side without it popping it out of the binding). Keep repeating this process until the screws are snug, and the heel is lined up.
Step 13 What you did above was practice for the main event. Remove toe unit and all screws from ski, work epoxy into the screw holes, then repeat the process above to get your boot heel lined up perfectly with the center marks on your skis. Tighten screws. This is your permanent mount for the toe unit.
(Note, a more tedious but fool-proof process is to only drill one pair of holes at a time, and redo center punching if necessary to align boot with ski center. Also be aware that boots are not perfect, so check alignment with both boots and don’t fret if you find a millimeter or two of difference in terms of how the heels line up with the ski center line. If there is a discrepancy just average it out. In our case, we usually just grab one boot and go as we’ve found these discrepancies to be minimal in 99 out of 100 cases.)
——- PART TWO — MARKER KINGPIN HEEL UNIT MOUNTING
Okay, you’ve got both skis mounted with your kingpin binding toe units, the screws are glued and tightened, boot heels line up perfectly with your ski longitudinal center marks.
Step 1 This part is a bit tricky, but will turn out perfect if you are perfectly careful. The challenge is making sure your Kingpin heel unit is mounted the correct distance behind the toe unit.
) SET BINDING HEEL TO “SKI” MODE USING THE “FLIPPER” SWITCH THAT SLIDES THE HEEL UNIT FORWARD AND BACK. Not doing this will result in a completely wrong set of heel unit holes drilled in your ski.
) Binding toe is screwed to ski, heel of boot drops down and aligns perfectly left/right with your ski longitudinal center mark.
) Grab your pozi screwdriver and adjust Marker heel unit so the boot length adjustment is midway between the forward and back extremes.
) Cock (open) heel unit by pressing cocking lever down until binding opens into the same position as if you had the binding “open” so you could step in before skiing. Again, BE SURE THE MODE LEVER IS SET TO “SKI.”
) Set binding heel unit on your ski.
)With boot snapped into toe unit, drop heel of boot into the binding heel unit.
)Position heel unit so it’s LIGHTLY pressed up against boot heel. AGAIN, DO THIS WITH BINDING HEEL IN “OPEN” CONFIGURATION.
)Mark fore/aft position of heel unit screws.
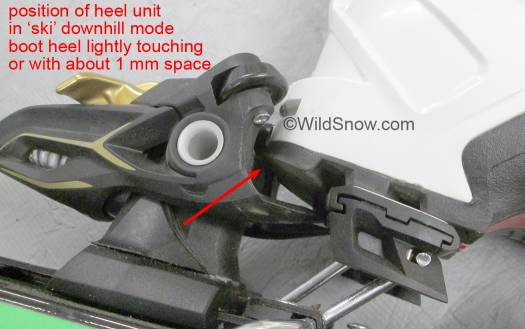
With boot attached to ski at the toe unit, slide the heel unit up to the boot heel and mark the screw positions. No need to jam things together here, just be sure the boot is lightly touching the heel unit, or has about a millimeter of space. You fill fine-tune this once the binding is screwed to ski.
Step 2 Lift the boot heel up out of the way and remove binding heel from ski. Using a straightedge draw Sharpie marks left-right across the ski, corresponding to the for/aft screw marks you just made.
Step 3 Grab one of the templates you printed out, cut it down so it’s slightly narrower than your ski, and cut the ends so the center-line on the template goes to the edge of the paper. Note the “5th screw hole” that the Kingpin heel unit requires. Locating the forward 5th hole as well as the 4 rear heel unit screw holes requires using a complete WildSnow paper template for each heel mount. This is all fairly obvious once you get going — and you can always print out more templates. Interestingly, with some mounts the 5th screw hole ends up on the ski boot center mark. Yes, interesting, but don’t use the 5th hole as a locator of any sort, just drill it where the template says to drill (after you verify location by setting the heel unit directly on the ski and observe all intended holes lining up with the actual physical binding heel unit.
Step 4 Place the paper template on the ski (remember to orient it via the “tip of ski” arrow on the template). Center the template left/right using the tip/tail line you drew in the center of your backcountry skis, and line up the forward screw line with that on your ski. Tape template to ski.
Step 5 Drop the boot heel down onto the ski and slide the heel unit back into place. Look down thorough the screw holes in the heel unit, and make sure they seem to line up nicely with those in the template.
If all looks good, remove the heel unit, lift the boot heel, check the location of the template to make sure it didn’t move, then center punch the screw holes.
Remove the paper template. Make another visual check. When satisfied, center punch all holes more aggressively.
Step 6 Drill the holes per drilling instructions in part one of this guide. To figure out which screw to place first, use the same process as the toe: Drop the boot heel onto the ski, place the heel unit into position, and eyeball which screw hole lines up the best. Get the boot out of the way, and place that screw first. Bear in mind you’ll need to adjust the heel unit boot-length setting to access the rear pair of screws. Put in only two screws at this time.
With two screws holding the heel unit you can now do the final alignment test. Gently drop the boot down and make sure the boot heel visually centers in relation to the binding heel unit.
Step 7 Remove all heel unit screws, place some epoxy or other type of ski binding mount glue in the holes, and run the screws back in. When placing the epoxy, wipe all excess off the top skin. If any oozes under the for/aft adjustment unit of the heel, it will harden and prevent fine-tuning.
Step 8 Fine tune your boot length “forward pressure” setting (BEWARE, doing this incorrectly is the source of many problems with ski bindings). This is done with Kingpin by placing boot in binding, with both heel and toe clamped into downhill mode. You then turn the black boot-length adjustment screw until the head of the screw is flush with binding housing.
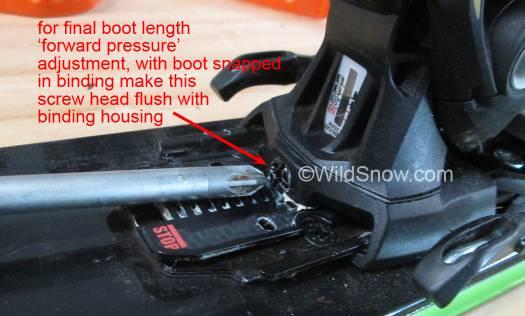
Final adjustment of Kingpin ski touring binding for boot length is done by turning adjustment screw until screw head is flush with binding housing.
Step 9 Set release values (DIN). With Kingpin (as with most “tech” type bindings) all safety release settings are done at the heel. Vertical release is the upper screw and number scale near the top of the cocking lever. Lateral (side) release is set via a screw that’s somewhat hidden under the heel lift flippers when they’re in the stowed position. Based on our testing and the fact that Kingpin is TUV certified to DIN standards, Kingpin should perform for you at your normal release settings. Nonetheless, use caution when first skiing the binding in case you need to tweak your settings.
Drill bits: Ski shops use special drill bits for drilling skis, usually 4.1 mm diameter for skis with metal layers, and 3.5 mm for skis without metal. If you mount a lot of backcountry skis, it’s a good idea to buy a selection of special drill bits from an outfit such as SlideWright. Along with such bits, buy a threading tool (tap) to thread the holes. In my experience, it’s okay to use the slightly larger 5/32 inch (3.9) mm) drill bit as suggested above, without a tap. If you do so, especially with non-metal skis, just be careful as you twist the screws in so you don’t over-tighten them and strip the holes, and use 1-hour epoxy in the holes since they’re slightly oversized. With skis that have a soft core and minimal binding mount reinforcement you can use the slightly smaller 9/64 inch (3.5 mm) drill bit size which is quite close to the standard ski drill size of 3.6 mm. To remove epoxied screws, lightly heat with soldering iron before twisting out, don’t use 5 minute epoxy as it’s brittle. Pozi screwdriver bits are also available from SlideWright, and mandatory if you want to do a decent job. Please see our article about ski drill bits.
WildSnow.com publisher emeritus and founder Lou (Louis Dawson) has a 50+ years career in climbing, backcountry skiing and ski mountaineering. He was the first person in history to ski down all 54 Colorado 14,000-foot peaks, has authored numerous books about about backcountry skiing, and has skied from the summit of Denali in Alaska, North America’s highest mountain.
