Disclaimer: By using these mounting instructions and templates, you agree to not hold Wildsnow.com, its owners or associates liable for anything. There is no warranty for these instructions, and no support. You are on your own.
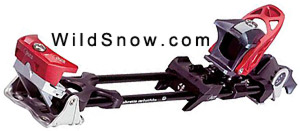
Silvretta Pure backcountry skiing binding.
To mount your Silvretta Pure backcountry skiing bindings at home, follow the directions below and use our carefully designed mounting template you can download here. Note the Silvretta Pure was initially quite fragile and eventually improved. Nonetheless, we do not recommend using and older ski bindings for actual skiing, these instructions are provided for historical background and museum/collection curation. Do not buy or use the older model, as it had durability problems. Silvretta Pure model identification details here.
(Warning: After downloading and printing template, compare to screw hole patterns on actual binding, as printing can sometimes distort the layout. If it doesn’t match, tweak printer settings such as scaling, which should be set to 100% or possibly “no scaling.”)
The keys to success with home binding mounts are careful measurement, going slow, and using the binding and paper template as a substitute for the mechanical jig used by a shop. Also, if you’re new to ski work consider doing a dummy mount on a pair of dumpster skis or a wood 2×4.
How to do the deed:
— handheld screwdriver with pozi-drive bit to fit screws that come with the binding (with care you can use a jumbo philips bit, but pozi is much better*.)
— electric drill with sharp 5/32 inch bit*
— electrical tape and clear office tape, and of course some duct tape
— sharp center-punch, with associated hammer
— long straight steel ruler (wooden yardstick is not straight enough)
— tape measure
— fine point Sharpie type marker
— 1-hour epoxy or ski binding screw hole sealer/glue
— paper templates
— scissors and paper punch
Step 1 Make sure you know where the mounting mark (aka “sole midpoint”) is on your boots. It’s usually a small vertical line, arrow, or triangle molded into the side of the sole about midway between heel and toe. If your boot doesn’t have it: Most of these marks are simply half the distance between toe and heel, just locate it by measurement. Enhance the mark with your Sharpie so you can’t miss it.
Step 2 Find the boot mounting mark on the skis; usually a small triangle or line that’s at the approximate midpoint of where you’d imagine a boot would sit on the ski. Be sure you get the right mark — if in doubt ask a shop rat, or call the seller. Using a straight edge, draw a left/right line on the topskin of your skis, matching the mounting mark. The idea here is to make the often obscure mark easily visible.

Use your long steel ruler to mark a tip/tail center line that extends well beyond front and back of binding. You’ll use this mark to align paper templates, so make it perfect!
Step 3 Continue doing layout marks. This time, make a nice long tip/tail center mark on both skis. THIS IS IMPORTANT, as our whole method of mounting depends on these marks being accurate. Measure across the ski and make left/right center marks a few inches ahead and behind the actual binding location. Connect the marks with your long steel ruler, then ink in a nice long tip/tail center line using a fine point Sharpie. You’ll use this mark to align the paper templates. Do it well!
Mounting backcountry skiing binding — making center line on ski.
Use your long steel ruler to mark a tip/tail center line that extends well beyond front and back of binding. You’ll use this mark to align paper templates, so make it perfect!
Step 4 Grab a Silvretta Pure backcountry skiing binding, adjust it for your boot, then snap boot into binding.
Step 5 Set the binding/boot combo on a ski, and align the mounting mark on the boot over that on the ski. I usually eyeball this. If in doubt, make a small square out of cardboard and use it to reach up from the ski to the mark on the boot. Again, take care that you get this exact to the nearest millimeter or so.
Step 6 On top of the ski, near the edge, carefully mark the for/aft location of the binding’s front screw holes. You’ll use this mark to line up the paper template. Using a straight edge and marker, extend this mark left/right across the ski top so it’s easily visible.
Step 9 Cut out the toe portion of the WildSnow paper template, leaving plenty of paper in front and behind screw marks, so you can line up tip/tail center marks accurately. Cut paper from either side of screw holes to make template slightly narrower than ski. Place paper template on ski with center marks aligned, and front screw mark aligned with screw mark/line you drew on ski. Tape template to ski once it’s perfect.
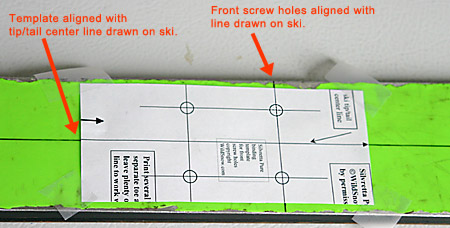
Front portion of paper template on ski. Template has been cut so it’s slightly narrower than ski, but long enough to show plenty of the left/right center location line.
Front portion of paper template on ski. Template has been cut so it’s slightly narrower than ski, but long enough to show plenty of the left/right center location line.
Step 10 Now the first moment of truth. Grab your sharp center punch, and dimple the exact center of the screw marks. Remove the paper template.
Step 11 Ahhhh, now, power tools! (But remember: measure twice = drill once, so triple check that your screw hole marks are spot on.) Chuck that sharp 5/32 bit in your drill. (Using a sharp drill bit prevents the bit from wandering sideways while you drill.) Place a screw in the binding (with the plastic shoe that goes under the toe unit) as if it were already in the ski, and use the protruding screw as a gage to to figure how deep you will drill. Tape a depth stop to the bit by wrapping tightly with electrical tape to create the stop. Drill your center punch marks with minimal pressure, so you don’t mash the bit through a ski.
(If you do totally klutz it and drill through a ski, it’s actually not that big a deal (repair with epoxy and P-tex), but it’s considered poor style — to say the least — and is none too good for your kitchen countertop. By the way, if you got the brakes for the bindings, put them on after you’ve done the mount, as they make it harder to work with the bindings.)
Step 12 Screw the binding to the ski using the front screws. Torque with care as not to strip the screw hole (don’t use a power drill to torque screws unless you’re a tool ace). Start by gently tightening one screw, then check how the rear of the plate lines up with your tip/tail centerline. Continue to tighten screws will checking alignment. If you’re confident about your mount, place epoxy in the screw holes before inserting screws. Otherwise, do a “dry mount” first and only gently tighten screws. Once you’re sure you’ve got it right, pull the screws, then re-insert with epoxy.
HEEL UNIT MOUNT
You now have the “plate” portion of the Silvretta Pure backcountry skiing binding mounted on both your skis. Time to mount your rear “heel” units.
Step 1 Cut out the heel portion of a WildSnow template. Cut sides of template so it’s slightly narrower than ski, cut front and rear off template, but leave plenty of the tip/tail center line so you can align it accurately with that on your ski. Notice that the heel unit template has a bold black mark, align ends of carbon fiber rails with middle of this line.”
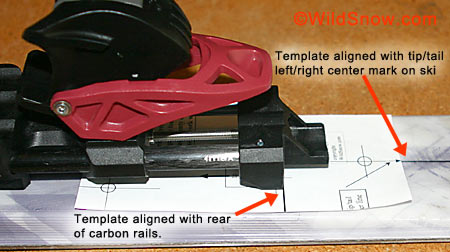
This method of mounting uses the main binding plate to locate the rear “heel” unit, so mount it first then use it to locate the rear template.
Step 2 Place template on ski, align indicated mark with end of carbon fiber rails, and center left/right by aligning template center mark with the one you drew on your skis. Tape template to ski once it’s perfect.
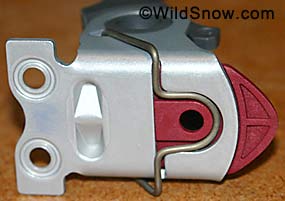
This shows correct assembly of heel unit before screwing down on ski. When unit is attached, spring should compress into slot. Check as you screw it down.
This method of mounting uses the INSTALLED main binding plate to locate the rear “heel” unit, so mount it first then use it to locate the rear template.
Double check location of Silvretta Pure backcountry skiing binding heel unit: Raise binding plate. Set heel unit on template, align screw holes, then drop binding plate. Rear of carbon fiber rails should be close to rear of screw holes in base plate. Also compare to photo above.
It’s crucial that the heel unit is properly located in relation to the binding plate, so take your time with this.
Disclaimer: This template is to the best of our knowledge accurate, but variations in binding manufacturing and user error may result in mis-located bindings. Check all dimensions before drilling skis, especially location of heel unit. WildSnow.com and Louis Dawson make no guarantee or warranty, express or implied, in the results of mounts using these instructions or our template.
Step 3 Use your sharp center punch to dimple the 3 screw locations, as indicated on the paper template.
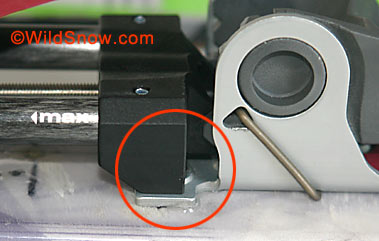
Heel unit is located such that rear of carbon fiber rails is close to rear of screw in base plate.
Step 4 Drill holes and screw heel unit to ski, use drilling and screw insertion instructions in part one of this guide. While attaching heel unit to ski, take care that small red plastic tab and metal spring are properly located.
Step 5 Test operation of heel unit. Clamp binding into alpine mode. Check all heel elevation modes.
Step 6 Refer to your user manual and complete all binding adjustments and give the epoxy 12 hours to cure.
