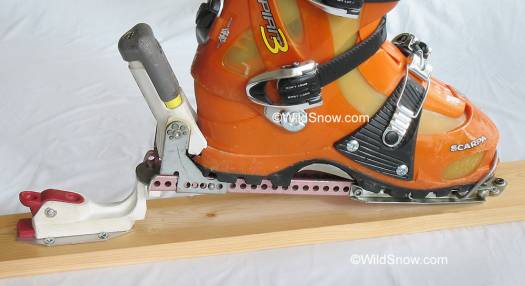
When it was first released in 1974, Paul Ramer’s “R” model Ramer binding was a revolutionary innovation in alpine ski touring. The R model introduced the concept of a heel lift for climbing, was lighter weight than any other offering of that era, totally field maintainable and more. All Ramer’s bindings (after the “R” came the “Universal” and ” MT2000″) were not without problems and quirks, however, so around 1986 Paul came up with a hybrid unit for Europe that solved some of the Universal model’s problems. The Comfort uses Ramer’s trademark toe mechanism that combines “safety” release with touring-walking pivot, but replaces the awkward and ugly heel clamp of his other models with a Look Nevada heel clamp release. Switching from locked heel to touring mode is accomplished with a simple sliding catch operated by pressing down with a ski pole.
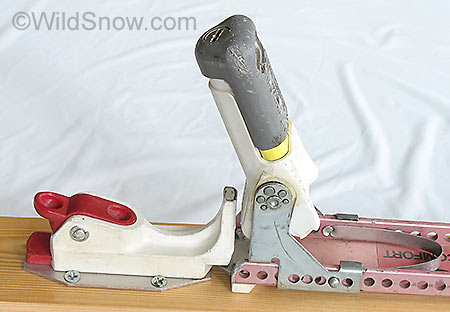
Look heel unit mounted with bracket, white unit to left is the walk-ski switch and heel lift. The Ramer Comfort heel latch mechanism is beautiful in simplicity. You just push down on the red divots with a ski pole tip, and it slides forward and backward to various configurations.
Ramer Comfort backcountry skiing binding had a normal step-in step-out heel clamp. It’s not a true step-in binding, however, as the toe wire will not stay elevated for placement of the boot toe while stepping in, so even with the step-in heel you still have to bend over and hold the toe wire up to enter the binding.
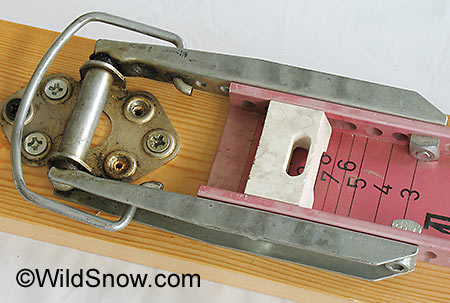
Pivot also provides lateral release on ball-socket joint.
Lateral (side) safety release was always a big issue with Ramer bindings. It’s not obvious how it works, accurate adjustment is difficult, and the mechanism has to be greased by the owner. Think of it as a tuning fork The steel bars shown above are the arms of the tuning fork. Each arm terminates at a ball-and-socket joint. The arms of the tuning fork act as springs, when lateral force is applied they flex and allow the socket joint to come apart. Adjustment of release level is done by moving the bolt in the slot visible in the photo. By moving the bolt forward the lever arm of the spring is shortened, thus making the release stiffer. Move it back and the release is looser.
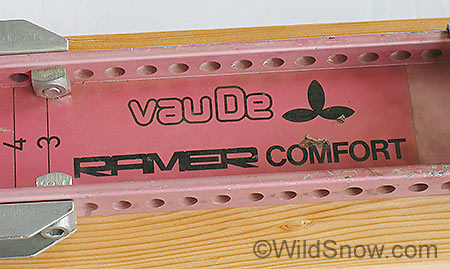
Logo is a sticker. Numbers to left are an effort at showing a lateral release indicator loosely based on the DIN release settings scale common to most ski bindings.
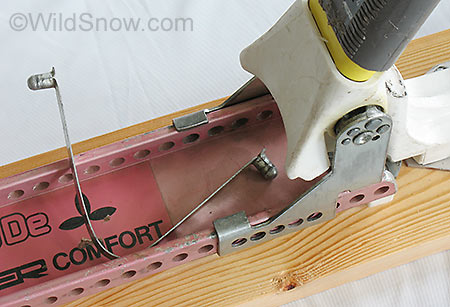
One of the most innovative and successful features of the comfort (and other Ramer bindings) is easy boot length adjustment. You simply squeeze the U shaped metal clip so the small nubs disengage from holes in the side of the binding, then slide the heel unit for or aft. Micro adjustment is accomplished by the holes on the heel unit being drilled in different frequency than those of the binding plate. This offers a finer adjustment than even some modern bindings.

Lateral release tension setting is done by setting position of this setscrew, farther forward results in higher value.
Weight: One binding with screws, 32.1 oz., 912 g
This binding was provided by Paul Ramer as a gear sponsorship to Lou Dawson, circa 1987 during his Colorado fourteener skiing project. Lou used the binding for a number of ski descents in the late 1980s; he was the first person to ski all Colorado 14ers.

Ramer Comfort binding thumbnail.

