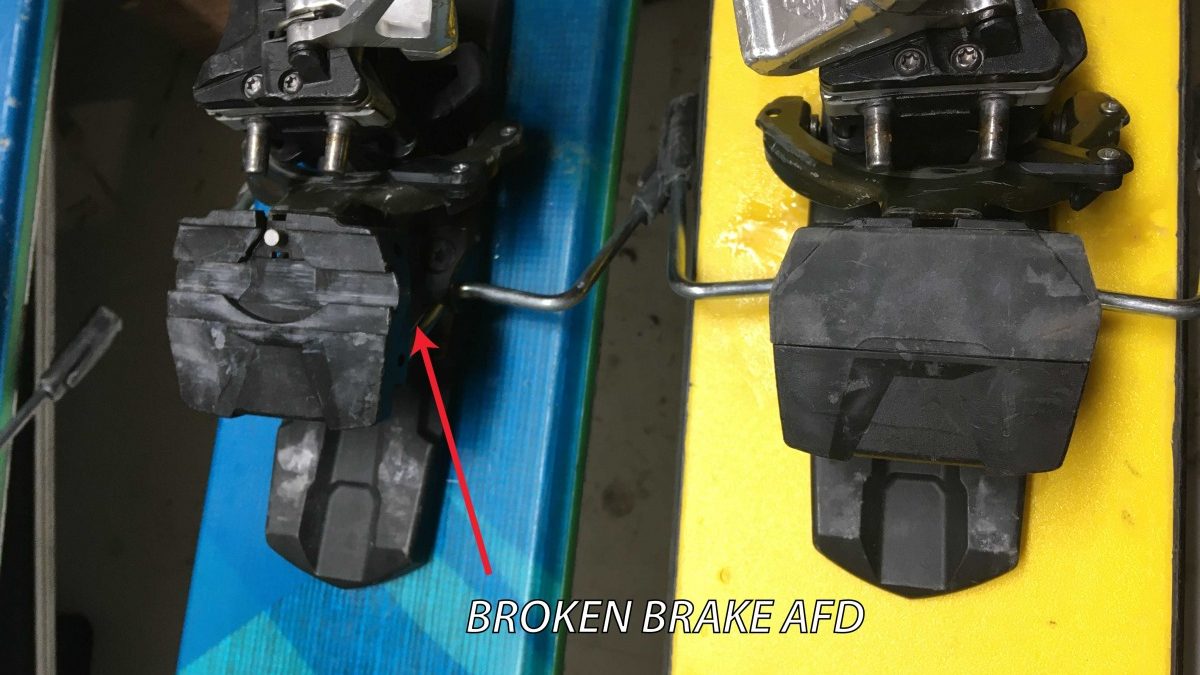
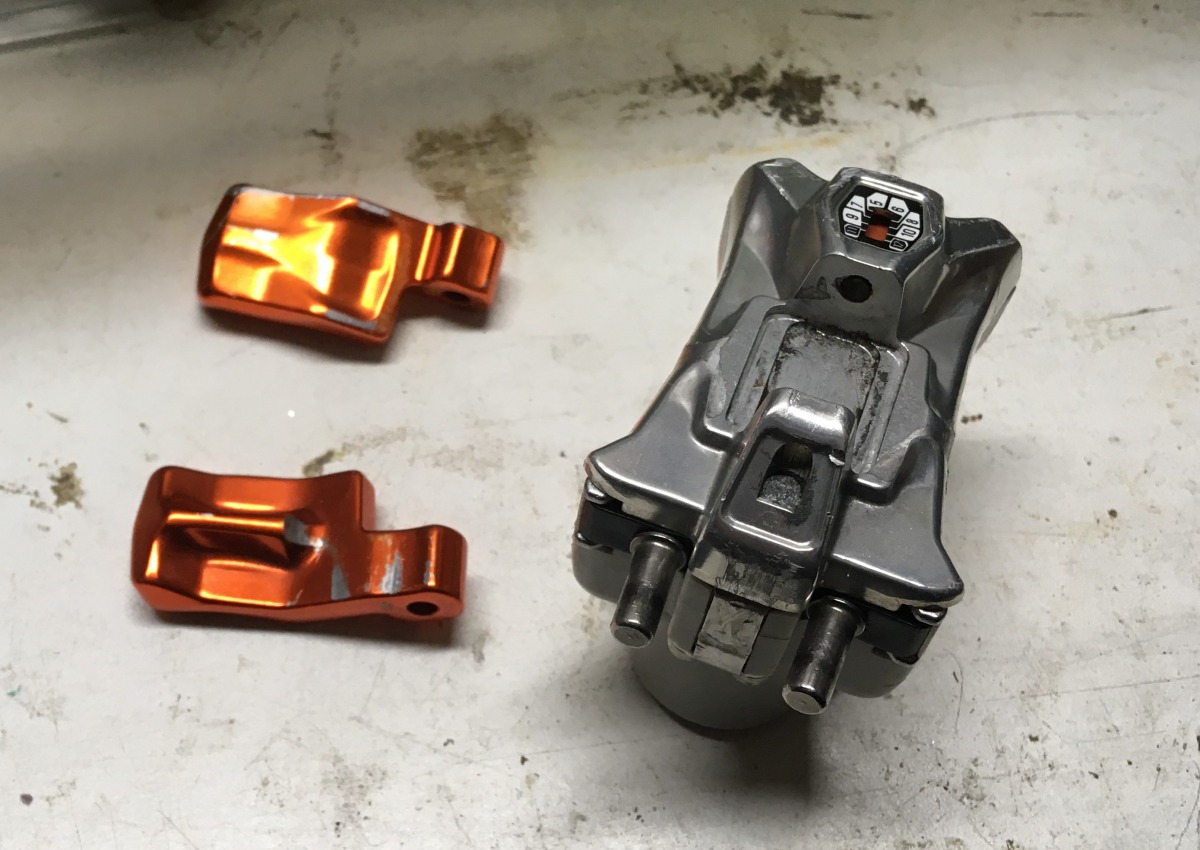
Broken/missing brake AFD. This isn’t a critical failure, and these bindings are still in daily use. However, the missing AFD could compromise the release of the binding, so it’d be best to replace the brakes.
In Part 1 of our DIY Tech Binding Inspection series we discussed basic things check on your tech bindings. Here we go deeper into common issues, and some solutions.
Common issues
How can a tech binding break? Let me count the ways… Lots of people are using tech bindings nowadays, and they keep finding unique ways of breaking them and wearing them out. However, there are some failure modes that are more common than others, and knowing about them can provide a nice basis for what to look for when inspecting a binding.
Missing screws
This may seem obvious, but it’s surprisingly common to see a well used pair of bindings with missing screws. Give the bindings a good look, specifically looking for screw holes that don’t have a screw inside. A good way to check is to compare two bindings in a pair. If a screw is missing, replace it. Replacement screws can be cannibalized from other bindings, or perhaps ordered from the manufacturer or a good ski shop. Know that some bindings have rather unique screws, while some don’t. And screw length has to be right. Engage the services of a ski mechanic if necessary.
Stripped screws
Along with missing screws, it’s common to find screws that are stripped. If you find any of these, remove and replace using various techniques to fix the stripped hole threads.
Broken screws
One of the most difficult fixes. Usually requires a pro.
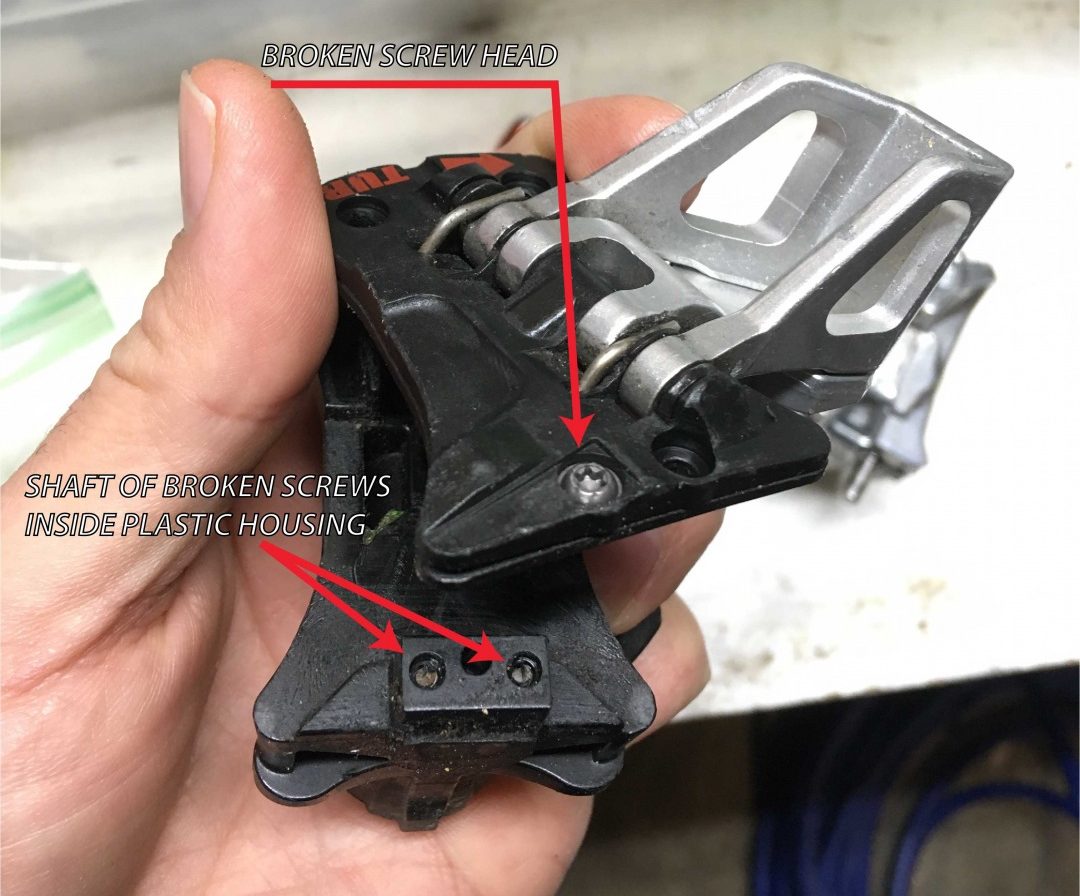
Broken screw visible on a binding. As you can see, the screw snapped (probably due to corrosion or stress), and the ends of the screws are still embedded in the plastic housing. Only the bottom unit (with the embedded screws) needs to be replaced. However, it may be easier to just replace the entire upper heel unit.
Broken top plate, or broken top plate screws
The “top plate” of the binding heel holds a lot of force from the release springs inside, and takes a lot of abuse from your boot heel slamming down on top. Because of this force, it’s common for top plates and their associated screws to break or crack. Because of the tension held in the release springs under this plate, when the plate fails the binding can literally explode, flinging binding parts into the snow, never to be seen again. Thankfully, catastrophic failure can be prevented ahead of time if you inspect your bindings carefully. See any cracks or deformation in the top plate? Or is the plate displaced upward, with a gap between it and the binding housing below? Fix or replace.
Broken/cracked heel housing
Similar to the top plate, there is potential for failure in the entire heel housing of the binding, which is usually constructed out of plastic and sees a lot of internal force from springs, as well as external forces. Any cracks or deformation call for replacement of the unit.
Worn out thimble bushing
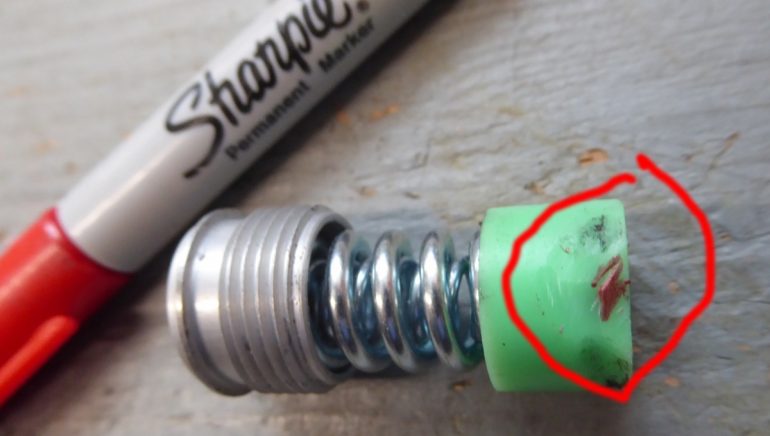
Typical thimble bushing and spring assembly, showing possible bushing wear. If you take a binding apart to inspect, beware of cross-threading the spring barrel screw during reassembly.
If your boot heel feels “loose” in your binding, or the heel unit wiggles or feels loose, this may be a symptom of a worn out thimble bushing on the horizontal release spring hidden inside the heel housing. This is fairly common part that often needs replacement on well-used bindings.
Stripped spring-barrel adjuster threads on heel unit
If you find the lateral/side release adjustment screw has become very difficult to rotate, or, conversely won’t hold it’s value, the threads may be stripped or cross threaded. This “barrel adjuster” is found on the horizontal release spring adjustment on many tech bindings, and similar parts are found on release mechanisms on many other types of bindings as well. Since this is often a metal part that is threaded into soft plastic, it is easy to cross-thread and compromise the plastic threads. This is only likely to happen if the release screw has been unscrewed completely, so this is only probable on bindings that have been taken apart, or accidentally adjusted beyond the lowest din setting. This will probably require replacement of the plastic housing (see below), but can sometimes be fixed with a threading tap, see here.
Broken or worn toe pins
Broken toe pins are rare on most bindings, are obvious (especially if you do a function check as described above). Likewise, worn-down toe pins are extremely rare, even in bindings that have been used for hundreds of days. However, this could be an issue with older well used bindings. Best to compare the shape to a similar binding to see if there’s any obvious change.
Brakes that break
Broken brakes are one of the more common functional issues seen with many tech bindings. Luckily this is “non critical”, it doesn’t affect the main functions of the binding. However, it is a good idea to keep an eye on your brakes. Luckily this is one of the easier components to replace, as many bindings have removable/replaceable brakes. Or, take the opportunity to lighten your load, and convert to the “brakeless” leashed touring lifestyle.
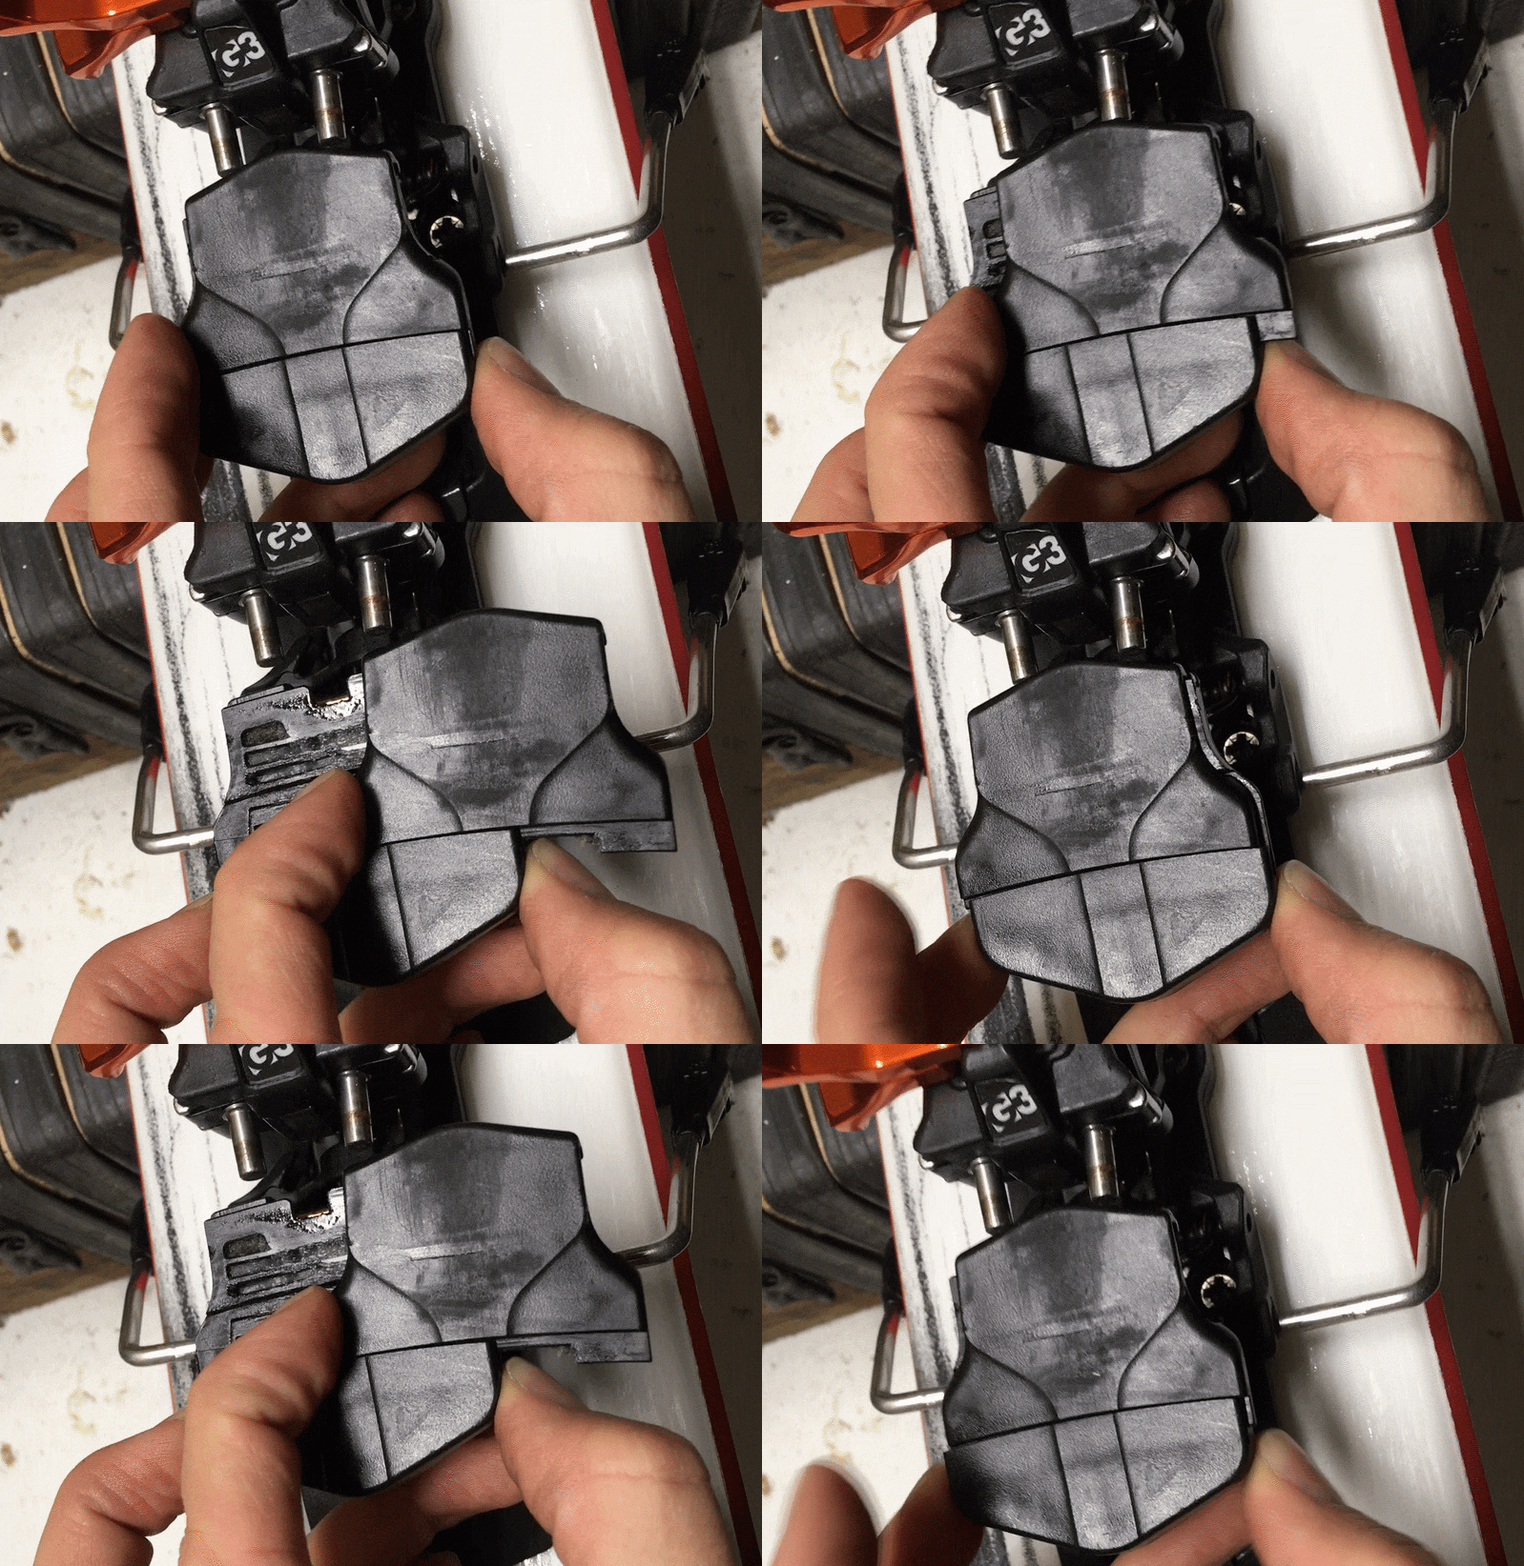
Check the function of your AFD by sliding it as shown. It should slide easily and smoothly, and snap back into place quickly when released.
Broken heel lifters
This is another common, and also non-critical item. A broken heel lifter can be a pain if it happens on a long day, so it’s best to nip the problem beforehand. Most heel lifters show signs of wear before the break, so field-breakage can usually be prevented. Look for any unusual movement in your heel lifters when there’s some weight on them (put your boots and skis on and have a friend take a look), and look for cracking.
A broken heel lifter can usually be prevented ahead of time by keeping an eye on signs of wear indicated by unusual movement.
Basic fixes
Replacing or tightening screws
Loose or lost screws are one of the most common binding issues. Replacement screws can often be found at the local ski shop, or cannibalized from an old retired pair of bindings. Removing screws is easy, just remember to be gentle; bindings are delicate. When putting the new screws in, be extra careful, as most screws are threaded into plastic, so they are easy to over tighten and/or strip. If you find screws that are impossible to remove, or are broken, you may need to replace the entire binding heel unit, using a new set of holes. Or you may need a “screw extraction,” which can be highly technical and failure prone, and best left to a pro.
Replacing the “heel unit”
The most common broken binding elements are all located on the heel unit of the binding. This means that often the best way to fix a binding is to replace the entire heel unit. It is quite easy to remove the heel unit, and often a replacement can be ordered from the manufacturer, or through your local ski shop. To remove the unit, simply back the “barrel adjuster” screw all the way out, and remove the springs, thimble bushing, and any other items. Then lift the housing off the heel tower. Or, it can be best to unscrew the heel unit from the ski and swap everything out. Be careful to keep everything clean and organized, I like to store the small parts in a zip-lock bag. Reverse the procedure (being careful to not cross-thread the threads) to attach the new unit. The heel unit removal process is the same used for lubricating the binding, a nice description of that process can be found here.
A few more helpful links
Evaluating tech binding release
Make sure the issue isn’t a tech fitting issue
Dynafit heel gap
Marker kingpin
Louie Dawson earned his Bachelor Degree in Industrial Design from Western Washington University in 2014. When he’s not skiing Mount Baker or somewhere equally as snowy, he’s thinking about new products to make ski mountaineering more fun and safe.
