(Editor’s note: Following is written as a how-to for Garmin GPSmap 60 series models, but the concepts work with nearly any handheld GPS. This is an attempt at a simplified and intuitive style of using GPS for navigation with no defined trail under your feet, and near zero visibility — and no pre-marked route or track.)
GPS, schmesh! I’ve been known to utter that neologism on occasion. Usually after I’ve nearly walked off a cliff in a whiteout while depending on the baffling readouts of that oh-so-geek-perfect icon of the millenium, the Global Positioning Unit.
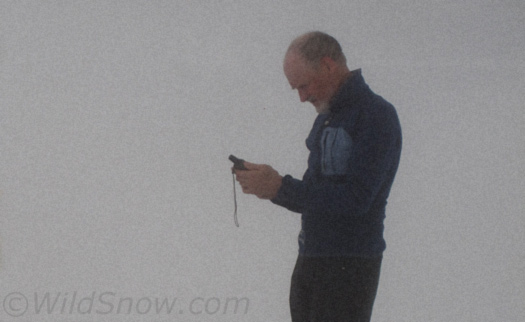
In the egg, intuitive use of the GPS is a nav method that could save your behind.
“Lou,” you say, “you’re acting like an idiot, those things are super easy to use!”
Maybe so when you’re on a defined trail tread and can see the sun or mountains above. But fly with that instrument rating hood (otherwise known as a whiteout) over your face and no route indicator on the land under your feet, and you may discover that staying close enough to your optimal route may be a bit confusing.
Forewith, a few things that’ll help you use your GPS intuitively, as if you had a paper topo map in front of you that was always perfectly aligned with the land under your feet, and showed your exact location. (Following is specific to low visibility navigation — a poorly addressed subject in most GPS how-tos. For the hundreds of other things you can do with your GPS see your manual and web sources).
Assuming you’re on a Garmin GPSmap 60 type handheld (other units have similar settings), rig it this way:
Prepare at home. First, you’re not going to be safely navigating mountain terrain in a whiteout or at night without a topographic base map installed in your unit (as in “wow, we’re walking 40 feet from a 1,000 foot cliff in pitch dark, follow me or die!”).
If your unit comes with preloaded topo maps, test at home to be sure they’re fine grained enough for real world navigation. If necessary, find free or purchase the best topo maps you can get for your area of interest, install in Garmin Mapsource software on your computer, then download relevant map sections to your handheld.
Next, at home, at the least create a few accurate trip waypoints in your Mapsource Software, then download to the GPS. (You can do this in other software environments if you want to geek out, but I’ve found sticking with Mapsource is much simpler (remember, this is a guide to using your GPS intuitively, if you’re interested in doctorate level GPS navigaiton tips, look elsewhere).
(I do plot and grab waypoints from Google Earth now and then, using the aerial photography to locate something better than could be done on a topo map. Likewise, I still use my USGS type topographic map software when I want the information that you can sometimes only get from those amazingly detailed maps.)
Optional: Create a route or track if you know the exact way and know your software well enough to do so, or download a trusted route or track. Caution, lots of routes and tracks on the web are made for summer navigation, or simply are done poorly. And remember, this blog post is about using GPS when you do NOT have a pre-installed route or track.
To be clear about GPS navigation, learn the diffence between a “route” and ‘track.” A route is usually an approximation of a trip, connecting points on the map (waypoints) with fairly long line segments that might work well on an ice cap or ocean, but are somewhat useless for mountain navigation. A “track” is virtually the same thing, only the points are numerous and the line segments tiny, thus making a breadcrumb trail that serves as an actual on-the-land way you can go.
Still at home, be sure your computer software is set to Datum WGS84. Geek alert, but important. Hundreds of “datums” exist, which are simply mathematical models of the earth’s sphere. What you’re using to work in Mapsource needs to match what your GPS is set to, which leads us to:
GPS settings (Use with Garmin GPSmap 60CSx but applicable to nearly any GPS handheld, menu directions for the Garmin included below.)
1. Datum setting on your handheld. on Garmin 60 press the Menu key twice to make sure you get to the main menu, then Setup/Enter/Units/Enter, scroll down to “Map Datum” and click Enter to pick your Datum. Again, usually WGS84 but could be something different if you’re working with data that exists under a different Datum spec.
2. While you’re in the menus, set your “Position Format” to something simple you can communicate over the phone or by texting, probably hddd.ddddd or UTM. (I prefer UTM.)
3. If you travel much in metric countries the arcane and confusing option of setting feet or meters labels for your maps is important to know. Perhaps it’s easier on other GPS models. For the Garmin 60 use the same menu sequence as above to reach the “Units” screen. You’ll see an option for “Elevation (Vert. Speed).” Confusing because you think it only sets your vertical speed readout to feet or meters? Confused me, anyway. But yeah, this is where you set things so your maps display elevations as metric or ‘Merican feet.
4. IMPORTANT. For no-vis navigation, set your map so north is always up on the LCD. Otherwise, as you walk the map will be constantly bouncing around on the LCD, making it difficult to visually reference what you need for direction of travel on the actual land.
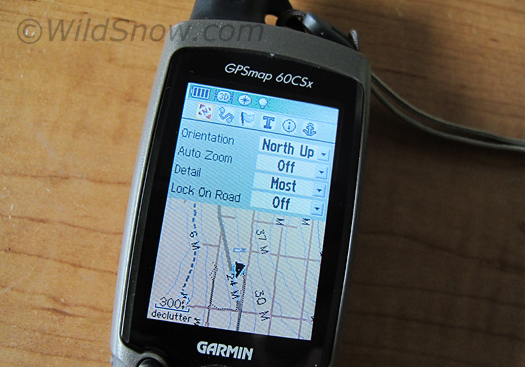
Some of the GPS settings for backcountry skiing map work, be sure to play around with the 'Detail' options to make your maps more legible in the field. Also, the 'Lock on Road' feature can be incredibly annoying, so keep it turned off unless you actually need it. 'North Up' makes the GPS behave like a paper map. Dozens of other important settings are available. Experiment. Practice.
Set north-up by punching the “PAGE” button till you see a map, then hit the “MENU” button. On the screen, go SetupMap/Enter. You’ll see an obvious scroll/up/down menu on the LCD, but what you actually want is to rocker move your cursor up to the funny icons at the top of the screen, which are actually sub-menus not just pretty decorations. Scroll left to the tiny “N” icon, then use the resulting menu to set North as Up.
Now, with “north up” your Garmin will behave more like a paper map, instead of a digital go-go dancer who looks pretty at the trade shows but requires medication.
5. Another gross obfuscation with GPS maps is how the map labels and shading can obscure the actual topopgraphic land forms like blobs of mud you’ve tracked onto you living room carpeet. When you see how poorly this is executed with most GPS maps, it makes you appreciate the art and craft of charts such as USGS or Swiss paper topos all the more.
Ah, but carpet cleaner exists. First, try running your map with “Declutter” turned on. Hit the “PAGE” key till you have a map displayed, then “MENU” and scroll to the menu option “Turn Declutter On.” Another thing I’ve found helpful is to turn off what is usually an effort at shading the map that simply looks stupid and makes it even harder to read. This is done by again going to that “Setup Map” menu, then using the icons at the top. I’ll let you figure out the details for a bit of brain exercise. Same place, you can tune the size of map labels, or even turn them off entirely.
6. Believe it or not, despite a zillion dollars worth of satellites racing through the heavens, a GPS that’s effective for blind navigation still needs a lowly compass. The one in the Garmin 60CSx model is lame but works just well enough to not cause you to gaze at the plastics recycling bin and think murderous thoughts. Later models such as 62 series are better, for example working without the unit being held horizontal, having less lag time and approaching the accuracy of a magnetic hand held compass.
7. One of the most confusing things about Garmin map navigation is the triangle shaped Position Marker. It seems to often point in random directions, especially when you’re stationary. As mentioned elsewhere here, the Position Marker generally points north and you can rotate the unit to match (with north set to UP), thus orienting your map. But not always. Our theory is that most of the reason for this is that the unit is switching between magnetic and GPS compass, with lag time that makes the Position Marker act funny. So, some IMPORTANT SETTINGS for that — and for some strange reason these are NOT located in the compass menu you get from the Compass Page. Weird? You bet. But here is how to get to those arcane options with a 60 series Garmin. Go to your main menu page by pressing the MENU key a few times, then use the rocker to SETUP, press enter, then rocker to HEADING and press enter. At the bottom of the resulting screen you’ll see “Switch to compass heading when below:” — leave the default 10 mh, but change the “for more than” to 15 seconds or less. That should take care of some of the weirdness. What you’re ending up with is the unit using its magnetic compass most of the time. That does take battery life (if desired you can turn mag compass off and on by pressing and holding the PAGE key), but when doing blind navigation you may be stationary quite a bit, so you want your unit to be using the magnetic compass most of the time to prevent lag and jitter of the compass based pointers.
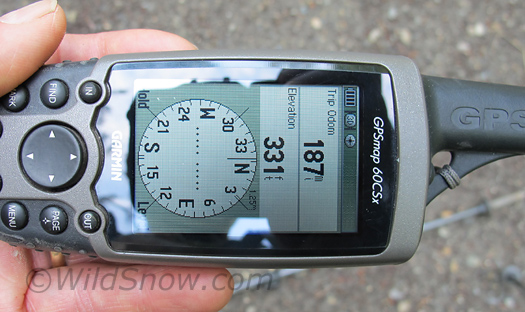
The infamous GPS compass. A couple hundred dollars and it's often less accurate than something you can get a the dime store.
As it were, the most frustrating thing about the Garmin GPS compass in my GPSmap 60 is how slow it is. In a critical situation, you need to know where north is NOW so you can quickly orient your LCD map with the land under your feet, then exit stage right, or left, or wherever the map tells you to go. Thus, I still see people who use a stand-alone magnetic compass in concert with their GPS. I’ve even considered taping a mag compass to my GPS (which wouldn’t work, because the GPS electronics’ magnetic field would mess with the accuracy of the stand-alone compass.)
Whatever the case, you and the GPS need to know where north is, and I mean _really_ know where north is. First, that means any time you move more than 100 miles or change batteries in the unit, you MUST calibrate the compass. Assuming you are on the Compass page, hit “MENU” then pick the “Calibrate Compass” option. You’ll be required to stand with the compass held level, then do two complete body rotations. Don’t click your heels. Do notice the funny looks you’re getting.
IMPORTANT: When the GPS compass is in magnetic mode it’s easily influenced by ferrous metals and consumer electronics. For example, in one test I held an operating digital camera next to the unit, and watched the GPS compass pointer swing nearly 90 degrees off true! An ice axe can do this as well, or other electronics and metal objects. For example, if you’re attempting to navigate while carrying an ice ax or whippet, you must keep those objects about 12 inches or more from the GPS to be sure they have zero influence. Of course, you really have no 100% certain way of knowing when the GPS compass is in magnetic mode as opposed to using the satellites for direction, so just assume you should never hold any object close that could malf the compass.
8. Simplify what you’re seeing on the GPS and how many pages are available. You could set one of these bad boys up in a way that it displayed so much data you’d want to throw it in the nearest crevasse before your cranium exploded. Instead, hit the “MENU” key a few times till you see the main menu screen, then go setup/enter/page-seq/enter. Nix any pages you don’t need to cycle through every time you use the page key, e.g., do you really need the “Hunt & Fish” page, or the “Calculator?”
My Garmin handheld GPS page sequence looks like this:
1. Trip Computer (set up so it only displays elevation, time and heading, in large sizes)
2. Map
3. Compass
4. Active Route (doesn’t show unless a set route is being followed.)
The idea is I only have to punch the “MENU” button a few times to reach any given page — instead of standing there like a mind numb savant grooving on all 15 pages one can have available for no reason other than to feel intimately connected to a constellation of sputnicks.
**********************************************************
Ok, now you’re ready for instrument rating. The key to accurately following a complex route on land, without landmarks or a trail under your feet, is to use the GPS as if it’s a paper map oriented perfectly to the land under your feet. You then take visual bearings off the GPS as it gives you nearly instant feedback by showing exactly where you are with its moving Position Indicator icon. (Even better, if you have a track pre-loaded, you can stay literally feet from the ideal of the track as shown on the LCD map.)
In situations without hazards, you can move fairly quickly. Just roughly visualize your direction of travel by watching the Position Marker move on the LCD map.
If hazards exist or your route is intricate, you move a bit slower, carefully watching how your movements conform to what’s on the GPS map. Doing this well is a bit more involved than just hacking your way along. Here is my method (written assuming you don’t have a pre installed track or route, but if you do you’ll still use the basic idea presented below):
1. Turn the unit on and hit “PAGE” till you have your map. Note how you can scroll the map by moving the cursor. Note the triangle shaped “position marker” icon. This is the key.
2. Know that your Garmin 60 series map has two “modes.” When you see the position marker, you’re probaly in “navigation mode.” If you use the rocker key to pan the map, the unit switches to “Pan Mode” and you can loose the position marker off the side of the map, thus breaking your navigation. Don’t panic, don’t cuss, just hit the “QUIT” key and you’ll bounce back to nav mode.
Above is one of the main reasons you don’t want a lot of pages to cycle through, since as far as we know the only ways to get the map to return back to nav mode is to cycle the map using the “PAGE” key, or turn the unit off then back on. If anyone has a shortcut for this, we’d appreciate hearing, as one of the biggest problems with this model Garmin is that the rocker keys get accidentally pressed while the unit is stowed, and you pull it out to find your map totally whacked and have to sit there pressing the Page key multiple times to get it back to showing your location.
3. During field practice, fool around with rotating the unit and watch what the triangle shaped Position Marker does. Depending on how your mind works, it might drive you crazy — or make sense. What the Position Marker does is eventually point exactly north as you rotate the unit, though it has a lag and other weird behavior that I’ve never been able to figure out.
4. So, to actually navigate blind, hold GPS horizontal like a paper map. Since the LCD map is stationary on the screen due to your settings (always has north up), as you rotate the unit the north pointing Position Marker will rotate over the map. What you want to do is rotate the unit till the Position Marker is pointed UP, then as you move, keep rotating to maintain that orientation.
By doing this, you’re using the north pointing Position Marker to help force the GPS map to stay oriented with the land under your feet. Thus, you can easily visualize which way to move to further your intended route.
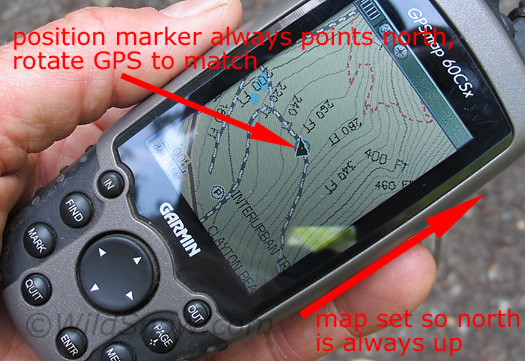
Position Marker on Garmin GPSmap points north if you rotate the unit horizontally. In this case, the map is not oriented (aligned with the land) but that can easily be rectified by rotating the GPS so the Position Marker points directly up (north) on the screen. It's quite obvious when you try it, but a bit difficult to explain.
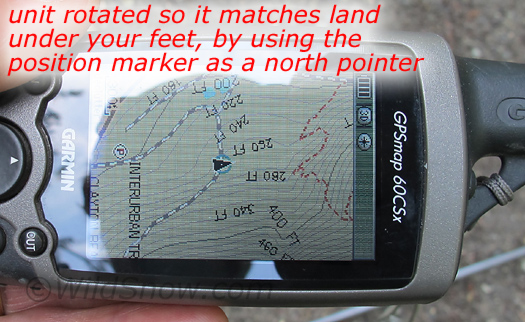
Oriented GPS, map, pointer and the antenna end of the actual GPS housing all point north.
Practice this anywhere. After a while, you’ll gain an intuitive feeling for rotating the GPS and getting it pointing north by lining up with where the Position Marker is pointing, or by using the compass page.
5. If in doubt about how well oriented the LCD map is, say, if you’re near a hazard or the Position Marker is driving you insane, stand still and switch to the compass page since it’s easier to see the compass in detail than the Position Marker (even though both work the same way in terms of how they point north). Rotate the unit so it’s pointed exactly north using the compass dial, hold steady, and flip back to the map page.
Know that (surprisingly) the compass in the 60CSx can be up to 5 degrees off, so be sure to get it as close as visually possible. (Newer models may be slightly more accurate.) In tricky situations, this is why using a magnetic compass as well may be wise, as a properly set up and used mag compass is far more accurate than 5 degrees, or even the 2 degrees of accuracy that some newer GPS compasses are said to have.
To clarify the above, visualize this: It’s pitch black night in a whiteout during a backcountry skiing trip. Your headlamp barely illuminates your feet. You’re standing on the top of a mountain, stationary. Cliffs drop to three sides, with a narrow ridge your only route on a traverse you must continue (thus, you’ve not following a marked return route). You hold your GPS steady. You can see the map and Position Marker, but without orienting the unit to the land under your feet you have no idea which direction to move to access the ridge. In fact, you don’t even know which direction to take the first step.
Unless you orient your unit to the actual lay of the mountain top and visualize which way you need to move, you’d have to move first and watch the Position Marker move. That’s ok, unless you step into the void. Better, use that little triangle or the Compass page to get your unit lined up, visualize which direction to move, then do so.
The best way to practice this sort of “intuitive map navigation” is to do a “GPS walk” anywhere you’re not on a set path (and you have maps loaded for). Use a large athletic field, for example. Keep your head down so you can’t see anything but the GPS, and attempt to navigate to a road intersection or building bordering the fields, as shown on the GPS map. Basically, imagine and attempt to simulate having zero visibility and no path to follow at your feet. At first, you may be surprised at how much random movement you can end up doing. But once you figure out how to keep the GPS oriented to north, so it matches the land under your feet, just go where the map indicates and watch the little triangle show your progress. (Zoom in for easy to see marker movement.) Bear in mind that in normal life, you probably will NOT be traveling a straight line, but rather navigating land forms that (we hope) are shown on the topo map you’ll be viewing on your GPS.
Funny, once you figure this out it seems easy. But for some of us it’s a long process that has to be learned on our own, since nearly all GPS tutorials are oriented to either following existing roads and trails, following “tracks” and “routes,” or else taking long straight-line movements such as done while boating. Practice, enjoy. GPS schmeeeesshhh? Perhaps not.
Shop for Garmin 60 series GPS.
Apology and warning. Sorry if the above is too sophomoric or crude for you GPS mavens out there. Yes, some of the advanced features in these units may allow blind navigation in different ways, but simplicity is gold, and the intuitive “map in front of me is better than a frontal lobotomy” method described above works. The warning: if you do venture into dangerous terrain and depend totally on your GPS unit for low visibility hazard avoidance, always have a backup. Never go without a compass and paper map. Better, be sure someone in your party also has a fully configured GPS. And don’t forget your spare batteries.
WildSnow.com publisher emeritus and founder Lou (Louis Dawson) has a 50+ years career in climbing, backcountry skiing and ski mountaineering. He was the first person in history to ski down all 54 Colorado 14,000-foot peaks, has authored numerous books about about backcountry skiing, and has skied from the summit of Denali in Alaska, North America’s highest mountain.
