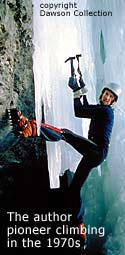
Backcountry ski gear to access ice climbs, how to.
It’s only a thousand vertical feet uphill to the ice climb you’ve picked for the day, but it is winter. Without skis or snowshoes, booting is your option. But the snow is soft and you post hole. Max heart rate is soon achieved. The slope steepens. You sink past your knees, up to your waist. Behind you is a four-foot deep trench you’ve dug with your hands. You wallow, curse, howl — even pray. Above you the prize looms … With fibrillating heart and the blood sugar of a diabetic coma, you turn and shuffle home.
Approaching winter climbs doesn’t have to be that way. Sure, you can boot to roadside wonders quicker than the jerk can pull your morning espresso. But to chase the remote big peaks, backcountry ice, or spring snow climbs, and you’ll need a method to move over snow — rather than through it.
Enter those time honored foot planks, otherwise known as skis.
Options, options
Skiing spawns a confusing array of gear, technique, and terms. Free-heel skiing refers to what’s often called telemarking or “tele,” and means skiing without your heels latched down, often using the genuflect-style telemark turn. But tele boots do not climb well, negating them for one-boot-does-it-all climbing approaches. Alpine touring randonnee (AT) equipment also frees your heels for climbing, with the added feature of latching your heels for the downhill. Randonnee boots are passable as climbing boots, but are too stiff around the ankle for serious ice or rock. Solution: A few AT bindings (i.e., Silvretta 404 and 505) also accommodate some plastic or leather mountaineering boots, making randonnee AT gear the best choice for climbers looking to ski in and out from their routes.
Planks
If you’re looking simply to approach climbs, go cheap. Buy a used pair of beater alpine skis at a ski swap or used equipment outlet, have them run through a tuning machine, mount AT bindings that will accommodate your mountaineering boots, and you’re set for approach style backcountry skiing.
The best length and width of an approach ski depends on your climate. For the average male climber, a ski in the 170 cm length range is a good bet. Don’t worry about width if you’re using the ski for denser maritime snow. But if your approaches involved deep unconsolidated fluf, you’ll need width — at least 95 mm underfoot.
If you catch the ski bug and want downhill performance, forgo the budget skis and get out your wallet. Specialized backcountry skis are carefully designed to save weight and cut blissful arcs in all kinds of snow.
More, if you enjoy the skiing you may want to use AT ski boots for the apparoach and descent. In that case, carry your climbing boots in your backpack, or climb in your ski boots (lighter softer models of AT ski boots are fine for moderate snow and ice climbing, and stiffer models work as well if you’re motivated).
Boots and bindings
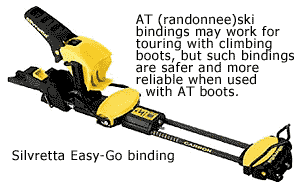
To build your setup, find a Silvretta binding with a 'toe wire'.\
Climbing boots are not compatible with all AT bindings. They only work in toe-wire bindings such as some Silvretta models. More, you’ll want to make sure your climbing boots have the correct heel height to work with an AT/randonnee binding, usually around 32 millimeters. See this diagram or check by simply comparing to a randonnee boot. This dimension has some flexibility, the final test being simply placing your boot in a binding and seeing if it works. If your climbing boots don’t have high enough heel, install a shim on the part of the binding that supports your heel.
The biggest concern in using AT binding with alpine climbing boots is that the safety release of backcountry skiing AT bindings is not designed to protect ankles in soft boots. So ski conservatively and consider not latching down the heel of the binding (this reduces leverage if you fall. Make sure your boot has enough welt to hold in the binding, just as you would for a step-in (e.g., clip on) crampon.
It is not uncommon for alpinists to use randonnee ski boots for the climb, especially at easier grades. But if you want performance, forget the fantasy of having ski boots that work as climbing boots.
Poles
A plethora of backcountry oriented fixed-length and adjustable ski poles are on the market. Adjustable models include those with a flick-lock length adjustment and those that twist. Flick-locks tend to be more reliable.
For the budget-minded, buy a pair of used alpine poles at a swap. Pole length is important. For downhill skiing size your sticks at about elbow height when you’re in street shoes; measure by inverting the pole and grasping just under the basket. You can tune adjustable poles for the terrain (using unequal lengths for traverses, for example). Some poles are available with snow-climbing aids, basically miniature ice-axe heads (called “self-arrest grips”), which are useful for climbing low-angled snow. Grips of this sort instill false confidence on steep, icy terrain, however, so when in doubt use real ice tools.
Climbing aids
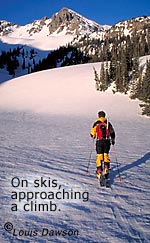
On the backcountry skiing approach.
Some of the finest minds on earth have spent their careers designing devices to help skis go uphill. So far, the best muscle-powered solution is the climbing skin, simply a furry strip of fabric attached to the bottom of the ski. The fur naps to the rear, thus sliding forward and resisting backward movement.
They’re called skins because the first, invented more than 500 years ago by Northern Europeans, were merely strips of animal pelt lashed to their planks. Today’s skins most commonly attach via multi-use adhesive, but some attach with straps. Stick-ons are preferred by most backcountry skiers for their ease of attachment and reliability; the main disadvantage is that it’s easy to contaminate the adhesive during removal and re-application. Climbing skins are available with different pelts. Mohair (goat-hair on a fabric backing) lacks durability and traction. Nylon is stronger and climbs better, and is your best choice for an approach setup.
Ski crampons (used in combination with skins) are essential for an approach rig and useful for all types of ski mountaineering. These clever devices snap on and off your skis in seconds — they can change a brutal, icy climb into a stroll, and ease your mind above cliffs and crevasses. Most ski crampons lift up and down with your bindings, others stay fixed to your ski. The latter type are more secure. B&D Ski Gear is a good bet for ski crampons you can mount on just about any rig.
Get down
Downhill skiing can be an exquisite sport, but only if you avoid mashed cartilage and shredded ligaments. Forget the moshing extreme skiers you see in the movies (they don’t film the months of sheet-time between takes). The key to safe skiing is staying on your feet and being conservative. That’s easy for an expert, but is it possible for a newbie?
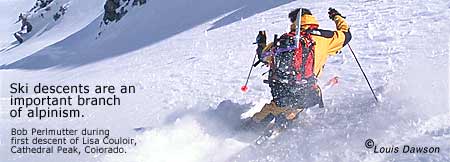
You might be a climbing zealot, but we'll bet the down will hook you as well.
It takes several years, with many days on snow, for the average athlete to become a competent downhill skier. But you can learn the basics in a season. The keys are spending time at a resort, having experienced friends to slide with, reading how-to books, and perhaps taking some lessons. If you ski only to approach climbs, learn “survival downhill,” and don’t forget to practice with that nagging backpack. Stick with basics, make staying on your feet a goal, and you’ll soon be stable enough to get down from a climb or move gear on a glacier. The essentials:
Kick turn: If any single technique defines survival skiing, it is the kick turn. You use it to link traverses going uphill and down, and it helps you reposition in tight situations. To perform on a descent, get your skis exactly perpendicular to the fall line. Stomp a stable platform. Look downhill and plant your poles behind you. Lift up your downhill ski, rotate it 180 degrees, and set it down. You’re now pretzeled, with your feet pointing nearly opposite directions. Lift your other ski, rotate, and align your feet. For ascending turns, rotate your uphill ski first (known as an uphill kick turn). With skis in the 180cm length range kick turns are easier than they sound. Start your practice at home on carpet, then graduate to the slopes.
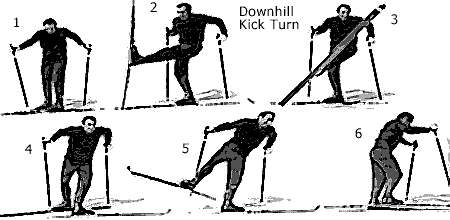
Kick turn, THE basic manuver for backcountry skiing.
Traverse: This is the basic motion that leads to all controlled downhill skiing. By linking a series of slow traverses with intervening kick turns, you can get down almost anything. Learn on low-angled slopes. Stand with your skis across the fall line, edged in so you’re not sliding. Position your uphill ski slightly ahead of your downhill ski. Release your edges with an ankle roll and push with your poles. Let gravity pull you along, while using your ankle and ski position to keep you on a controlled glide. Challenge yourself by traversing ever steeper and rougher terrain; soon you’ll be scooting across the most radical runs at the resort. Stop your traverse in the middle of the most heinous terrain you can find, and execute a kick turn. Now you’re ready for anything.
Sidestep: Uphill, downhill, or flat ground, the sidestep is incredibly effective. To execute it, simply step to the side without crossing your feet. This technique will get you down a couloir no wider than your skis, allow you to climb — albeit strenuously — without skins, and save you from all manner of hairy situations. The key with sidestepping is elegance. Move precisely. Sidestepping is easiest with your heels attached to your skis, so latch your AT bindings for this maneuver.
Sideslip: The sideslip involves releasing your edges while you are standing with your skis across the fall line — you skid down the slope. At advanced levels you can sideslip down just about anything. Precision is key. Don’t graduate too rapidly while you’re learning. Master each slope angle with a slip so exact you can drop down the fall line with only inches of fore/aft movement. You get that control by using micro ankle rolls and subtle pressure on the tip and tail of your skis.
Snowplow: Last on this list of survival ski techniques, but perhaps most important, the snowplow is usually the first turning position learned in alpine or telemark skiing. With good reason. It can be used as a turn, it’s a great way to stop, and it yields a controlled downhill glide that’ll get you down amazingly steep terrain.
First, practice a straight running snowplow on a low-angled resort slope. Point your skis downhill, and spread the tails apart with heel push. Make a wedge with your tips and edges. Done correctly, you can stand still without sliding. Release your edges with an ankle roll, and you’ll start gliding downhill. Experiment with edge pressure and angle, and you’ll see why it’s called a snowplow. Challenge yourself with ever steeper terrain, and you’ll be surprised at what you can plow down. The trick for steep terrain is to control your speed. Keep it super slow — often slower than walking. Once you’re comfortable with going straight, try the snowplow turn by moving a bit of weight to one ski.
Observe the ski patrol working a toboggan down the steeps. You’ll see them sideslipping and snowplowing, while moving at a speed so slow it’s painful to watch. That’s survival skiing.
Getting up
You’ll be able to climb with skis and skins the first time you try, but efficient ascension involves as many subtleties as going downhill. At home, practice applying and removing skins (stripping fur) until it’s second nature. If you know you’ll be using your skins as soon as your car is parked, put them on at home. But don’t store your skis with the skins stuck on, as a chemical reaction can sometimes occur and leave slime on your ski bottoms.
Fur care: Stick-on skins cling like industrial magnets to dirt, tree branches, and your hair. To prevent sticky nightmares, store each skin glue-to-glue. To apply, hook the tip-loop over a ski then pull the skin apart as you apply it. To remove, pull about half from your ski tail, fold it glue-to-glue, then do the other half.
Extreme angles: Climb the steepest angle you can without awkward and inefficient motion, but know that the key to efficient uphill with climbing skins is to NOT obsess on how steep you can charge uphill. A somewhat gradual climb involving longer traverses is frequently much more efficient. Maximize traction by keeping your ski flat on the snow and not wobbling from edge to edge. Snap on your ski crampons if the going gets icy or your skins are slipping.
Sticks: Use your poles for balance, keeping one planted to the rear to catch you if you slip. Use your legs. Muscling on your poles for uphill progress will tire you out and may cause elbow tendonitis.
Flatlands: Wax your climbing skins by rubbing on alpine wax for glide on low-angled terrain or in sticky snow. For short sections of hard-packed flats, leave your skins in your pack and skate.
Foot travel: Vibram soles can be more efficient or safer than skins in certain conditions. If your path starts looking like a low-angled ice route, or a flat trail is rutted and hard-packed, try stowing your skis on your pack and using your feet and possibly crampons.
Uphill kickturn: As with downhill skiing, the kick turn is essential for climbing. The downhill version described above will work as a direction changer when you’re headed up hill. But the uphill version is easier and better once you master it. Assuming you’re starting from a climbing traverse, plant your poles firmly and stomp out a small platform. Once in a secure stance with no possibility of a back-slip (the key), lift and rotate your uphill ski to your new travel direction, then follow with your downhill plank. Experiment with pole positions and slope angle, and you’ll rapidly figure a technique that suites the flexibility of your hips and knees.
Okay you non-skiing climbers out there, that’s about it for the basics! Just beware of one thing (I can testify, because it happened to me), once you get set up with decent gear, you might end up liking ski mountaineering more than straight climbing. You have been warned.
WildSnow.com publisher emeritus and founder Lou (Louis Dawson) has a 50+ years career in climbing, backcountry skiing and ski mountaineering. He was the first person in history to ski down all 54 Colorado 14,000-foot peaks, has authored numerous books about about backcountry skiing, and has skied from the summit of Denali in Alaska, North America’s highest mountain.
