I’ve been working on another Onyx post. Rather than publish as another blog, with this great comment string in mind I figured I should just add part two to this post. So here you go:
Part Two
G3 Onyx ski binding final development was done by releasing a beta non-retail version last year. Doing a public beta is a risky endeavor. You might receive useful feedback, but people’s impressions of the beta tend to become gospel, achieving a perverse immortality on the internet despite the fact that the very problems encountered in beta can be (and often are, unless you’re Microsoft) resolved in the production version.
With those thoughts in mind, I took the time a few days ago for a lengthy conversation with G3 so I could get clear about which beta lessons schooled the production version. Here is more of what I learned (also see part one, below), as well as some of my own impressions.
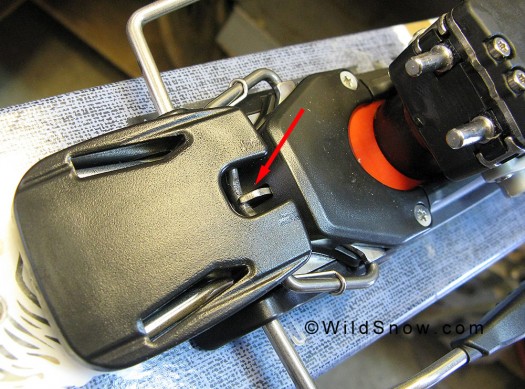
First, I did a visual comparison of my 2009/2010 production Onyx to my beta version. The two bindings are nearly identical, but a pair of ribs on the production version heel housing make ID fairly easy (one of the heel lifts rests on top of these when it’s not in use).

Onyx binding heel, showing reinforcement rib that exists on production version.
In my view, getting into the binding is still Onyx’s biggest issue. You open the toe by pressing down with a ski pole on the tab in front of the toe jaws. My beta version required what I thought was a ridiculous amount of force to do this. Other skiers agreed, and so did G3. So perhaps the most important tweak in the retail version is less force required to open the binding. More, aside from being easier to open, my production binding seem to be easier to HOLD open — which is the important aspect of this entry method.
In steep or awkward situations, having to hold your binding open while getting your boot in is in my experience problematic. So making the Onyx easier to hold open is good, but why is my spidy sense tingling and telling me there is still room for improvement or even a different methodology? The future will tell.
Other improvements: Heel lifts that are more stable, and that click into position with a positive feel. Latch that switches from tour to downhill and back has a more obvious “snap” when it’s in position.
All above is fine and good, but in my view the big thing is G3s retail version of ski brakes. G3 admits that developing brakes for the Onyx has been a challenge (they had to send out a service kit to dealers for the first generation brakes), but it appears they’ve got something functional that’s impressive for a freshman effort. If you’ve wondered how they were going to make a brake that stayed true to the “change tour/alpine modes on the fly” feature of the Onyx, here is how it works.
When in alpine/downhill mode, the brake functions in similar fashion to most other ski brakes. An actuator pad rides under you heel, keeping the brake compressed and retracted until your boot leaves the binding, thereupon the brake extends and hopefully stops your ski from flying back to your pickup bed at the trailhead (you hope).
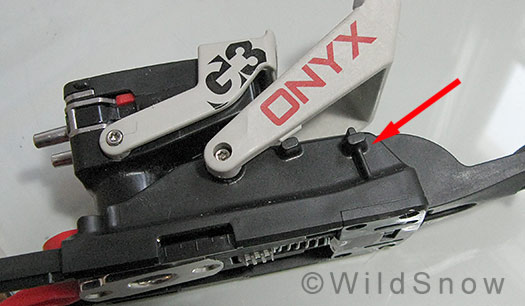
The cool trick is how the Onyx brake folds up and stays there for touring mode. It is really quite simple, but must have been a bear to engineer. What happens is when you shift the heel unit rearward for touring mode, a tiny catch is positioned that hooks and holds the brake the first time you press down on it. So once you switch to tour mode you step down once on the brake, it catches and stays closed, then you flip up your chosen heel lift and start your climb. When you change back to downhill mode, the tiny catch releases and you’re back to having a normal type of ski brake.

Brake catch indicated by arrow is shown in touring mode, holding the brake closed. When you slide the heel unit forward into alpine mode the catch releases. Click image to enlarge.
I’ve got one concern with the brake. If any ice or snow jams in the brake when you try and press it down into the catch, it’s not going to click into retracted mode. Thus, in icy conditions you could quite possibly be back to the Dynafit scenario of taking your ski off to change to tour mode.
But my theoretical concerns aside, one has to applaud the sheer mechanical genius of how the Onyx brake works in concert with the binding’s mode change methodology. Indeed, while Onyx has been branded somewhat of a “me too” effort because it uses the now public domain Dynafit “tech” interface, the way the brake and heel unit work are definitely a unique departure that makes the Onyx easily stand on its own in terms of innovation.
It’s of course up to you, dear reader, to decide if Onyx features such as easy mode changes and the ability to swap between skis are deal clinchers. But these are things worth considering if you’re shopping.
We’ve got our production Onyx rig out in the field being used by various backcountry skiing testers. We’ll file a field report eventually. For now, whatever binding you are on, enjoy the spring ski mountaineering season!
**********************************************************************************************
PART ONE — Onyx and Dynafit Comparo — Toe Wing Tension and Prevention of Pre-Release (Published March 15, 2010)
Since the G3 Onyx has a weight penalty of 326 grams per binding (with brake and screws) over Dynafit FT12, in all kindness I’ve been trying for a year now to get a handle on why one would go with G3 instead of Dynafit.
Much of the reviews and PR surrounding the Onyx tend to harp on the fact that unlike Dynafit, you can very easily change modes from downhill to touring without exiting the G3 binding. To me, that’s like choosing a Ford over a Chevy because the key fob is easier to use for the Ford. Let’s get serious.
Firstly, the available G3 binding swap plates really are a nice feature. You can buy one set of bindings and with the purchase of additional plates swap your grabbers to as many skis as you like.
But more importantly, Onyx is said to be a beefier tech binding, with better release/retention characteristics than Dynafit. Is it?
In terms of beef, it’s obvious when you look at Onyx that some parts are stronger, most markedly the toe wings. If you’ve ever broken a Dynafit you might find that to be attractive. Thing is, the vast majority of users do not break Dynafits, so for most of us more strength just means more weight to haul.
So, on to the most important issue, that of release/retention.
Skiers, especially those of the larger stronger persuasion, are sometimes adamant about the need to prevent pre-release by locking Dynafit toe for their downhill skiing. Locking the toe basically results in super high side (lateral) release tension, but to be clear does NOT change vertical (up at the heel) release tension. For all but the largest and strongest skiers, downhill skiing with a locked Dynafit toe means you effectively do not have sideways safety release and you have dramatically increased your likelihood of being injured. Thus, locking the Dynafit toe for the down is a serious move, and for many skiers could even be called stupid (though locking either Onyx or Dynafit for fall-you-die extreme skiing is a nice feature).
Enter Onyx. In bench and field testing it’s pretty obvious the Onyx toe, while similar in exterior appearance to Dynafit, is somewhat different. It looks stronger and perhaps it is, but mainly, it has a more subtle yet to some folks an important difference.
To put it simply as I can, while downhill skiing on hard snow, larger skiers may be able to throw enough force at the Dynafit toe to start it opening or even pop it open. To understand this, look at how any tech binding toe closes. Snap it closed without a boot, and notice how the spring loaded mechanism under the boot toe pops down and goes “over center” to thus lock the pins onto your boot. It’s the same concept as snapping into a clip on crampon with a heel throw that goes over center on your boot heel. The tension this provides is enhanced and elasticized by the small barrel springs you can see if you examine the binding.
The question is, in the real world, how much side force on your boot toe does it take to open the toe wings of a tech type binding, and thus pre-release? Most people will never find this out. I know I have not.

Forces as indicated by arrows may cause pre-release of tech type bindings. Onyx (to left) is much more resistant to this force than Dynafit (to right)
Nonetheless, from time to time I speak to big strong skiers who adamantly claim they need to lock the Dynafit toe or it’ll open while they’re skiing. Some have figured out how to replicate such pre-release by wearing their boot and ski indoors and slamming the ski sideways on the floor. While initially taking this with a healthy dose of skepticism (since most people have no problem skiing Dynafits unlocked), I now feel this test is somewhat valid if it translates to something these folks are experiencing in the field — which they are. In other words, while any properly set ski binding can be made to pre-release if you abuse it sufficiently, I know enough about Dynafit to know these folks are not imagining things nor being obsessive.
Besides slamming your ski on the carpet (feel those knee ligaments stretch!), a more controlled bench test for this is easy. Stick a boot in either Dynafit or Onyx. Tilt the boot and ski on its side, then lean your body weight on to the boot toe, directly perpendicular to the long axis of the ski. With the ski on the bench you can press with your hands, or lay the ski on the floor with the tip propped up on something and yard down on the boot toe with everything you’ve got. With enough weight on the Dynafit rig you’ll see the toe wings begin to open, thus enhancing the possibility of pre-release. With the Onyx, no matter how much force I applied I couldn’t get the wings to budge.
My source at G3 claims “you simply do not need to lock the Onyx to to prevent pre-release. That applies to everything from high speed charging to cliff jumping.” I believe them. (Bear in mind we’re speaking here of locking the binding for downhill skiing. Both bindings should usually be locked for touring.)
That, my friends, is one reason why some skiers might favor Onyx over Dynafit.
WildSnow.com publisher emeritus and founder Lou (Louis Dawson) has a 50+ years career in climbing, backcountry skiing and ski mountaineering. He was the first person in history to ski down all 54 Colorado 14,000-foot peaks, has authored numerous books about about backcountry skiing, and has skied from the summit of Denali in Alaska, North America’s highest mountain.
