(This post sponsored by our publishing partner Cripple Creek Backcountry.)
Check out Part 2 of this series, where we focus on the “hybrid” ski touring bindings with alpine-like heels. Also see an earlier 10 hints and tips.
(We list a variety of bindings here, by intention we limited our selection to what we feel is best considered by newcomers to the sport; considering factors such as availability, standardization, not a first year product, and more. Suggestions welcome. This is a sponsored post with affiliate links, please see bottom of post for details.)
I was over at Cripple Creek Backcountry the other day (our local shop and publishing partner who this post was sponsored by), got into a conversation about the huge number of never-ever ski tourers taking up the sport. Seems a lack of basic knowledge plagues the newcomers — despite Google.
My theory: Ski touring is simply too complicated, with too many opinions, to be cut and dried. (Perhaps that’s why we blog?) No different from a lot of other things. Bicycle shopping? Figuring out your daily supplements and vitamins? Take your pick. We have quite a bit of “foundation” content here, but considering how rapidly we see the gear changing, getting a new basic how-to up every season or so seems worthwhile.

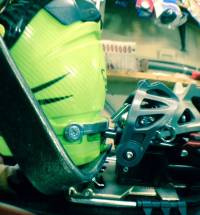
Salomon Guardian frame binding latched down for skiing downhill. Note how the toe and heel units are mounted on a “frame” or “plate.” Click to enlarge.
1. Know the difference between a “frame” binding and “tech” binding. The frame binding carries the binding’s toe and heel units on a frame (a.k.a., plate), the frame in turn has a front pivot that provides walking action. You unlatch the frame for walking, latch it down for making ski turns.
Tech bindings, often called “Dynafit” or “Low Tech” (after foundational brands of the industry,) substitute the boot for the binding frame. This little engineering tweak (eliminating binding frame) revolutionized ski touring by not only making bindings significantly lighter in weight, but by making it unnecessary to lift the weight of the binding heel unit during each stride.
Further, tech bindings generally have a toe pivot point closer to your foot than that of frame bindings, this helps with walking stride ergonomics. While frame bindings may appear “safer” or “stronger” than tech bindings, in my view there is no functional difference in safety or durability in either overall category. (Assuming all bindings are properly adjusted and used.)
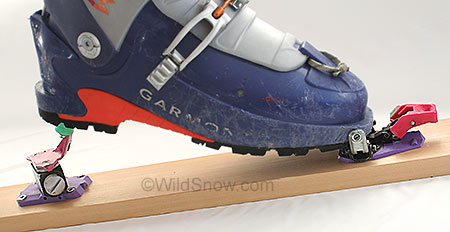
Complete 1993 Dynafit Tourlite Tech backcountry skiing binding shown above. The pink and purple color scheme is typical of late 1980s and early 1990s style. Note how the boot is suspended between the toe and heel units. This design philosophy is the foundation of all modern tech bindings.
See our ski touring glossary for lots of terminology — might as well start developing your ski touring language skills.
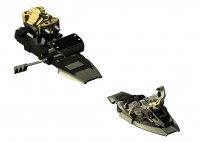
Current model Dynafit Radical 2.0 is a good example of a ‘free touring’ class ‘tech’ touring binding. “Gold” version shown here, most are black on black.
2. If you’re looking for a tech binding rig you can ski both on the resort, and backcountry, best stick with the “free touring” (our preferred term) or “freeride” class of bindings. Or perhaps a “frame” binding (see # 1 above).
Free-touring bindings are cleverly designed with cosmetics or additional parts that may appear more substantial than lighter weight binding versions, but in reality their two main distinguishing features are a:) they always boast ski brakes, and b:) some means whereby the binding absorbs ski flex with a spring loaded mechanism that allows the heel unit to move forward and back on a track.
A few free-touring tech bindings also offer additional upward heel elasticity (part of the release-retention system), valid if you ski aggressively but not a deal maker or breaker for most of us. We’ve done quite a bit of writing about these issues, for edification see How Elastic is the Plastic? and this post with a good video showing how the binding and ski flex interract.
Examples of free-touring bindings:
G3 ION 10 & 12
Dynafit Radical 2.0
Marker Kingpin
Fritschi Vipec Black

Marker Kingpin boasts more heel upward travel in the release-retention mechanism you depend on while downhill skiing, toe unit is virtually the same as most other tech bindings. We call this a “hybrid tech binding” as it uses the tech type toe but an alpine-like heel. New this season Fritschi Tecton is also a hybrid.
(Scolding prevention: Yes Virginia, some free touring bindings (notably Marker Kingpin) allow for significantly more vertical heel travel in the retention-release mechanism than most tech bindings. This only affects binding performance in downhill mode. Depending on your style of downhill skiing, this can be quite beneficial (for the hard charger) — or a non issue. My view is nobody, no one, not anybody, should ski a tech bindings as aggressively and carefree as they would an alpine binding. Learn to dial it back a little bit, minimize falling, and be aware of the consequences of an accidental release, i.e., getting pitched into trees at high speed, or getting launched down steep terrain. This dire take is changing with the rapid pace of binding innovation — but I’m telling it like it is, not living in the future.)
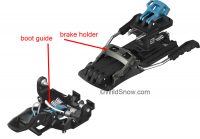
Salomon MTN binding (also Atomic Backland) exemplifies a modern ski touring binding. Brake is optional and works well if you prefer.
3. Know that any free-touring binding can tour, but touring bindings without brakes and built to be lighter are not free-touring bindings.
If you expect all, or nearly all your use will be for muscle powered ski touring, trend to the “true” touring bindings. Some of these have optional brakes, many have no available brake. Some touring bindings do have mechanical ski curve compensation, while others depend on the rear “pins” sliding in and out of your boot heel fitting. In our experience, most users find that a properly adjusted binding of either type works fine for human powered touring, albeit with the free-touring oriented bindings often being noticeably heavier.
Caveat: If you fall and trigger a binding release more than a few times a year, or are simply more comfortable with ski brakes, by all means purchase bindings with brakes. Going “brakeless” isn’t for everyone — on or off the resort slopes.
-
Examples of “true” touring bindings we recommend:
Atomic/Salomon Backland/MTN (Has what in our opinion is the most well designed ski brake on a tech binding, brake is optional).
G3 ION LT (A solid North American product we have on a lot of our test skis, though it has indeed had a warranty issue.)
Dynafit TLT Speed Radical (It’s been through some trials, be sure to buy lastest version as detailed here. Note, while we feel Radical 2.0 model is appropriate for experienced free-touring skiers, it has a rotating toe that’s problematic for inexperienced users. Latest model of this series, Rotation 10, is easier to use but new this season.)
Hagan Core (This rebadged ATK Raider 12 2.0 is clearly an expensive but very nice touring binding that’s also said to double for free-touring. Available brake is minimally effective though cleverly designed.)
4. Enjoy your baseball stats, but don’t get caught in the ski binding numbers hype. In almost every case, the “12” or “13” versions of bindings are virtually the same thing as the “10” versions. They’re often no beefier. Any mechanical differences are trivial. They won’t make you ski better. Only difference being that larger or more aggressive skiers can indeed dial up more release-retention force with the higher numbered version.
You’re immediately thinking: “That’s me!, I’m aggressive, see that number on my bindings?”
Avoid mental shenanigans. Nearly every ski tourer out there will be fine at settings based on standard “DIN” charts, meaning even if you need a few “notches” over chart settings a “10” binding will do you fine. If you’re the exception, you know who you are and you probably don’t need these shopping tips.
5. Avoid first-year tech bindings. It pains me to write this. I like new gadgetry as much as the next guy. But the history of tech bindings shows what I feel is an inordinate number of defective products that don’t become known until they’ve been in “consumer” testing for a season (or more). So buy what’s been around for a season or two. The prices might be better anyway. (Now you know why I use a 3-year-old smartphone — and you might even find me on 25-year-old bindings.)
6. Buy your bindings from a reputable retailer who obviously services the ski touring market. If possible, get your bindings mounted there as well. But trust no one. Upon first receiving your mounted bindings, immediately snap your boots into the toes and make sure the boot heel fitting falls centered on the heel pins. Also inspect the binding base plates — they should be snug to the ski. An on-the-bench function test should be performed as well, with your boots, and after that do a “carpet test” involving you in your boots, entering and exiting the bindings on the floor.

Backcountry travelers gather at Cripple Creek Backcountry to discuss the psychologies of avalanche awareness. Good brick-and-mortar retailers often do community outreach.
Retailing these days is constantly morphing. On the one side, you have your “online, straight to checkout” model, Amazon being somewhat the epitome. In between, Backcountry.com has online chat help and reasonable product information. Either can work when you’re certain of your shopping goals. However, your service oriented retailer — with brick-and-mortar as well as an online presence can often be your best bet if, as the blog title says, this is your first. Truthfully, there are not a lot of great great ski shops that carry touring gear. This blog post has an ongoing list of such, and our partner as well as sponsor of this blog post, Cripple Creek Backcountry, is doing a fine job of one-on-one sales style that’s particularly suited to the newcomer.
7. Following along #6, it’s mandatory you learn how to check and if necessary adjust your binding “heel tech gap” and your release-retention settings. Tech gap requires various methods and settings by brand and model, we have lots of how-to posts here at WildSnow, and most bindings have some sort of manual that describes the procedure. As for retention settings, most users begin with whatever they’ve used in the past. That’s fine, but there is no guarantee, including certifications that the numbers printed on a given binding actually match the numbers printed on your other bindings (in terms of actual spring tension). Scary, eh? Solution is to proceed with caution (do your first skiing in forgiving terrain), and dial you settings up a bit if you do tend to ski out of the binding. While not common, if your ski shop actually has a binding tension testing machine it doesn’t hurt to work with real-life numbers.
See our 10 tips to prevent tech binding accidental release.
8. But, and it’s a big BUT, if you do ski out of a binding, before fooling around with your release settings be sure you have a good guess as to why you took your (hopefully) brief flight. Many accidental tech binding releases are caused by icy or dirty boot toe sockets, or ice under the toe wings that doesn’t allow them to close completely on your boot. Mis-adjusted heel gap can cause “pre release” as well. Worth scolding that if you’re just cranking up your release value setting without knowing truly “why” you could just be setting yourself up for a broken leg or destroyed knee.
9. Don’t assume your bindings are ready to go every time you extract your skis from your rooftop box. Referencing what I wrote above, inspect your bindings often for impending breakage or missing parts. Past lessons: Brake “pedal” plates that go AWOL, screws in the heel unit that begin to back out, cracks in toe unit frame (super dangerous), broken heel lifters, and more possible nightmares too numerous to list.
10. In the tech binding world, sometimes a boot-binding-user combination simply does not function. Most commonly, sometimes a boot-binding combination doesn’t exhibit smooth release on the bench, or conversely, deliver reliable downhill skiing performance without accidental release. Less common, tech bindings are not for everyone. This especially true if you’re attempting to push your bindings to perform on-resort as alpine bindings. At the least, Check bindings with basic bench top moves you can do at home.
Important: I’ve encountered individuals who were simply not willing to make the commitment to tech binding idiosyncrasies such as ice cleaning, greater possibilities of breakage, finicky adjustments such as heel gap, sensitive release settings and so forth. If your use is mostly in-resort sans muscle power, consider a frame binding that mimics an alpine binding (Marker Duke), or just do what we recommend if you’re not doing a lot of crossover “sidecountry”: Ski alpine gear when you’re lift served, ski touring gear when you’re muscle powered.
Shopping Links (in no particular order, bear in mind we only do shopping links to bindings that are well distributed in North America):
Our top pick for the newbie needing extended advice and service is
Cripple Creek Backcountry.
Links to bindings on backcountry.com (Straight to checkout mail-order not recommended for sport newcomers.)
G3 ION(tech binding)
Salomon Guardian (frame binding)
If you want to ski uphill with a tech binding type system, but ski down on a full-on alpine system, I’d recommend exploring the CAST binding options. Heavy and fiddly, but the only system that is actually an alpine binding when configured for the downhill.
There you go, happy shopping! Please feel free to ask questions or help me improve the article, comments are open.
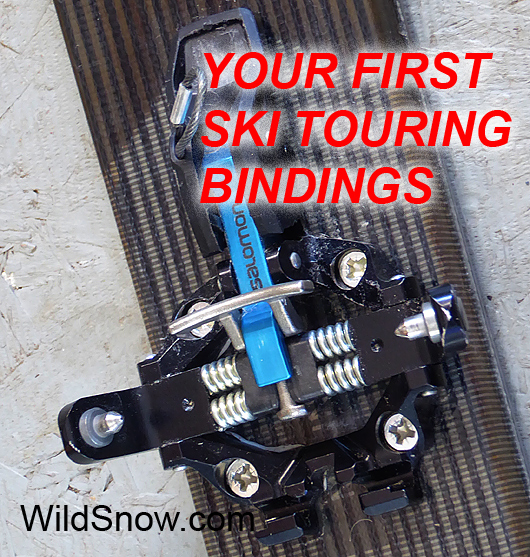
Your first ski touring bindings could be a Salomon, or Dynafit, or….?
WildSnow.com publisher emeritus and founder Lou (Louis Dawson) has a 50+ years career in climbing, backcountry skiing and ski mountaineering. He was the first person in history to ski down all 54 Colorado 14,000-foot peaks, has authored numerous books about about backcountry skiing, and has skied from the summit of Denali in Alaska, North America’s highest mountain.


