– The Backcountry Ski Site
  • Avalanches
  • Gear Reviews
    • Ski Reviews
    • Boot Reviews
    • Binding Reviews
    • Snowboard Splitboard
    • Book Reviews
    • Avalanche Beacon Reviews
    • Airbag Backpacks
    • Backcountry Electronics
    • Misc Gear Reviews
  • Podcast
  • Tips & Tricks
    • Ski Touring Basics
    • Boot Fitting
    • Fitness & Health
    • Gear Mods
  • Trip Reports
    • Fourteeners
    • Huts – Cabins – Lodges
    • Denali McKinley
    • 8,000 Meter Skiing
  • Stories
    • History
    • Humor
    • Land Use Issues
    • Evergreen Ski Touring
    • Poetry
  • Resources
    • All Posts Listed
    • 100 Recent Comments
    • Backcountry Skiing & Ski Touring Webcams
    • Ski Weights Comparison
    • Archives of WildSnow.com
    • Authors Page
    • Ski Touring Bindings
      • Trab TR2 Index and FAQ
      • Salomon Guardian & Tracker
      • Naxo Backcountry Skiing Bindings – Info Index
      • Silvretta Pure Backcountry Skiing Bindings – Info Index
      • Marker F10-12 Duke Baron
      • G3 Onyx Ski Binding FAQ
      • G3 ION Ski Touring Binding
      • Fritschi Backcountry Skiing Bindings – Info Index
      • Fritschi Diamir Frame Bindings Mount DIY
      • Fritschi Diamir Bindings FAQ
      • Fritschi Tecton FAQ
      • Atomic Salomon Backland MTN
      • Dynafit Tri-Step Binding 2001-2003
      • Naxo randonnee alpine touring AT ski binding FAQ
      • Dynafit Skiing Bindings – Info Index
      • Dynafit Binding Frequently Asked Questions FAQ
      • Dynafit Beast 16 FAQ Review 1
      • Dynafit Beast 16 FAQ Page Two
    • History
      • Ski Touring Binding Museum
      • Trooper Traverse Intro & Index
      • Randonnee Ski Touring “AT” ski gear — What is Hip?
      • Chronology
    • Backcountry Skiing Core Glossary
    • Gear Review Policy & Disclosures

– The Backcountry Ski Site

  • Avalanches
  • Gear Reviews
    • Ski Reviews
    • Boot Reviews
    • Binding Reviews
    • Snowboard Splitboard
    • Book Reviews
    • Avalanche Beacon Reviews
    • Airbag Backpacks
    • Backcountry Electronics
    • Misc Gear Reviews
  • Podcast
  • Tips & Tricks
    • Ski Touring Basics
    • Boot Fitting
    • Fitness & Health
    • Gear Mods
  • Trip Reports
    • Fourteeners
    • Huts – Cabins – Lodges
    • Denali McKinley
    • 8,000 Meter Skiing
  • Stories
    • History
    • Humor
    • Land Use Issues
    • Evergreen Ski Touring
    • Poetry
  • Resources
    • All Posts Listed
    • 100 Recent Comments
    • Backcountry Skiing & Ski Touring Webcams
    • Ski Weights Comparison
    • Archives of WildSnow.com
    • Authors Page
    • Ski Touring Bindings
      • Trab TR2 Index and FAQ
      • Salomon Guardian & Tracker
      • Naxo Backcountry Skiing Bindings – Info Index
      • Silvretta Pure Backcountry Skiing Bindings – Info Index
      • Marker F10-12 Duke Baron
      • G3 Onyx Ski Binding FAQ
      • G3 ION Ski Touring Binding
      • Fritschi Backcountry Skiing Bindings – Info Index
      • Fritschi Diamir Frame Bindings Mount DIY
      • Fritschi Diamir Bindings FAQ
      • Fritschi Tecton FAQ
      • Atomic Salomon Backland MTN
      • Dynafit Tri-Step Binding 2001-2003
      • Naxo randonnee alpine touring AT ski binding FAQ
      • Dynafit Skiing Bindings – Info Index
      • Dynafit Binding Frequently Asked Questions FAQ
      • Dynafit Beast 16 FAQ Review 1
      • Dynafit Beast 16 FAQ Page Two
    • History
      • Ski Touring Binding Museum
      • Trooper Traverse Intro & Index
      • Randonnee Ski Touring “AT” ski gear — What is Hip?
      • Chronology
    • Backcountry Skiing Core Glossary
    • Gear Review Policy & Disclosures
   

#1 DIY Project For Spring — The Wax Box

by Guest Blogger June 12, 2015
written by Guest Blogger June 12, 2015

Written by Jesse Morehouse

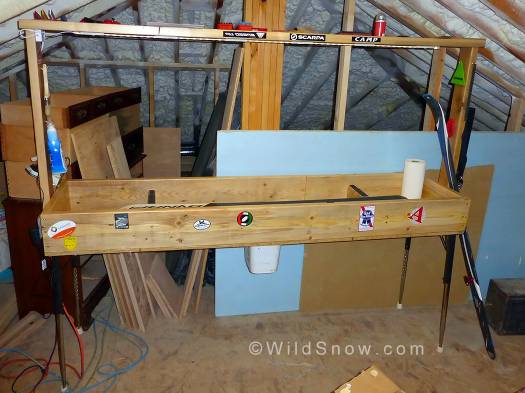
My new favorite piece of gear -- The Wax Box. Click images to enlarge.

My new favorite piece of gear — The Wax Box. Click images to enlarge.

I have always loved well waxed planks for backcountry ski touring. I enjoy the task of waxing but I have no garage and find myself either paying shops or bumming off friends for space to wax. Or, in a pinch I’d do it out back on saw horses or the wood pile — acts of desperation that result in horrible wax jobs.

I dreamed of waxing inside but couldn’t stand the thought of the mess it would create. Then I went over to a friend’s house who is a waxing fanatic to get some pointers. He ushered me into the cleanest waxing setup I’d ever seen, compliments of a waxing box.


The concept is ridiculously simple which is probably why I for one have never thought of it. Make a box that you wax in and you get no mess. Duh!

Nice and clean!
The basic concept is so simple I feel most folks could have me stop here and they would be fine. However, just for the sake of documentation and brainstorming, I’ll include basic dimensions (no hard and fast rules here) and some thoughts on tricking this bad boy out.

The Basics


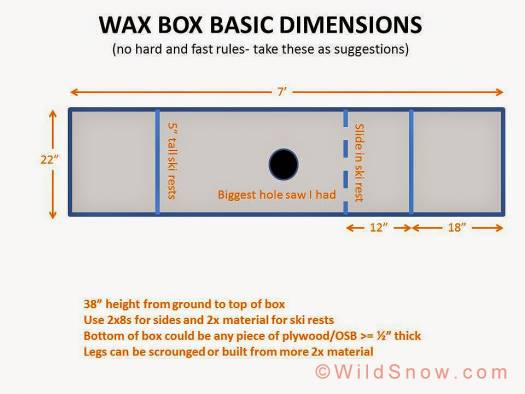
Cut and sand everything first. Build a box out of 2x8s that is 7 feet long and 22 inches wide by gluing and screwing the sides together. It will be more efficient if you cut the ends and ski rests at the same time and make them all the same length.

One note on dimensions: the length should accommodate skis of any width up to 200cm long. The plans I made allow for a drop-in ski rest so kid length skis (sub 150cm) can be waxed. Check out the diagram and picture below for details.

Glue and screw a piece of plywood or OSB to the bottom.


Add the ski rests after ripping to 5 inches tall and if you want, with arched openings underneath to aid in wax cleanup. I also cut a 3/8 notch about 1.5-1.75 inches deep in the middle of each rest to hold skis on edge for wax cleanup of sidewalls and for edge maintenance. These rests are topped with pieces of a foam rubber from a snowboard rear foot pad. You know, for when those poor souls are hobbling through lift lines. The foam rubber keeps the skis from sliding around.

Scrounge some legs. Folding table legs would make it stowable if space is at a premium.

For cleaning out the wax scrapings, the hole in the middle has a small trash can mounted under it but you could just put one on the floor. A small hand brush like those cheap $2 “china brushes” in the paint section of your local hardware store does the trick nicely.
Construction measurements.

Construction measurements.

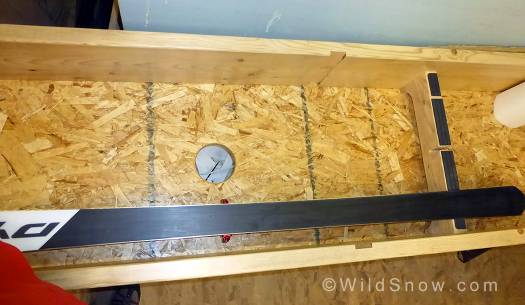
The ski rest and trash hole. You can see the notch for standing up skis on edge, the notches to slide in a shorter ski rest for kid skis and the arched hole under the fixed ski rest to sweep wax through. Key to this thing is a good polyurethane finish which allows the wax to be easily swept out. An initial thorough sanding followed by 3 coats with light sanding between worked for me. Pretty standard stuff and takes more time than all the rest put together. But worth it.
The ski rest and trash hole. You can see the notch for standing up skis on edge, the notches to slide in a shorter ski rest for kid skis and the arched hole under the fixed ski rest to sweep wax through. Key to this thing is a good polyurethane finish which allows the wax to be easily swept out. An initial thorough sanding followed by 3 coats with light sanding between worked for me. Pretty standard stuff and takes more time than all the rest put together. But worth it.

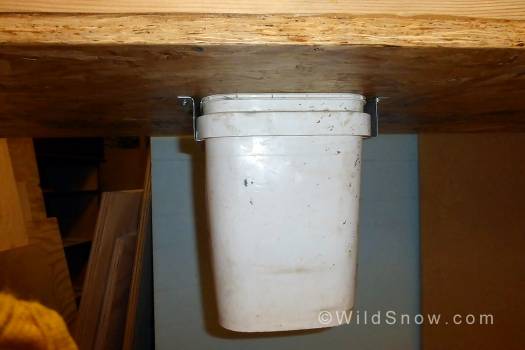
The waste bin. I bent some sheet metal into an 'S' that allowed solid mounting. A trash can on the ground would work too. The guy I got the idea from didn't do any of this and just used a shop vac to clean out the wax. Many ways to skin this cat.

The waste bin. I bent some sheet metal into an ‘S’ that allowed solid mounting. A trash can on the ground would work too. The guy I got the idea from didn’t do any of this and just used a shop vac to clean out the wax. Many ways to skin this cat.

Customization Thoughts
There are a lot of things you can do to trick this basic box out. My friend had thin wooden pockets along the side for tools, a few hooks on the end, a magnetic holder for his metal scraper, one of those ski wax iron holders and a bottle opener. The bottle opener may be mandatory?

I felt somewhere to put the bottle or can once open was critical, wanted good lighting and a different tool organization plan so…
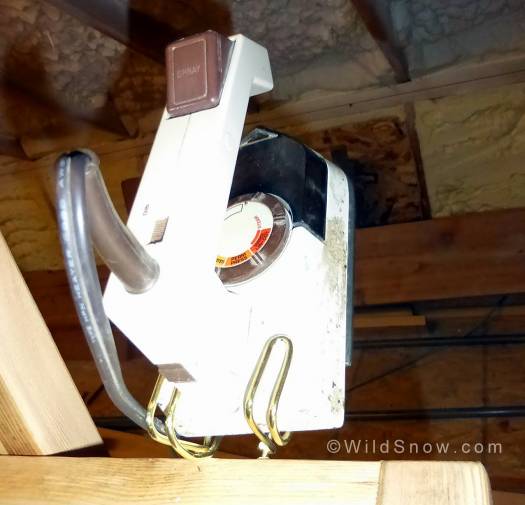
Iron mount for my ratty travel iron made from 2 cheap coat hangers.

Iron mount for my ratty travel iron made from 2 cheap coat hangers.

I added a top shelf basically just to mount a work light but subdivided it to stow waxing stuff. What you don't see is one of these partitions on the end is fitted with a sheet metal liner so I can throw hot Ptex in it. Overkill but what the heck.

I added a top shelf basically just to mount a work light but subdivided it to stow waxing stuff. What you don’t see is one of these partitions on the end is fitted with a sheet metal liner so I can throw hot Ptex in it. Overkill but what the heck.

LED strip lit up under the shelf.

LED strip lit up under the shelf.

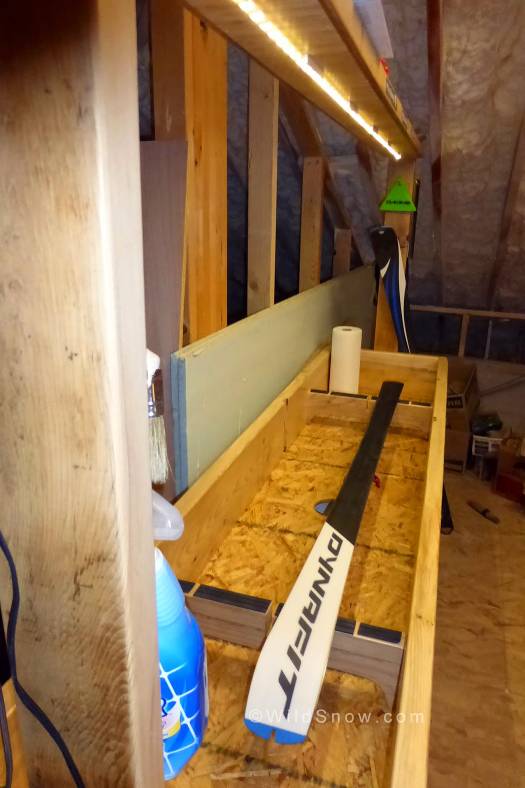
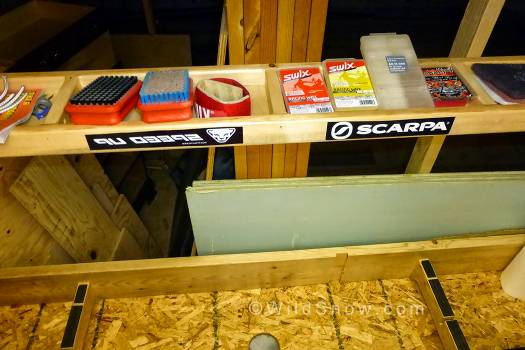
On the vertical posts I added some cheap screw-in hooks, bent a bit more open to hand all kinds of stuff. The red thing on the right post is a plastic scraper sharpener. The bottle opener is the dark plastic box on the far right- I got it from a restaurant supply house years ago with a build in cap holder. The scrounged legs have nonslip feet. The top shelf has beverage holders on the far right- a critical consideration IMHO. On the left you can kind of make out a power receptacle I mounted on the bench for the light and iron so I'd only have one cord running to the bench. Of course Id have to clean my attic to make that effort noticeable! A side benefit is I finally have a place to throw the stickers I've accumulated. Bonus!

On the vertical posts I added some cheap screw-in hooks, bent a bit more open to hand all kinds of stuff. The red thing on the right post is a plastic scraper sharpener. The bottle opener is the dark plastic box on the far right- I got it from a restaurant supply house years ago with a build in cap holder. The scrounged legs have nonslip feet. The top shelf has beverage holders on the far right- a critical consideration IMHO. On the left you can kind of make out a power receptacle I mounted on the bench for the light and iron so I’d only have one cord running to the bench. Of course Id have to clean my attic to make that effort noticeable! A side benefit is I finally have a place to throw the stickers I’ve accumulated. Bonus!

One thing I’m thinking about is a sheet of thin plywood that drops in to fill the box, resting on the ski rests with some type of simple clips at the top and bottom so I can use this rig to perform skin glue maintenance.

It could, with some padding, be a great place for some dirtbag friend of yours to crash. Like I said, endless possibilities.

Anyway, those are some ideas. Im sure you can think of other very cool variations. I saw one on the Internet that was made of 1x4s and foldable for storage in a small condo type setting. Your imagination is your only limiting factor here!

(WildSnow.com guest blogger Jesse Morehouse is a middling but psyched skimo enthusiast who loves endurance-based outdoor adventures. He tries to keep the epics manageable on family outings, fearing his kids might revolt and become racketball players. He is always trying to save a buck with DIY projects so he can buy more skimo gear.)

Guest Blogger

Beyond our regular guest bloggers who have their own profiles, some of our one-timers end up being categorized under this generic profile. Once they do a few posts, we build a category. In any case, we sure appreciate ALL the WildSnow guest bloggers!

wildsnow.com
0
Email
previous post
Das Parka, Nano-Air, and Hi-loft Down Sweater — Patagonia Insulation Review
next post
UPDATED! 2015 BBQ on Independence Pass, Colorado

Trip Reports

  • A Small Hut for Big Skiing in the San Juans: Aladdin’s Lamp

    April 23, 2024
  • Revisiting a 2011 Trip Report: Adventure in the Pickets — Thread of Ice Ski Descent

    December 9, 2022

Avalanche Department

  • Ask a Forecaster: Q&A with CAIC’s Andrew McWilliams

    March 10, 2024

Tips & Tricks

  • Transition Efficiencies 101 with Tech Binding Heel Units

    January 6, 2023
  • Visualizing the Backcountry as a Splitboarder: Minimizing the Challenges of Movement by Anticipating Terrain

    December 5, 2022
  • TURBOCHARGE YOUR TRAILHEAD BEACON CHECK

    November 15, 2022

Recent Comments

  • Daniel on Backcountry Ski Boots Buyer’s Guide: The Touring Boots Worth the Money
  • Jim Milstein on Best Touring Packs for Guides and Daytrippers
  • Bergen Tjossem on Much more than a steep ski: Fischer Transalp 92 CTI Long-Term Review
  • Maciej on Much more than a steep ski: Fischer Transalp 92 CTI Long-Term Review


  • Facebook
  • Twitter
  • Instagram
  • About Lou Dawson
  • Terms of Service
  • Authors Page
  • About
  • Contact
  • Advertise
  • Copyright & Legal
  • Website Security

@2025 - All Rights Reserved. Designed and Developed by WildSnow


Back To Top

Read alsox

WildSnowNZ — French Ridge Hut

July 25, 2022

10 Essential Mistakes for the Backcountry...

December 2, 2020

Spring Considerations for Avalanche Forecasting

June 2, 2020