(This post sponsored by our publishing partner Cripple Creek Backcountry.)
Homebrew DIY backcountry ski touring binding install tricks and tips, mount them yourself! I’ve worked on this post constantly since it was published some time ago. Once every few years we re-pub with a current date so it’s clear that we keep it as current as possible This time we have the support of Cripple Creek Backcountry helping to keep it going. I know the process I outline is a bit complicated. I’ve not found a way to make it simpler without introducing possible errors that novices could make. If you have a modicum of experience, you’ll find some of the steps to be redundant or easily shortcut. Please keep that in mind. Novices, don’t skip any steps!
Instructions below picture an early Dynafit binding model, but work for most other models (check hole patterns by setting binding on paper template, some early bindings have heel unit hole patterns that may be slightly different.)
Disclaimer: By using these mounting instructions and templates, you agree to not hold Wildsnow.com, its owners or associates liable for anything. We provide no obligatory support or help with using these instructions — you are on your own. If you have questions or observations, please bring them up as a comment on this post.
(Be aware that in the case of Dynafit Radical FT 12, the distance between toe and heel has to be perfectly set for the binding’s “stiffening plate” to function as designed. We’ve tested and skied this binding and felt no difference with the stiffening switched on or off (or removed entirely). For ease of mounting the Radical FT, we’d recommend not worrying about the stiffening plate, simply leave it off — chuck it in the trash or hang as a mirror medallion in your Sprinter van. See this post for bench evaluation of FT 12 stiffening damper plate.)
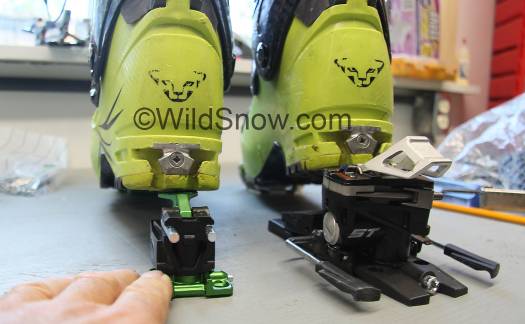
Note that some Dynafit models with brakes, such as Vertical/ST/FT and Radical, may require removal of brakes to facilitate mounting. Instructions for brake removal are here. That said, starting in late 2012 the Dynafit Radical FT and ST models have brakes that are NOT user removable, other later models also do not have removable brakes. For easier access to mounting screws, with most tech bindings you can remove the remove the heel housing from the heel plate, though doing so is often not necessary if you have the right tooling (torx 2.0 or posidrive driver, with skinny section about 3 inches long to fit between brake and heel housing.)
Warning: These instructions are based on using a paper template you will download and print, please verify scale of printing by comparing template to actual physical binding — before drilling holes in ski.
The keys to success in home mounting bindings are careful measurement, moving slow, and using the paper template and your boots as a substitute for the mechanical jig used by ski shops. Also, IMPORTANT: if you’re new to ski work slow down and do a practice mount on a pair of dumpster skis or a 2×4.
What I’m presenting here is one of many ways a craftsman could achieve a good backcountry ski touring binding mount. If you’re comfortable with tools and measurements, you’ll probably figure out a few variations along the way. For example, after you’ve done a few mounts it speeds things up if you do the heel unit first, but for novices we recommend starting with the toe unit as doing so will force you to be super careful with locating the boot on the ski and centering the binding. Whatever you do, just remember the theme here is to center the bindings left/right on the ski, and locate the boot so it matches the boot location mark on the ski.
How To Do The Deed
For mounting ski bindings you need a solid workbench or kitchen counter. Cover your counters with something liked taped butcher paper, but leave the outside counter edge exposed in case you need it for reference. Tools and materials list:
– Handheld screwdriver with pozidrive 3 or torx bit 20, depending on binding (see notes below)
– Electric drill with sharp 5/32 inch bit or special ski bit (see notes below)
– Electrical tape, clear office tape, masking tape, and of course duct tape
– Sharp center-punch, with associated hammer
– Straight steel or plastic “yardstick” type ruler
– Tape measure
– Fine point Sharpie type marker
– Epoxy, one-hour type prefered
– Wildsnow paper template for most Dynafit bindings (jig)
– Wildsnow Radical 2.0 & Rotation template (jig)
– Scissors, blank paper and paper punch
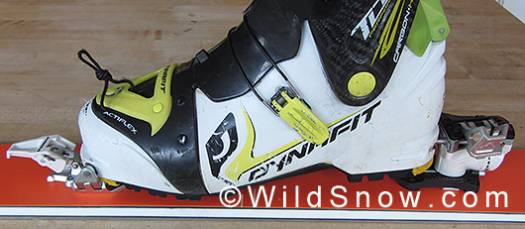
Dynafit Speed Radical backcountry skiing binding, 2012/13 model.
Step 1 Make sure you know where the mounting mark (aka “sole midpoint”) is on your backcountry skiing boots. It’s usually a small vertical line, arrow, or triangle molded into the side or bottom of the sole, midway between heel and toe. If your boot doesn’t have it, simply make a mark half the distance between toe and heel. Enhance the mark with your Sharpie so you can’t miss it (bring the mark over to the edge of the sole so you can see it from the side).
Step 2 Find the boot mounting mark on the skis; usually a small triangle or line that’s at the approximate midpoint of where you would imagine a boot sitting on the ski. Be sure you get the correct mark — if in doubt ask a shop rat or contact the ski manufacturer.
Step 3 Using a marker pen (Sharpie) extend the boot mark across the top surface of the ski, left to right. Eyeball this using a straightedge. If you feel challenged, you can align the skis with the edge of your work surface and use a large framing square to make the marks square to the skis. The idea here is to make an easily visible mark on top of the skis, for referencing the boot and paper template positions.
Step 4 Install a binding toe unit on a boot and place boot on a ski. Align boot center mark with ski mark. Hold the boot steady and carefully press the binding toe down on the ski, as you do this, keep the boot aligned with the boot center mark on ski. Once the binding toe is snugged down on the ski, mark the center of the front pair of screw holes (in this process, you are using the binding as a template).
Step 6 Remove boot and binding from ski. Using a straightedge, make a left-right marks across the ski showing the positions of the screw holes you just marked.
Step 6a Tape measure from ski tail to the mark you made, transfer measurement to the other ski and make a matching mark.
(You will align your paper template with the screw position marks you made.)
Step 6Print the paper template (links are at beginning of this article), and make sure it prints at 100% scale and that your printer doesn’t change it from 100% scale.
Scale of the paper template is easy to check. Print a template and simply set your binding on the paper, if the holes line up you’re good, if not, play around with your printer settings. Also check by measuring the scale check box printed on the template. Our templates align by matching a longitudinal (tip/tail) center line you draw on your skis. Used correctly, this results in a mount that’s often more accurate than a mechanical binding jig.
Step 7 Make super-accurate center marks/dots (left/right) on your skis, about 12 inches forward and behind your binding toe and heel unit locations. These marks are important so take your time. You can make left/right center marks by eyeballing a ruler and double checking, or by using a drawing compass to measure from the edges, but our favorite method is to simply use folded paper, as follows:
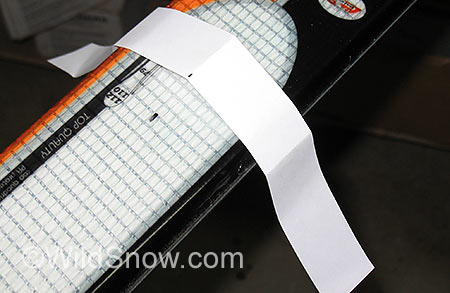
Using paper folding to find center of ski, left-right.
To find center using paper, simply wrap a strip of paper around the ski, crease it over the sharp steel base edges, remove and fold in half using the edge marks as reference, then place back on ski and use the crease to locate center. While simple, work carefully (mainly, mark the spot on your ski where you place the paper, as moving it towards the tip or tail will throw things off because of the ski’s varied width.)
Connect your left/right center marks with a your yardstick and draw an accurate line using the edge of the yardstick as a guide. The idea is to create a long mark down the center of each backcountry ski in the binding mount area (in the tip/tail direction). Be sure this mark is long enough to go well past the mounting area of both front and rear binding units.
Step 8 Cut the sides off your paper templates so they’re slightly narrower than your skis, and use a pen or sharp pencil to extend the center lines to the front and rear edges of the templates. If you’ve not done so already, cut the paper template in half so you have a front and rear sections. Set the binding toe template on the ski. The trick here is to align the paper with the marks you have on your ski. Line up the center lines, and line up the front screw locations. Take your time, and tape securely to the ski (leave the ends of the centerline visible so you can check for movement off alignment.)
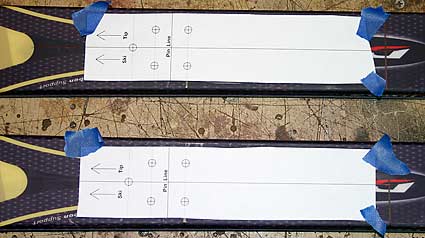
Toe portion of template taped to ski, ready for center punching the screw hole locations.
Be extra careful to point the template in the correct direction. An arrow points towards the ski tip.
Step 9 Now the moment of truth. First, use a sharp finely pointed object to divot the paper template on the exact screw location marks, this mark helps locate your center punch by feel, as center punches are sometimes too thick to visually locate. Next, using your your sharp center-punch tool, lightly dimple the ski at the exact center of the screw marks. Remove the paper jig.
Notice that the hole pattern for the toe unit includes one forward mark/hole that’s centered on the ski. Before drilling, make sure your center-punch mark for this hole is on the tip/tail centerline you drew on the ski. Check the other marks as well, and make sure they’re equidistant from the edges of the ski.
Once you’re sure the marks are where you want them, center punch the forward hole with a harder hit from the hammer, to make sure your drill bit doesn’t wander when you drill. Leave the other marks alone for now.
Step 10 Ahhhh, now, power tools! Chuck that sharp bit in your drill. (Using a sharp drill bit prevents the bit from wandering sideways while you drill.) Place a screw in the binding (with the plastic shoe that goes under the toe unit) as if it were already in the ski, and use the protruding screw as a gage to to figure how deep you will drill. Tape a depth stop to the drill bit by wrapping tightly with electrical tape to create the stop. Drill the marked skis with minimal pressure, so you don’t mash the bit through a ski. Remember, only drill the ONE front hole at this point, and be clear that you’re only working with the toe unit at this point, the heel heel comes later.
Which hole to drill first? In the case of 5-hole tech binding toes, drill the forward center hole. If your binding toe has 4 screws, set the binding on the ski, eyeball the marks you’ve made, and drill the one that seems closest to being perfect in terms of allowing the binding to to sit centered on the ski.
If you do totally klutz it and drill through a ski, it’s actually not that big a deal (repair with epoxy and P-tex), but reaming a ski is considered poor style — to say the least — and is none too good for your kitchen countertop.
Step 11 Some toe units (FT and ST) come from the factory with the screws threaded in the plastic base plate. Remove the screws, then drill out the holes in the plastic toe unit base plate so the screws fit snug but only thread minimally. The reason for this is sometimes the threading screws tend to lift the plate up off the ski as you’re doing the mount (known as “screw jacking”), in turn inspiring you to keep spinning the screws with more and more force and possibly damaging stripping the holes in your ski.
Step 12 Screw the toe unit onto the ski, using only one screw in the one hole you’ve drilled. Snug down the screw but don’t tighten aggressively, as you’ll be removing it again, (don’t use glue at this stage, and don’t use a power drill to torque screws unless you’re a tool ace).
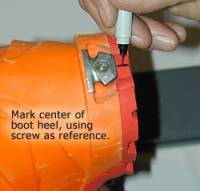
Step 13 This step is a double-check. Snap a boot in the binding toe that’s screwed to your ski. Mark a center line on the heel of the boot with your Sharpie, below the metal binding fitting, using the center of the screw as a reference. Drop the heel of the boot onto the ski, and center by matching with the tip/tail center mark you drew on your skin in previous steps. (The idea here is to get the boot heel and binding toe-unit centered on your ski, mark everything well, and be able to keep rechecking it.)
While keeping the boot centered, carefully unlatch the binding toe unit and remove the boot. Using the binding for reference, study the punch marks you made on the ski for the remaining holes. Do they line up close with the holes in the binding? If so, remove toe unit, center-punch the holes a bit deeper, and drill the holes in the ski. If they’re off more than a smidgen, place the boot back in the toe, re-center heel, and repeat checking the alignment. Sometimes the combination of boot machining and whatnot results in the holes needing to be drilled slightly off (never more than a millimeter or less, in my experience). Recheck several times. If you’re still sure your punch marks are off, re-punch (the reason you first lightly punch them), re-check, and drill the new marks once you’re happy with them.
Step 14 Again, screw the Dynafit binding to the ski with just the forward center screw. Snap in the boot, drop the heel on the ski, center the boot, and remove with care. Study the holes. Several will usually line up perfectly. Install the screws into those first. Do NOT heavily tighten the screws as you’ll be removing them again later. Again, snap the boot into the binding toe, drop the heel, and use the boot as a lever to nudge the binding so that the heel lines up with your center mark (while you do this, pull the front tab up to lock the binding in touring mode, so you can thrust the boot side-to-side without it popping it out of the binding). Keep repeating this process until the screws are snug, and the heel is lined up. Backcountry skiing!
PART TWO — TECH BINDING HEEL UNIT MOUNTING — DYNAFIT
Okay, you’ve got both skis mounted with your Dynafit binding toe units, the screws are snug but not heavily tightened (and not yet glued), and the heel center marks line up perfectly with those on your skis. The hard part is over. Now the heel units.

Mark location of heel unit front screws. You will use this as reference for locating the template on the ski. Extend mark across ski left-right using marker and straight edge.
Step 1 Snap a backcountry skiing boot in the binding, and again drop the heel onto the ski. Grab a Dynafit heel unit, flip it upside down, and make sure the for/aft adjustment system is located at the midpoint of its range, if not, position by cranking the length adjustment screw located at the rear of the binding base plate.
Place the heel unit on the ski, and slide the metal pins-prongs into the corresponding slots on the boot heel. If your binding requires a heel gap, grab the small plastic feeler gauge spacer provided with the bindings, and slip it between the binding and the boot heel. With earlier TLT bindings don’t jam the spacer down over the plastic bump on the binding, but rather let it set on top of it. Later bindings may have various specifications for this “tech gap.” Indeed, models such as Radical 2.0 actually use a minimal tech gap that’s basically just a slice of light you can see between boot and binding. Be careful to set this correctly. More information here. Eyeball the heel unit so it’s centered left/right on the ski. On the top edge of the ski, make a mark that corresponds to the for/aft location of the FRONT screws. This simply shows the front/back location of the screws.
See this article for more about setting “tech gap” with various Dynafit binding models.
(Important: The thickness of the heel spacer feeler gauge and corresponding clearance setting for the Tourlite/TLT/Speed/Race binding is 4 mm , while that for the Comfort and Vertical models is 6 mm, or 5.5 mm for Vertical models starting in 2009. For some time the Radical series bindings had a heel gap of 5.5 mm, then beginning around 2014 an “in line” change was made to a heel unit with spring loaded fore/aft movement that requires a very small heel gap. If you don’t have a spacer, make one using above dimensions. Two American nickel coins are 4 millimeters.)
Step 2 Lift the boot heel up out of the way. Using a straight edge scribe a Sharpie mark across both skis, corresponding to the for/aft screw marks you just made.
Step 3 Grab the paper heel template you downloaded and printed several copies of in previous instructions, cut it down so it’s slightly narrower than your ski, and cut the ends so the center-line on the template goes to the edge of the paper.
Step 4 Place the paper template on the ski (remember to orient it via the “tip of ski” arrow on the template). Center the template left/right using the tip/tail line you drew in the center of your backcountry skis, and line up the forward screw line with that on your ski. Tape template to ski.
Step 5 Drop the boot heel down onto the ski and slide the heel unit back into place. Look down thorough the screw holes in the heel unit, and make sure they seem to line up nicely with those in the template.
If all looks good, remove the heel unit, lift the boot heel, check the location of the template to make sure it didn’t move, then center punch the screw holes.
Remove the paper template. Make another visual check. When satisfied, center punch all holes more aggressively.
Step 6 Drill the holes per drilling instructions in part one of this guide. To figure out which screw to place first, use the same process as the toe: Drop the boot heel onto the ski, place the heel unit into position, and eyeball which screw hole lines up the best. Get the boot out of the way, and place that screw first. If you need room for your screwdriver, rotate the upper part of the heel unit out of the way.
Line up the other screw holes with the holes in the base plate, hold the unit tightly to the ski so it doesn’t move, and drop the boot-heel gently down. If it lines up close to the center of the heel unit pins (within a millimeter or so), run screw number two in the other hole that lines up best.
With two screws holding the heel unit, and the release tension set super low, you can now do the final alignment test. Gently drop the boot down, and make sure the wedge shaped metal of the boot heel fitting drops between the prongs with little or no sideways nudge (a millimeter or so of misalignment is okay, you’ll fix this in step 9). Then — with a sharp press down — snap the boot into the heel piece (it should go down easily with the low release tension setting). Look and feel good? If so run the remaining two screws, checking alignment each time.
Step 7 Remove all four heel unit screws, place some epoxy or other type of ski binding mount glue in the holes, and run the screws back in. When placing the epoxy, wipe all excess off the top skin. If any oozes under the for/aft adjustment unit of the heel, it will harden and prevent fine-tuning. One-hour epoxy is best, but use 5-minute if you’re in a hurry. Continue to check alignment as you do the final torque on the screws.
Step 8 Re-check heel clearance with the small red shim, and adjust as necessary using the small screw on the rear of the base place.
Step 9 THIS IS SUPER IMPORTANT, remember how you didn’t epoxy or heavily tighten the toe unit screws? Now remove all the toe unit screws, place binding mount glue in the holes, and run the screws back in. Again, tighten the forward most screw but leave the others only snug. Place boot in binding, then drop heel down. Nudge boot left or right ’till the metal fitting on the boot is nicely centered on the heel unit pins. Remove boot, and tighten toe unit screws that line up the best, re-check boot heel alignment, and continue to tighten toe unit screws. The idea is to gradually tighten the toe unit screws while making sure the heel of the boot is aligned with the backcountry skiing dynafit binding heel.
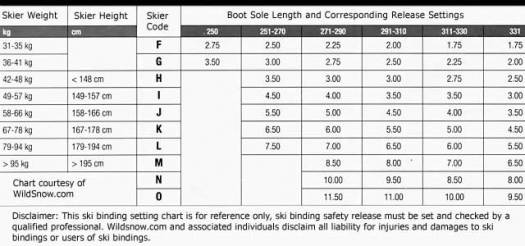
Step 10 Fine tune your boot length setting (BEWARE, doing this incorrectly is the source of many problems with tech bindings). Adjust lateral and vertical release setting according to directions in the Dynafit binding pamphlet or use the chart located below on this page. A good place to start is to use the same settings as your alpine bindings. See this article for more about Dynafit binding adjustments.
NOTES
*As near as I and others can tell , the actual physical hole dimensions of classic Dynafit bindings are: On the toe piece, the 4 hole pattern is 30mm X 26.5mm and the front hole is 18mm. On the heel piece, the hole pattern is 32mm on the front holes, 36mm on the rear holes and 52.5 mm between front and rear holes. If necessary, verify all with calipers. Radical series bindings locate front pair of screw holes 12 millimeters farther forward, and eliminate the front centered hole. Models such as Beast and Radical 2.0 use other hole patterns, detailed on our templates.
*Drill bits: Ski shops use special drill bits for drilling skis, usually 4.1 mm diameter for skis with metal layers, and 3.5 mm for skis without metal. If you mount a lot of backcountry skis, it’s a good idea to buy a selection of special drill bits from an outfit such as SlideWright. Along with such bits, buy a threading tool (tap) to thread the holes. In my experience, it’s okay to use the slightly larger 5/32 inch (3.9) mm) drill bit as suggested above, without a tap. If you do so, especially with non-metal skis, just be careful as you twist the screws in so you don’t over-tighten them and strip the holes, and use 1-hour epoxy in the holes since they’re slightly oversized. With skis that have a soft core and minimal binding mount reinforcement you can use the slightly smaller 9/64 inch (3.5 mm) drill bit size which is quite close to the standard ski drill size of 3.6 mm. To remove epoxied screws, lightly heat with soldering iron before twisting out, don’t use 5 minute epoxy as it’s brittle. Please see our article about ski drill bits.
*Pozi screwdriver bits are also available from SlideWright or other suppliers, and mandatory if you’re dealing with pozidrive screws. Likewise, Torx (star drive) 20. Check out our extensive coverage of tools for your home ski shop.
Related linkage:
7 Deadly Sins of Tech Binding Mounting
WildSnow.com publisher emeritus and founder Lou (Louis Dawson) has a 50+ years career in climbing, backcountry skiing and ski mountaineering. He was the first person in history to ski down all 54 Colorado 14,000-foot peaks, has authored numerous books about about backcountry skiing, and has skied from the summit of Denali in Alaska, North America’s highest mountain.

