Mike Arnold
Overview
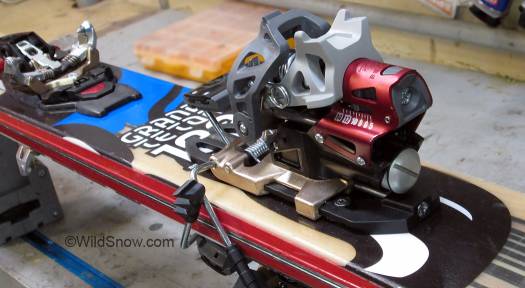
The last decade has seen huge evolutionary improvements in backcountry skiing gear. Dynafit Beast 14 binding is a strong example of where things have come, and perhaps a hint of where things will go in the future.
Beast 14 is a stripped down version of “big brother” Beast 16. From my experience doing this evaluation, Beast 14 could easily change your mindset about the tech binding universe — it will perform at a high level when you feel the need to “open it up” while inbounds, or in the backcountry. Overall, like Beast 16, Beast 14 fits the skier who resort skis for part of a day, then decides to go for a tour to find more untracked powder. Yet beyond sidecountry, with its weight savings and being frameless, 14 will backcountry tour quite nicely if you like something beefier for your human powered ski adventures.
Ride the tram or break trail to your line. This is a free-ride binding that can be pushed, whether on big cliffs, pillow lines or charging the great faces of Europe.
Installation: Mounting
Beast 14 has some extra steps to installation that adds stability to your existing boot. The horseshoe power bar that replaces the rear pin attachment is a quick install on the heels of your boots. I used the horseshoe power bar as a jig and drilled holes with 1/16in drill bit and used epoxy to secure each screw in the proper location. (Notes: While WildSnow is always supportive of DIY, for all but the most skilled garage technicians binding systems as complex as Beast should be installed by a qualified shop technician. Also, know that Beast 16 and 14 bindings are NOT compatible with “short sole” boots such as Dynafit TLT6.)
Beyond nuts-and-bolts, the key to a proper installation is knowledge of the binding. When you pick up your skis and boots at the shop “grill” the ski tech and gain a full understanding of what your Beast binding has to offer, and how it functions.
There has been some controversy with using the Beast power bar (horseshoe shaped fitting on heel of boot) with other tech bindings. I have been using the power bar on Dynafit Radical ST and Speed Turns. The only issue I have encountered is when the ski flexes while touring using the heel-flat-on-ski position, the power bar gets caught in the heel of the binding and locks until ski is flattened out.
The Beast 14 Power Bar can also work with a frame binding such as the Duke or Fritschi so long as it’s on a boot that fits frame bindings (i.e., not the TLT 6). That said, know that the Beast Power Bar can create wear on the heels of frame bindings, so check your bindings from time to time and make sure the structure of the binding is still intact.
In all cases, if you choose to use a Power Bar equipped boot in a binding other than Beast, be sure to check release functions on the workbench before heading out to the wild.
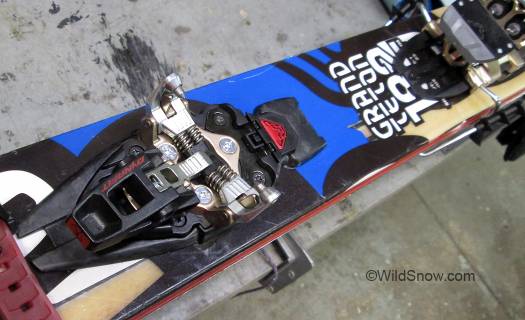
Beast 14 toe rotates 5mm, similar in function to Beast 16 as well as Radical 2.0. A clever part of the lock lever keeps the binding from rotating while it’s open, making it easier to step into.
Toe Piece
The rotating toe piece of the Beast 14 is an innovative design. It’s stripped down and simplified in comparison to the Beast 16. The 5mm of “swivel” motion in the toe substitutes for the “ball and socket” action of most “classic” tech binding toes. In many cases it is smoother and more reliable, and is said to provide a bit more lateral elasticity as well (in my bench tests this appears to be the case, but it’s difficult to evaluate small differences in binding elasticity without sophisticated testing equipment). The Beast 14 pivoting toe is found on next year’s Radical 2.0 and will continue to influence Dynafit and other tech binding products for years to come.
The toe piece locks for touring mode in a similar way to the rest of the Dynafit fleet and many other brands. You pull up on a locking lever, which locks out the toe release while at the same time locking out the toe rotation.
For what it’s worth, with the classic Dynafit binding I typically lock my toe piece 2-4 clicks on firm piste. Yes, I know here on Wildsnow we question the efficacy of this, and it’s been pointed out that the difference between a few clicks and full lock may only be psychological. Whatever the truth about the mythical “clicks,” those days are over. Beast does NOT have clicks in the toe locking mechanism that vary the release level.
Not having clicks to fiddle with might shatter your world but it is what it is — and it works fine. Instead, while the Beast toe does have one “click,” as soon as you pull up the lock lever everything is fully locked due to the lever blocking out the toe rotation. Thus, the binding is either release locked, or it is not. Considering Beast 14 has better elasticity I was comfortable skiing hardpack without fiddling around with the locking lever, and skiing it unlocked.
(Note: It’s possible that pulling up the lock lever partially (before it clicks!) might reduce the high amount of force needed to release in touring mode, say in an avalanche. But know that even in the partially pulled up position you have blocked out normal calibrated safety release due to locking the toe rotation.)
Heel Piece
Beast 14 heel piece travels on a track under spring load to allow the ski to flex without triggering a pre-release. The binding marked with 5-14 DIN release setting numbers. That’s plenty of range for most users. I tend to run my release setting at 10. (strong skier, weight 170, Height 6′)
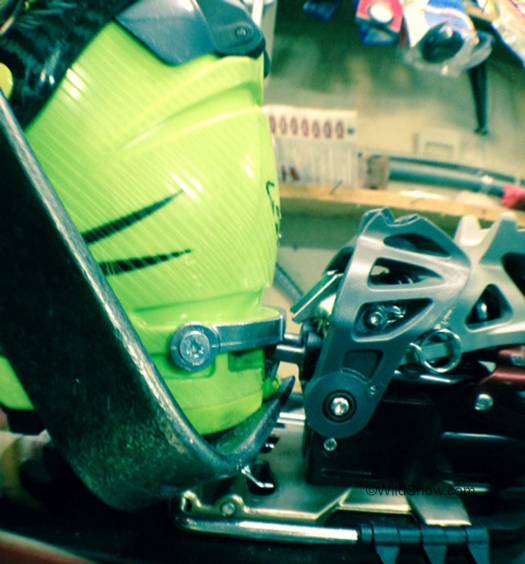
Boot in Beast 14 heel, testing for vertical elasticity and release using the famous WildSnow ANSI prybar. Smooth and nice. Pictured TLT6 boot is stated by Dynafit to be incompatible with Beast bindings, but functioned for demonstration and testing purposes. We did quite a bit of bench testing and found that all the Beast binding safety and touring functions still work with the TLT6; issue is possible boot damage (see photos below).
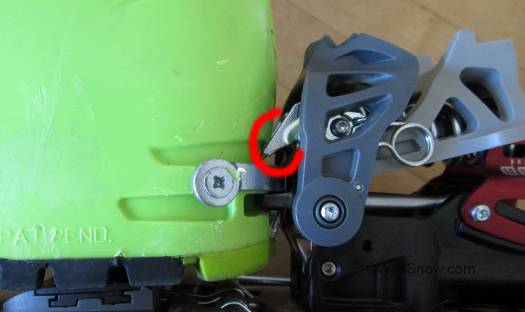
Reason why Beast model bindings are incompatible with short sole boots, the red circled metal prongs press against the boot shell causing likely damage.
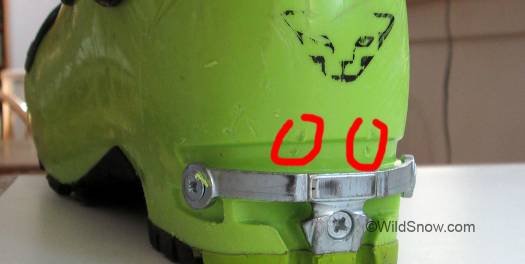
Heel area of TLT6 showing slight damage caused by Beast binding, in our opinion this is the reason for “official” incompatibility of short-sole boots with Beast model bindings. If desired, should you go ahead and use such boots with this binding? Take at WildSnow is if in a pinch you can do it if you’re willing to accept the small gouges in your boots. Otherwise, don’t. Indeed, with a binding this beefy it’s a bit silly to be using a light touring boot. Pairing is not only for wine and cheese.
Skiing and Touring
With eight days of touring and skiing the Beast 14, I was convinced of the relevance of having a binding like this in nearly any quiver — and most certainly in mine. Essentially, it does everything, with an edge for the more aggressive side of the sport.
Mike’s info: 170lbs, 6’0, Aggressive skier/IFMGA Ski + mountain guide
Beast 14 construction: Forged aluminum 6082, CrMo steel, stainless steel, titanium, high-strength plastic
Maximum DIN: 14 (Tester DIN @ 10)
Weight of bindings:
Heel unit (with screws) 598 grams, 20.4 ounces Toe unit (with screws) 254 grams, 9.0 ounces Total (with screws) 852 grams, 29.4 ounces .
Terrain: Tested in the heart of the Rocky Mountain Elk mountains, Colorado: (groomers, powder, breakable crust, steep couloirs, ski touring)Days tested: 8
(WildSnow.com guest blogger Mike Arnold is an IFMGA mountain guide who works internationally for Aspen Expeditions. When he’s not sleeping in his Sprinter van or some hut above Cham, he lives in the Roaring Fork Valley of Colorado.)
Beyond our regular guest bloggers who have their own profiles, some of our one-timers end up being categorized under this generic profile. Once they do a few posts, we build a category. In any case, we sure appreciate ALL the WildSnow guest bloggers!

