– The Backcountry Ski Site
  • Avalanches
  • Gear Reviews
    • Ski Reviews
    • Boot Reviews
    • Binding Reviews
    • Snowboard Splitboard
    • Book Reviews
    • Avalanche Beacon Reviews
    • Airbag Backpacks
    • Backcountry Electronics
    • Misc Gear Reviews
  • Podcast
  • Tips & Tricks
    • Ski Touring Basics
    • Boot Fitting
    • Fitness & Health
    • Gear Mods
  • Trip Reports
    • Fourteeners
    • Huts – Cabins – Lodges
    • Denali McKinley
    • 8,000 Meter Skiing
  • Stories
    • History
    • Humor
    • Land Use Issues
    • Evergreen Ski Touring
    • Poetry
  • Resources
    • All Posts Listed
    • 100 Recent Comments
    • Backcountry Skiing & Ski Touring Webcams
    • Ski Weights Comparison
    • Archives of WildSnow.com
    • Authors Page
    • Ski Touring Bindings
      • Trab TR2 Index and FAQ
      • Salomon Guardian & Tracker
      • Naxo Backcountry Skiing Bindings – Info Index
      • Silvretta Pure Backcountry Skiing Bindings – Info Index
      • Marker F10-12 Duke Baron
      • G3 Onyx Ski Binding FAQ
      • G3 ION Ski Touring Binding
      • Fritschi Backcountry Skiing Bindings – Info Index
      • Fritschi Diamir Frame Bindings Mount DIY
      • Fritschi Diamir Bindings FAQ
      • Fritschi Tecton FAQ
      • Atomic Salomon Backland MTN
      • Dynafit Tri-Step Binding 2001-2003
      • Naxo randonnee alpine touring AT ski binding FAQ
      • Dynafit Skiing Bindings – Info Index
      • Dynafit Binding Frequently Asked Questions FAQ
      • Dynafit Beast 16 FAQ Review 1
      • Dynafit Beast 16 FAQ Page Two
    • History
      • Ski Touring Binding Museum
      • Trooper Traverse Intro & Index
      • Randonnee Ski Touring “AT” ski gear — What is Hip?
      • Chronology
    • Backcountry Skiing Core Glossary
    • Gear Review Policy & Disclosures

– The Backcountry Ski Site

  • Avalanches
  • Gear Reviews
    • Ski Reviews
    • Boot Reviews
    • Binding Reviews
    • Snowboard Splitboard
    • Book Reviews
    • Avalanche Beacon Reviews
    • Airbag Backpacks
    • Backcountry Electronics
    • Misc Gear Reviews
  • Podcast
  • Tips & Tricks
    • Ski Touring Basics
    • Boot Fitting
    • Fitness & Health
    • Gear Mods
  • Trip Reports
    • Fourteeners
    • Huts – Cabins – Lodges
    • Denali McKinley
    • 8,000 Meter Skiing
  • Stories
    • History
    • Humor
    • Land Use Issues
    • Evergreen Ski Touring
    • Poetry
  • Resources
    • All Posts Listed
    • 100 Recent Comments
    • Backcountry Skiing & Ski Touring Webcams
    • Ski Weights Comparison
    • Archives of WildSnow.com
    • Authors Page
    • Ski Touring Bindings
      • Trab TR2 Index and FAQ
      • Salomon Guardian & Tracker
      • Naxo Backcountry Skiing Bindings – Info Index
      • Silvretta Pure Backcountry Skiing Bindings – Info Index
      • Marker F10-12 Duke Baron
      • G3 Onyx Ski Binding FAQ
      • G3 ION Ski Touring Binding
      • Fritschi Backcountry Skiing Bindings – Info Index
      • Fritschi Diamir Frame Bindings Mount DIY
      • Fritschi Diamir Bindings FAQ
      • Fritschi Tecton FAQ
      • Atomic Salomon Backland MTN
      • Dynafit Tri-Step Binding 2001-2003
      • Naxo randonnee alpine touring AT ski binding FAQ
      • Dynafit Skiing Bindings – Info Index
      • Dynafit Binding Frequently Asked Questions FAQ
      • Dynafit Beast 16 FAQ Review 1
      • Dynafit Beast 16 FAQ Page Two
    • History
      • Ski Touring Binding Museum
      • Trooper Traverse Intro & Index
      • Randonnee Ski Touring “AT” ski gear — What is Hip?
      • Chronology
    • Backcountry Skiing Core Glossary
    • Gear Review Policy & Disclosures
   

Dynafit Tech Binding Heel Unit Breakdown and Assembly

by Lou Dawson December 2, 2014
written by Lou Dawson December 2, 2014

(We had this in our legacy archive; it is now converted to a blog post. Applies to nearly all model Dynafits: TLT, Comfort, Vertical, FT, ST, Radical)
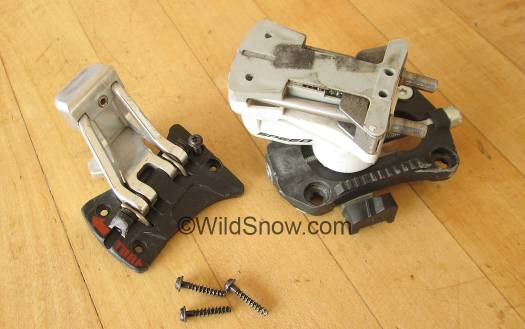
Dynafit Speed Radical with top plate removed.

Dynafit Speed Radical with top plate removed. Heel lifter shown with aftermarket B & D Nubbin lift extension. The screws will be carefully re-inserted with a small dab of epoxy on the threads. Be aware we only recommend this procedure for repairs or for re-lubrication after excessive wear or contamination.

This project is not as tricky as rebuilding a vintage automobile carburetor, but similar attention to detail will yield good results. Taking apart a Dynafit heel unit is easiest if the binding is mounted on a ski. Good mechanical skills are required, as well as proper tools. Reasons for doing this could be: 1.) repair swapping broken part, 2.) cleaning and lubrication after several years of heavy use, 3.) cleaning after exposure to road salt or a solvent spill.
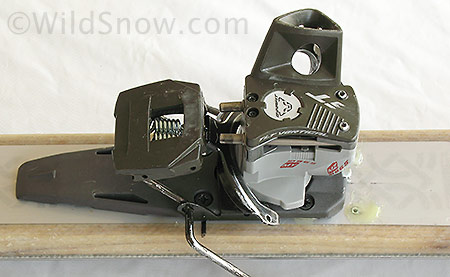
Dynafit Vertical ST binding. Radical series are nearly identical as to internals.

Dynafit Vertical ST binding. Radical series are nearly identical as to internals.

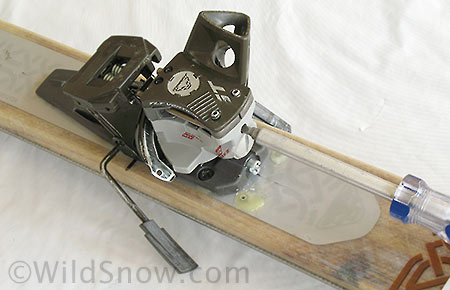
Addendum: Note that later “Vertical” series bindings similar to the one pictured above have a tiny metal roll pin attaching the upper heel-lifter-top-plate plastic unit to the lower housing. To remove, push (or carefully “drive”) the roll pin inwards with a pin punch or reversed drill bit. Before re-assembly, entirely remove the roll pin, re-insert as the last step in assembly.


Driving in the roll pin.

Driving in the roll pin, Dynafit Vertical FT/ST binding. Early version bindings did not have this pin, easy to spot. Use the butt end of a drill bit, drive pin inward then remove by pulling out with needle nose pliers, re-insert as last step of assembly.

Our victim in these photos is primarily an 07/08 Dynafit Vertical ST. Most Dynafit bindings from the last decade or so have similar or in many cases identical internals, so these instructions will work for most models in use (main exception as of 2014 would be the Beast models).

These are all the tools you need for disassembly of the Dynafit heel, but to do the job right you should have each one. From top: screwdriver bit holder, large slot bit, #10 Torx bit, small slot bit and right angled pick. Find the largest flat/slot bit possible for turning the rear spring adjustment barrel.
These are all the tools you need for disassembly of the Dynafit heel, but to do the job right you should have each one. From top: screwdriver bit holder, large slot bit, #10 Torx bit, small slot bit and right angled pick. Find the largest flat/slot bit possible for turning the rear spring adjustment barrel.

First step in taking apart the upper mechanism is to back off the vertical release setting. Crank the adjustment screw until DIN setting indicator is at the lowest marked setting, then give it one more full turn. Don't go past that point. If you neglect this step, the binding will fly apart as you remove parts.

First step in taking apart the upper mechanism is to back off the vertical release setting. Crank the adjustment screw until DIN setting indicator is at the lowest marked setting, then give it one more full turn. Don’t go past that point. If you neglect this step, the binding will fly apart as you remove parts.
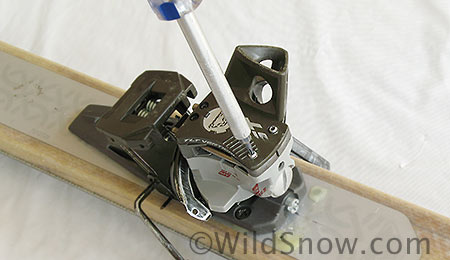
Next, use your Torx screwdriver to remove the fasteners holding the top plate. Lift the top plate off.

Next, use your Torx screwdriver to remove the fasteners holding the top plate. Lift the top plate off.

The binding will look like this after the top is removed. Just lift the guts out. They'll tend to come apart as you remove. Don't stress, they're really quite easy to re-assemble.

The binding will look like this after the top is removed. Just lift the guts out. They’ll tend to come apart as you remove. Don’t stress, they’re really quite easy to re-assemble.
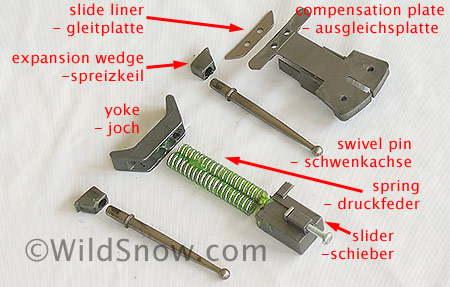
Here is a parts breakdown with official names.  German is a cool language for this sort of thing.  The green goo is lubricant and probably a corrosion blocker. If you're cleaning and re-lubricating you can use a light lithium grease.

Here is a parts breakdown with official names. German is a cool language for this sort of thing. The green goo is lubricant and probably a corrosion blocker. If you’re cleaning and re-lubricating you can use a light lithium grease, or better, use a specified ski binding grease such as that sold by G3.

Assembly of Upper Heel Unit
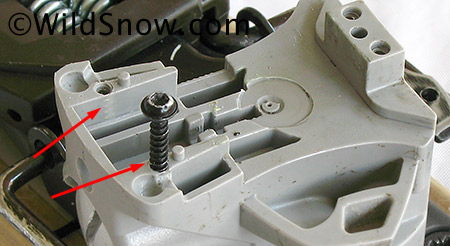
If you're working on high mileage bindings, inspect housing for cracks in areas indicated by arrows. If the housing is cracked it won't hold the screws securely and must be replaced before mission critical use. Know that with some TLT moldings there may be a tiny gap adjacent to the screw hole; this is not a crack and not a concern. (Screw inserted to illustrate, not as part of assembly sequence.)
If you’re working on high mileage bindings, inspect housing for cracks in areas indicated by arrows. If the housing is cracked it won’t hold the screws securely and must be replaced before mission critical use. Know that with some TLT moldings there may be a tiny gap adjacent to the screw hole; this is not a crack and not a concern. (Screw inserted to illustrate, not as part of assembly sequence.)

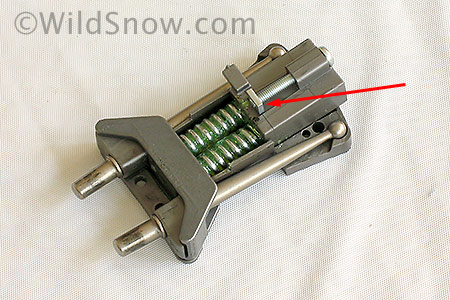
This is what the guts look like flipped over after removal. Arrow points to a small nut on a threaded rod (the vertical DIN adjuster). Before re-assembly make sure this nut is at end of rod as shown.
This is what the guts look like flipped over after removal. Arrow points to a small nut on a threaded rod (the vertical DIN adjuster). Before re-assembly make sure this nut is at end of rod as shown.

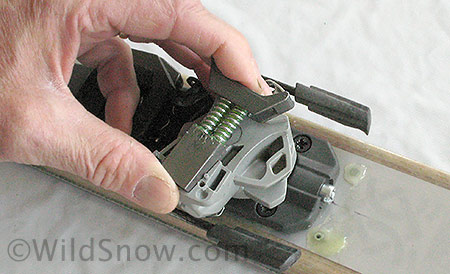
First step to reassembly is to pop in this stripped down version of the parts. Place the rear in first, compress the springs, and press the front yoke down and in. The small nut shown in photos above must seat in its dedicated slot. Check by viewing binding from side.
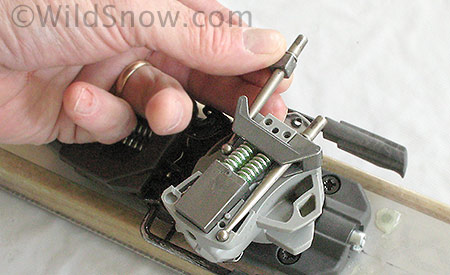
First step to reassembly is to pop in this stripped down version of the parts. Place the rear in first, compress the springs, and press the front yoke down and in. The small nut shown in photos above must seat in its dedicated slot. Check by viewing binding from side.

After you've popped in the yoke and springs, insert the pins with their tapered collars. Orientation is obvious -- if in doubt compare to your other binding (which is hopefully still together).

After you’ve popped in the yoke and springs, insert the pins with their tapered collars. Orientation is obvious — if in doubt compare to your other binding (which is hopefully still together).
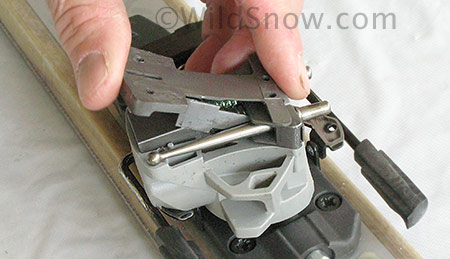
Getting the compensation plate inserted is a bit tricky. Video shows it better than this, but basically you insert the lower flanges first as shown, then drop the rear down.
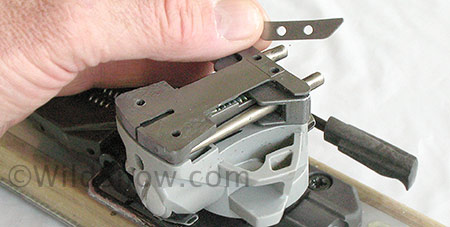
Getting the compensation plate inserted is a bit tricky. Video shows it better than this, but basically you insert the lower flanges first as shown, then drop the rear down.

Don't forget any parts. This small metal plate, the slide liner, is easy to overlook. You can slide it in at any time in the process before running the screws back in. Once everything is in, press all together with your fingers and make sure it feels solid and completely assembled. Replace the top plate and associated small steel reinforcing plate (obvious) and run the screws back in. Gently snug the screws in a cross pattern, then torque down firmly but with much less force than you'd use for most other fasteners.

Don’t forget any parts. This small metal plate, the slide liner, is easy to overlook. You can slide it in at any time in the process before running the screws back in. Once everything is in, press all together with your fingers and make sure it feels solid and completely assembled. Replace the top plate and associated small steel reinforcing plate (obvious) and run the screws back in. Gently snug the screws in a cross pattern, then torque down firmly but with much less force than you’d use for most other fasteners.

In the case of high mileage bindings, consider re-inserting the screws with a small amount of one-hour plastic-enabled epoxy smeared on the threads and under the head — to help prevent loosening or shearing due to micro movement and metal fatigue. Warning: the four screws holding the Dynafit top plate are sensitive to stripping as they’re inserted in plastic; tighten with care, and re-check tightness periodically. Do not over tighten!
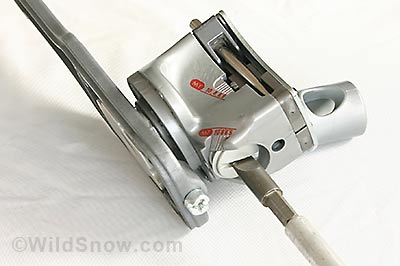

Removing spring cover barrel is much easier than replacing it.

Use a large flat blade screwdriver for adjustment and removal of rear spring barrel. Getting this out is easy, but it's quite difficult to re-install without stripping the threads. If you strip an old binding it's possible you will not find replacement parts.

To remove lower housing and side/lateral release mechanism please refer to our Dynafit brake installation instructions.

Remember, taking apart the upper part of a Dynafit tech binding rear unit is most often unnecessary and may even void your warranty. But the process might be necessary to maintain or rebuild older bindings hence our publishing these instructions.

Lou Dawson

WildSnow.com publisher emeritus and founder Lou (Louis Dawson) has a 50+ years career in climbing, backcountry skiing and ski mountaineering. He was the first person in history to ski down all 54 Colorado 14,000-foot peaks, has authored numerous books about about backcountry skiing, and has skied from the summit of Denali in Alaska, North America’s highest mountain.

www.loudawson.com
1
Email
previous post
AA & AAA Rechargeable Battery Basics
next post
El Tigre–Backcountry Adventure Wheels

Trip Reports

  • A Small Hut for Big Skiing in the San Juans: Aladdin’s Lamp

    April 23, 2024
  • Revisiting a 2011 Trip Report: Adventure in the Pickets — Thread of Ice Ski Descent

    December 9, 2022

Avalanche Department

  • Ask a Forecaster: Q&A with CAIC’s Andrew McWilliams

    March 10, 2024

Tips & Tricks

  • Transition Efficiencies 101 with Tech Binding Heel Units

    January 6, 2023
  • Visualizing the Backcountry as a Splitboarder: Minimizing the Challenges of Movement by Anticipating Terrain

    December 5, 2022
  • TURBOCHARGE YOUR TRAILHEAD BEACON CHECK

    November 15, 2022

Recent Comments

  • Daniel on Backcountry Ski Boots Buyer’s Guide: The Touring Boots Worth the Money
  • Jim Milstein on Best Touring Packs for Guides and Daytrippers
  • Bergen Tjossem on Much more than a steep ski: Fischer Transalp 92 CTI Long-Term Review
  • Maciej on Much more than a steep ski: Fischer Transalp 92 CTI Long-Term Review


  • Facebook
  • Twitter
  • Instagram
  • About Lou Dawson
  • Terms of Service
  • Authors Page
  • About
  • Contact
  • Advertise
  • Copyright & Legal
  • Website Security

@2025 - All Rights Reserved. Designed and Developed by WildSnow


Back To Top

Read alsox

Click in and Go with the...

February 14, 2023

Salomon’s MTN Summit 12 BR Binding:...

February 2, 2023

Kreuzspitze GT 2.0 Binding: A First...

January 4, 2023