Near the top of the the skin track trail you catch up with Dan. He’s struggling on the steep climb. His ski trail out behind his skis like the appendage of a textbook bacterium. With every hacking step his skins peel from his planks a few more inches, until, after one mighty heave on a switchback, Dan slips backwards and falls with a howling curse, once climbing skin stripped from a ski and curled like a dead snake on the trail above him.

Rat tail skin attachment method 1, viewed from below.
Sure, you can duct tape your ski tails — and thus leave litter on the trail when it comes off after a mile or two. Or, you can handle your skins with the care of a cardiac surgeon and you’ll perhaps have no problems (at least until you reapply your skins in freezing rain.)
(Most skin fix solutions as sold retail work reasonably well, but they are not 100% reliable. They get knocked off when your ski tips collide, are sensitive to cold, and add weight. Other methods of tail fix may look good, but don’t do well when your skins stretch during a long climb on a hot day…)
Reality is that skins, even the latest, can have glue failure at the tails — especially in full conditions when reapplied in the field. Thus, having a simple and elegant way to attach your stick-on skins both at tip and tail is a key to efficient and safe ski and split-board mountaineering or touring.
Many years ago, when stick-on skins first came on the market, we were having the skin attachment problem among our group of Aspen area ski mountaineers. Pioneer extreme skier Chris Landry had traveled up to Canada, and noticed the locals using a skin tail solution that worked. He brought the method back with him, and it became somewhat popular for a few years, though never caught on big because it requires a small amount of home brew. Several decades later, despite better skin glue, I’m still seeing people’s skins come off, and I’m still using the solution Chris brought back with him — and I still believe it’s the best system. If you’ve got a few moments and a bit of hand skill, give it a go. You won’t be disappointed with the Rat Tail!
Making the Rat Tail is simple, and can be done in two forms. The first method below is the simplest and best because it doesn’t require any stitching, but you need skins longer than your skis to start with. If your skins are already cut to the length of your skis, see Rat Tail system 2, below.
Rat Tail system 1:
1. For this elegant rig your skins need to be 8 to 12 inches longer than your skis. Fit your stick-on skins with a simple wire tip-loop, cut to shape of ski if necessary, and cut the length 8 to 12 inches longer than your skis. For tip attachment use the wire tip-loops which attach by doubling the skin through the loop, and sticking it to itself. This allows you to micro adjust the length later. You can build in a few inches of length adjustment by looping more skin through the wire, but too much begins to interfere with the skin sticking to your ski. Your skis also need a tail notch for this system to work, if necessary cut a shallow notch with a rough file in your ski’s tail protector. Keep the release paper the skins are stored with.

Rat Tail method one,completed, with a rat tail made from the rear 10 inches of the skin.

Rat tail method 1, viewed from below.
2. Place a skin on the ski, with the extra length hanging off the tail of the ski. Stick a hunk of release paper back on the skin tail so you can work on it. Make a mark on the skin about 1.5 inches back from the skin tail. Remove the skin from the ski, then use a ruler and pen to mark the above shape (the rat butt) on the release paper that’s stuck to your skin. The shape doesn’t have to be perfect, but the Rat Tail® should be exactly centered on the skin, and be exactly 1 inch wide and parallel.
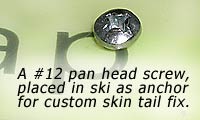
Simple anchor is a screw in top of ski.
3. Next, you need to create an anchor point on your ski. The easiest way to do this is screw a #12 pan head screw into the ski about one third of the distance between your binding heel unit and ski tail (closer to the binding than the ski tail). You may need to locate the screw farther from the ski tail if your skis are thin. Make sure you drill a large enough hole for the screw (don’t force it in). Leave the screw protruding about 1/8 inch. It’s often hard to get the exact length of screw required. If need be, buy slightly long and shorten with a file. After everything is done, remove the screw and reinsert with epoxy. Do not locate the screw too far rearward, as you ski may be too thin for the screw, and you run the risk of the screw catching your other ski if you cross your ski tails while you’re skiing.
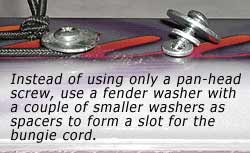
More complex of an anchor, but possibly more reliable.
While simply placing a pan head screw in your ski may be all you need to attach the bungie cord, my experience has been that the cord will occasionally get pulled off the screw during a kick turn or tough trail breaking. If you want the ultimate, try this: Use a #10 x 1/2 inch pan head screw. Place a 1/8 inch x 3/4 inch fender washer under the screw head, followed by two aluminum 3/16 inch pop-rivet back-up washers. This forms an attachment point that the bungie can’t get pulled from.

Some bindings may have a trick way of attaching the bungie cord loop. These shots of the Fritschi Diamir Freeride show a convenient little notch that’s molded into the plastic mounting plate under the heel unit. Who knows what this is intended for, but it works great as a place for the rat to curl his tail. Skin below overlaps over tail, not as good as cutting short as shown elsewhere in this article, but it still works and allows longer skins to be used with shorter skis.
4. The rest is easy. Double over the end of the Rat Tail and tape it closed. Tie a loop of 1/8 inch bungie cord through the tail, adjusting the size so it hooks over the screw in your ski with adequate tension. After you’re sure the Rat Tail works, apply duct tape to the glue on the underside of the Tail. Make sure you apply the tape to the area where the Tail wraps around the ski, otherwise the glue here will pick up dirt, then transfer it to other parts of your skins when you store your skins. Also, if you don’t apply duct tape to the underside of the tail, it will stick to your ski topskin and not allow proper tension from the bungie.
To use your home-brew Rat Tail skin tail fix, simply apply skin to ski as usual, hooking the tip first and using the Rat Tail as a convenient handle. Loop the Rat Tail over ski tail, hook bungie over screw, and go. To remove, grab the tails of bungie cord you left when you tied the knot. Use the Rat Tail as a convenient handle to pull the skins off your skis. You’ll be amazed how much time and effort this simple modification will save you over the course of a ski mountaineering season.

Rat Tail method one, completed, sans ski.
6. For the Rat Tail to work correctly, you MUST have a skin notch in the tail of your ski. If your planks don’t have a notch, make it yourself with a course file or disk grinder. Make the notch just a hair over an inch wide, center it perfectly, and make it just deep enough to keep the Rat Tail from slipping to the side.
Rat Tail system 2:
1. This system assumes your skins are too short to cut the rat butt described above. As in the instructions above, fit your stick-on skins with a simple wire tip-loop, but cut the skin tail so it goes to about 1/4 inch from the tail end of your ski.
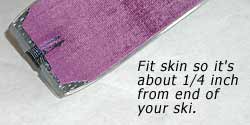
For rat butt method 2, cut skin a short distance from tail of ski.
You’ll be adding a piece of webbing to the end of the skin, so keeping the end of the skin close to the tail of the ski places the stitching under the upward curving part of the tail, thus preventing wear and resistance to glide.
2. Assuming your skis are 190cm or shorter, stitch an approximately 15 inch piece of 5/8 inch flat (non-tubular) webbing to the tail of your skin. Try to find webbing that’s not as thick as the beefy climber’s webbing sold in mountaineering stores. But the latter works if that’s all you can find. The length of webbing you stitch on is not critical, you’ll cut it shorter when you complete the project. While this can be done with a good quality sewing machine (rub WD40 on the needle and webbing to prevent gumming up the works with skin glue), it’s perhaps better to stitch by hand. Stitch well, with strong thread and many passes.
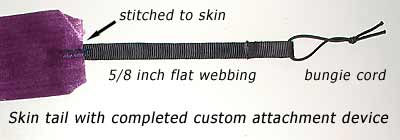
Method 2 involves stitching or otherwise attaching webbing to skin.
3. Make an anchor point on each ski, see details in Method One, above.
4. Stick a skin on a ski to check length of webbing. Wrap webbing up around ski tail and sew a loop at the end of the webbing so it ends up about 6 inches from the screw in your ski.
5. Tie a loop of 1/8 inch bungie cord through the webbing, using an overhand knot and leaving the knot tails a few inches long. Buy extra bungie cord, and experiment with different lengths/tensions for the loop. Fuse ends of webbing and bungie with a butane lighter.
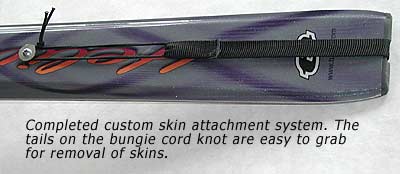
Rat tail method 2, completed.
Notes
Some of the commercial tail fix systems can be easily modified and changed to a more reliable Rat Tail style attachment. Reliable. Simple. Lightweight.
With both types of Rat Tails, you can slightly adjust your skin length for different skis by varying the amount of skin you have doubled through the tip loop. To add more adjustment, include a buckle in the webbing/bungie system, or use longer bungie and tie a few knots in the bungie loop so it’ll attach for various length skis. Remember, if you’d like your skins to work for different skis, skins that are custom cut for shaped skis will not work well for skis that are much different in length or shape. Some builders have reported they skipped using the bungie and just used a buckle. YOU MUST USE THE BUNGIE CORD FOR THIS SYSTEM TO WORK CORRECTLY, as the bungie allows the length to micro-adjust while while you are skiing, which is why this system is superior.
Every time I bring up the idea of using a tip/tail attachment system for skins, someone always chimes in with the fact that they never have problems with their skins coming off, and they don’t need tail fix. Fine, and more power to you. If you’re new to this game, my advice is try using your skins without tip and tail fix (but leave the tail long and wrap it up over the tail of your ski. If they work for you, that’s terrific. If not, install the Rat Tail, or use a retail system. That said, if you’re planning on doing radical ski mountaineering in harsh conditions, it might be a good idea to have a tip/tail system just for insurance, even if you have no problems during your normal trips.
WildSnow.com publisher emeritus and founder Lou (Louis Dawson) has a 50+ years career in climbing, backcountry skiing and ski mountaineering. He was the first person in history to ski down all 54 Colorado 14,000-foot peaks, has authored numerous books about about backcountry skiing, and has skied from the summit of Denali in Alaska, North America’s highest mountain.
