(Editor’s history note, 2014. According to Backcountry Access, the Alpine Trekker was readied for retail in July of 1994. While we do still tout the efficacy of this product for certain skiers, we also feel it and other heavy touring solutions of those days are what drove the trend to today’s amazing array of lightweight alpine touring bindings. Adapters such as Alpine Trekker still have their place, but be sure to consider other solutions if you need a backcountry skiing rig that’s purposed to some distance and vertical.)
Review
Dream nightmares of mega-slogs such as Canada’s Mount Logan; or nail your favorite Austrian couloir. In either case skis are the tool for amazing adventure; and in most cases you’ll want modern backcountry bindings that switch between locked and free heel.
But sometimes, the need for an alpine binding supersedes the need for a touring binding. Perhaps you’re sidecountry skiing and only walking a short distance from and back to the resort. Perhaps you ski so aggressively only a competition quality alpine binding works reliably enough for you. Or perhaps you just don’t have the money for a ski touring rig.
While various solutions exist for getting touring capability from your alpine bindings (e.g., CAST), the tried and true standby is the touring adapter, and the best of those out there is the Alpine Trekker.
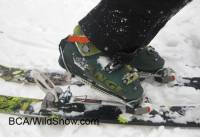
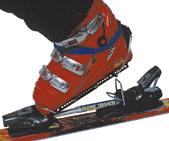
Alpine Trekker is simply a dummy ski-boot sole that you clip into your alpine ski binding. Attached to the dummy is an adjustable frame that holds your ski boot via a clip such as those used with clip-on crampons. An axle attaches the front of the frame to the foundation, and the resulting pivot allows you to lift your heel and walk with the shuffling gait of a backcountry skier. Attach climbing skins to your skis and up you go.

Alpine Trekker inserted in an alpine binding, showing how the boot can lift in a walking stride. Click to enlarge.
To keep your Achilles tendons happy the Trekker even has adjustable heel lifts. If your path gets hard and icy, snap on the optional crampons. When it’s time to ski down, stow your Trekkers in your pack and cut snow on the same gear you use at the ski resort.
If you’ve done much backcountry skiing, the first difference you’ll notice about using Trekkers is the weight. I calculated one rig, using my heavy alpine skis, at over twelve pounds per foot! Even so, ski touring a short distance with that kind of load is not as bad as it sounds, since you slide your skis rather than lift them. Also, it’s easy to cut weight by building your alpine rig using modern and usually lighter skis, bindings, and boots. Further, many alpine boots now have some sort of “walk” mode switch. While such switches may not free the boot cuff to match the articulation of a state-of-art ski touring boot, they do make a boot totally capable for a short walk in the sidecountry.
Another interesting part of using adapter plates is your stilt-like position jacked up about four inches off your planks (or more if your bindings are on risers). While you’ll get somewhat used to this, it is not ideal.

Alpine Trekker inserted in alpine ski binding, allowing stride.
Perhaps the most worrisome problem with Trekkers (and common to all adapter plates) is that you can place ominous torque on the system by driving your foot forward in a “knee fall” or twisting the binding plate sideways. If you take a hard fall while touring, and such forces don’t release the plate from the binding, you may bend the adapter or damage your alpine toe piece. Building an adapter without these problems would add great weight and expense. Indeed, the Trekker is an excellent compromise between weight and strength, and holds up fine under proper use: Be aware of potential problems, keep everything properly adjusted, and use good touring technique. As with any binding system, carry a repair kit if you’re on a long journey.
Adjusting the Trekkers is easy, just turn a screw at the rear and match up the length to your ski boots. You can use a Swiss Army knife for this, but a cordless drill works better. After that, adjust the toe and heel wires for proper tension. Doing so took me all of five minutes. Loan your Trekkers to your friends or change your equipment; one size fits all.
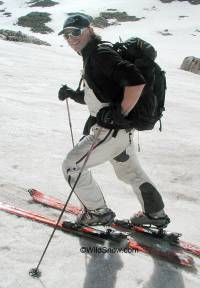
During testing I stowed my Trekkers in my pack, along with climbing skins, avalanche beeper and shovel, and headed out for a sidecountry tour near our local ski resort. After a morning of warming up on the packed slopes I ducked through a backcountry access gate, snapped in my Alpine Trekker adapters, and switched to adventure mode. The snow was less than perfect; but my ruthless alpine gear churned butter from the crust.
At the bottom of the backcountry run, my smile stayed bright as I snapped my Trekkers into my bindings, stuck my climbing skins to my skis, and strolled through a pristine aspen forest back to the ski resort. Another quick click, strip my skins, and I was again in full alpine mode. After a few runs on the groom, I decided to dive off the back again. Variety, the spice of skiing.
Weight of one Alpine Trekker ski touring adapter: 21 ounces, 594 grams.
(Other brands of adapter plates may be available in the used and retail market. Adapters other than the Backcountry Access Alpine Trekker may have durability problems. Test all adapters near civilization before heavy use.)
WildSnow.com publisher emeritus and founder Lou (Louis Dawson) has a 50+ years career in climbing, backcountry skiing and ski mountaineering. He was the first person in history to ski down all 54 Colorado 14,000-foot peaks, has authored numerous books about about backcountry skiing, and has skied from the summit of Denali in Alaska, North America’s highest mountain.

