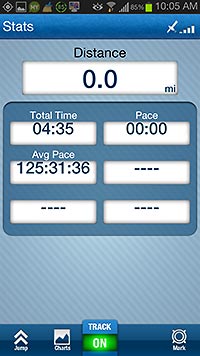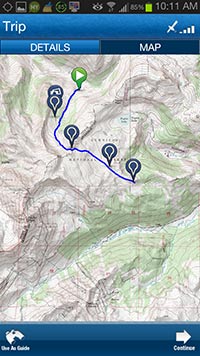
Trimble Navigator app on my Galaxy Note showing a route obtained from their cloud database.
Trimble is a deeply experienced GPS company that sells a GPS smartphone app as well as cloud sourced desktop companion software. We reviewed their desktop companion some time ago. This review is focused on the phone app.
First, naming conventions: If you search for Trimble in the Android app store you’ll see icons for “Trimble Outdoors Free,” “Trimble Outdoors Pro,” “My Topo Free,” and “My Topo Pro.” But the text next to the Outdoors icon will add the word “Navigator” to the mix. On top of that, they offer “Elite” versions/memberships in addition to “Pro,” and when you’re viewing the free version of Trimble Outdoors on your smartphone, you’ll notice they offer an upgrade to Pro+ (that’s with a plus sign). Frankly, by the time I saw the + sign and also realized that the smartphone app was called “Navigator” rather than “Trimble Outdoors Pro+” I gave up trying to understand what all the Trimble stuff is officially called.
So we’ll do a couple of things to simplify. First, in this review I’ll ignore “My Topo.” Instead we’ll discuss the Trimble Outdoors Navigator smartphone app and we’ll call it either “Navigator Free” or “Navigator Pro.” If you’re curious about what the + sign means (not much), you can view the features matrix of Navigator here.
The nut of the deal is that unless you pay a one-time charge of $4.99 for Navigator Pro you’re not going to be able to grab and store offline maps for use in the backcountry. What is more, Navigator Free will obscure part of your screen with advertising. Thus, for backcountry navigation you’ll need the Pro version or else buy map cards from Trimble. Map SD cards are $69.99 per state. Again, the Pro version lets you backload maps while you’ve got data access. But if you stay mostly in the same area, buying a map card could easily be worth its cost due to saving time you’d spend fooling around with map loading.
(Note, you can transfer SD card map data to a larger card if you need extra storage.)
Map Navigation — use device as a basic GPS.
Most muscle powered backcountry travelers use GPS as a simple map-and-locate tool. You set up your device with a terrain map on the screen, and let the pointer icon tell you where you are. Beyond that, you might download a route, show it on your map screen, and follow it.
Navigator does an adequate job of supporting such basic GPS assisted travel.
Trimble Navigator map screen is relatively uncluttered, though you’ll still wish for a way to disappear the ridiculous blue band across the top, which takes up a hefty percentage of your pricy Android LCD to state the word “Map,” presumably so if you don’t know what a map looks like, you’ll know you are looking at a map. A tiny GPS satellite connection indicator is there as well, but again doesn’t need about 9% of your Gorilla glass.
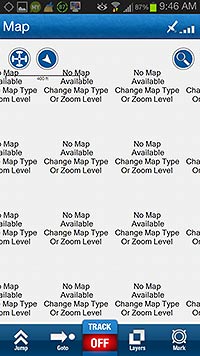
When using online or cached maps, if you zoom your map too much you get this, then have to zoom back down for a visible map. This annoyance definitely needs a fix. (Trimble map SD card does not have this problem.)
A menu across the bottom of the map screen show a fat “TRACK” button that turns on your route tracking as well as a “Layers” option that takes you to your map layer choices. Map types are limited, but adequate: a couple of street maps, some satellite views, USGS topo maps (My Topo), and Terrain OCM. For backcountry navigation I’d generally use USGS, OCM and a sat view.
One brain pricking annoyance is that when using online or cached maps, Navigator maps will zoom to a level where you’ll see no more map, but instead get a screen full of error messages. I’ve used the app quite a bit and still encounter this due to accidental finger swipes and taps, or during the simple act of attempting to get the max zoom level for a map. It would seem trivial for an app to stop zooming when there is nothing larger to display. Indeed, other map & GPS apps I’ve tried have no problem with this. Likewise, when using the Trimble map SD card, zoom stops at the visible limit without confusion.
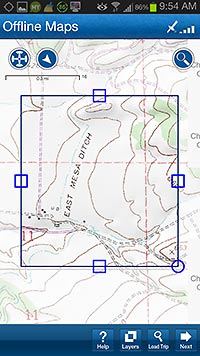
Marking a map for backloading is a confusing process but it works. If you did it regularly you'd easily memorize the process.
Using Trimble Navigator to pre-load maps for offline use is obscure but doable once you learn the non-intuitive steps: First get a map showing on your screen, centered on your trip or location. Touch Layers/Offline-Maps. Next, on the “Offline Maps” screen press the arcane +/new icon on the lower right which brings your map back up with a user adjustable bounding box. Why you can’t just do this from the map screen is an odd quirk. Once your bounding box covers the area you want to pre-load (keep it tight, huge amounts of data), touch “Next.” Here you’ll select your map types for storing on your advice. Again, keep it simple, generally Terrain:OCM and Topo:MyTopo. But wait, it gets more confusing. The next screen allows you to select zoom levels you’ll download. The upper slider is your max and the lower your min. For backcountry navigation use always download the max zoom level, but try keeping the minimum to 9 or so, as you don’t really need the view from outer space.
Another confusion point with backloading maps is once you’re navigating, make sure the map layer you’re using is one of the layers you stored. Otherwise you get a bunch of tiles that give the non-helpful error message: “Error: No Network Connection.” Uh huh, I happen to know I’m on the south side of nowhere without a cell tower in 100 miles. I-don’t-have-a-network-connection-thankyouverymuch — now what?
Indeed, context-sensitive error messages might be something Trimble could look at providing. The map tiles have enough space to say something like “Error: turn on network connection or use offline map layer you downloaded.”
Another gotcha is that the map download to your device may take some time. Have a large SD card unless you’re selecting small areas for download.
Using the “Jump” option on the bottom menu, you can shift to “Stats,” which is a disappointing GPS information screen that’s limited to showing variations of distance, speed and elevation. Amazingly, even though this is a GPS app the Stats screen can’t be set up to show your present GPS coordinates. I find that to be just plain weird, and unfortunately require running another GPS app that has a better information screen. (I don’t usually allude to possible upgrades, but in this case Trimble does say they’ll soon be adding GPS coords to the stats screen. Let’s hope that happens soon, as this is a deal breaker for some folks.)
If you do need your GPS coords, here is what you do:
Option 1) With your map on the screen, press “Track” then “Mark.” This will show you the coords of your location, and create a waypoint if you want.
Option 2) Long-press on the Map screen and create a waypoint, which will show GPS coords. My big blunt finger does this crudely, but the stylus that comes with my Galaxy Note is just the tool for the job, and in fact allows me to mark a series of very accurate waypoints, thus essentially creating a “route.” (It’s also possible to create a waypoint by entering GPS coords, as with most GPS units.)
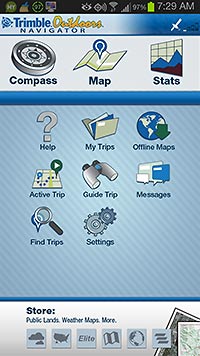
Big icons look somewhat juvenile -- until you use in bright light. Then, aha! Still, why not just put them on a black background? Anything to help with how bad smartphone screens are in bright ambient light is a huge plus.
GPS app use in bright sunlight is always a pain. While the Trimble maps have nothing unique that helps with this (wouldn’t it be cool if they did?), the large icons in the “Jump” menu are a real plus. They look old-fashioned when you’re indoors and not needing them, but they sure help during actual backcountry use. What a concept; you can actually see what you’re tapping!
Next, what about that mysterious arrow icon that’s the map pointer? What’ll confuse the newb is when you’re moving at walking speed it seems to jiggle around and rotate, with no plan. When you’re driving, it points in your direction of travel until you stop (say, at a stop sign), in which case it swings north. The root setting for how the pointer operates is the “Use Magnetic Compass” choice in the app settings. With any GPS, you always want this switched on if available, as it’s key to making a GPS unit work well for blind navigation (say, in a whiteout). The following assumes your phone is set to use magnetic compass.
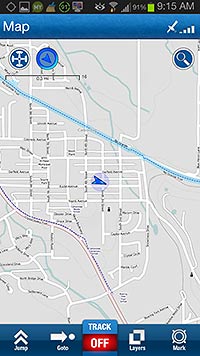
The mysterious blue pointer icon. Which way does it point? Also, it needs a few size and shape options.
– When you exceed a certain speed or combo of speed and motion, the pointer operates in “vehicle mode” in which it points your direction of travel. In other words, the pointer does not reflect the magnetic compass.
– At walking pace, the icon points north and reflects the magnetic compass. The jiggling is movement of your map/screen “under” the pointer. In blind navigation, you’d want to keep your screen rotated so that the up direction (north) on the screen remained aligned with pointer direction (north). That way your map would be oriented to the land under your feet and you’d thus be able to walk the correct direction away from that 1,000 foot cliff just to your south.
– Hint if you have trouble visualizing: When in walking mode, rotate unit the direction you want the pointer to “move,” so as to align pointer with “up” on the map. Try it.
– Pointer arrow is large and may obscure detail underneath. I can’t find an option for changing size or shape. Sometimes a simple dot would be better with a nice big compass overlaying part of the screen. Near as I can tell, center of the arrow is your location, not the end of the pointer.
– Confusion about pointer seems to come from 1) the fact that it operates differently depending on your magnetic compass settings; 2) whether your phone thinks you are driving or walking. In my opinion, this should be something the user can toggle to automatic or manual.
In summary, Trimble Outdoors Navigator Pro:
— A pleasantly simple app that doesn’t confuse.
— Sometimes app is too simple, for example lacking a full GPS info screen.
— Compass is nice, but only available on a separate page. Needs an option to overlay a compass on the map, perhaps with different size options.
— Backloading maps is a confusing process, but does work.
— Available SD map cards are expensive, but super nice.
— Large icons are terrific in bright light but overall design could still be better for visibility in the reflector oven.
— Overall screen interface could be better designed for bright light. White text on light backlit blue is not exactly high contrast, though it does look nice in your grandmother’s parlor. An overall white on black or black on white option would be appreciated. Even grandma might like it once she was outside, squinting at her smartphone trying to find the tomato patch in her garden she stored as a waypoint.
— No option for drawing or otherwise creating a track or route, other than actually traveling the route. You can create a series of waypoints and do a “GoTo” to each point. Rather primitive and fiddly.
— Both free and paid app versions are integrated with Trimble Outdoors, access all their cloud stored trips (when using the free app some trips cost, some are free, confusing). Create your own trip using their desktop companion. This is important as many of the excellent GPS apps out there in appland lack an integrated way of creating routes on your desktop then easily utilizing on your phone. What is more, if you have any wish to share trips, via social media or blogging or otherwise, the Trimble system for doing so is robust.
— On the whole, recommended if you’re serious about using pre existing routes/trips obtained online from Trimble, or creating and publishing routes/trips yourself. Test the free app and upgrade to “Pro” version if you like it.
WildSnow.com publisher emeritus and founder Lou (Louis Dawson) has a 50+ years career in climbing, backcountry skiing and ski mountaineering. He was the first person in history to ski down all 54 Colorado 14,000-foot peaks, has authored numerous books about about backcountry skiing, and has skied from the summit of Denali in Alaska, North America’s highest mountain.

