(Editor’s note: This post seems to be good grist for discussion, so I re-upped it today in anticipation of the coming (or already present) avalanche season here in the Northern Hemi. Comments appreciated.)
Some things in ski mountaineering take a high degree of mental acuity. Tech bindings might be one. For men, how to actually end up skiing with a woman instead of a group of guys is definitely another. Starting before 10:00 in the morning could be an item for improvement as as well.
But above all, sometimes it takes a while to wrap your mind around the fact that snow avalanches are predictable in a number of ways. Thus, while luck and chance play a part in any aspect of life, it is not just chance or luck of the draw that keeps you alive in avalanche country.
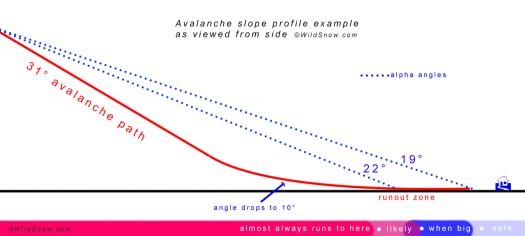
Avalanche slope profile side view showing alpha angle concept. This is a representative graphic of a fictional avalanche slope. Click to enlarge.
I’m making no claim here to any sort of engineering or geology expertise. This is written from one backcountry skiing layman to another, with the simple purpose of conveying a concept I’ve found useful and practical over the years for increasing avalanche safety. Any mistakes in terminology or facts are mine and mine alone and I’ll correct upon notification.
Avalanches behave according to natural physical laws involving mass under the influence of gravity and such. While it’s impossible down to inches to predict where an avalanche will stop moving (unless it goes up against a terrain feature), it is possible and quite easy to predict the maximum extent within a few hundred feet or less, depending on topography and some basic engineering concepts. Yep, we’re talking about alpha angle (also known by terms such as angle of reach). We’re talking about the learned skill of being able to recognize an avalanche slope and perhaps avoid the runout, even in situations such as a high altitude glacier with no vegetation clues.
Before we start with the details, if you don’t get this, here is the proof. All over the world, municipalities and land use planners in alpine regions zone or otherwise designate avalanche safe areas in alpine topgraphy. They don’t use voodoo to do this. They don’t use divining rods. They don’t just sit around and go “blah blah blah.” Instead, they have someone use a few simple techniques that give a very good idea of safe and unsafe areas. If necessary they refine this with engineering math, but anyone can do the basics.
Below depicts a huge avalanche path near McClure Pass, Colorado known as the Cleaver. (A good spring corn snow skiing destination, by the way.) The lower trim line is easily spotted, and is the result of a 100 year type of avalanche that occurred on January 12, 2005. How do we know it was a 100 year variety? It is because of the 100-year-old trees that were taken out.
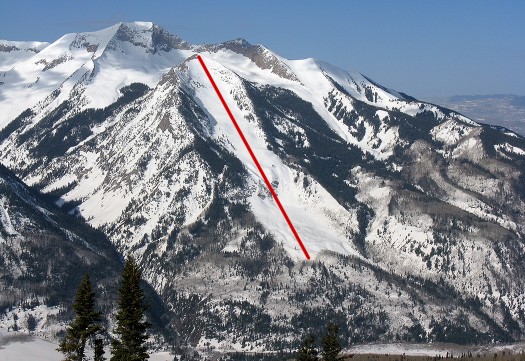
Cleaver avalanche path, extent of 2005 ‘full path’ slide is marked as one would shoot alpha angle if he were standing at the bottom next to the trees that were still standing. I know from years of observations that this location would be quite safe during a normal avalanche in this path, but dangerous or deadly during the 100-year event due to wind blast and debris. Whatever the case, let’s work with this spot and see what the angles are.
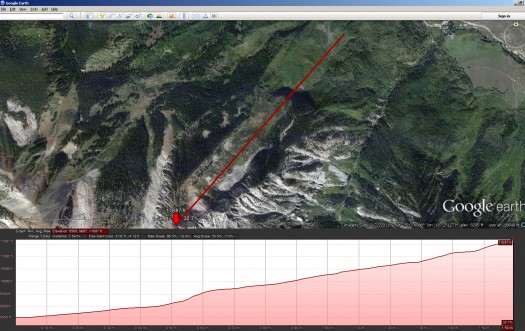
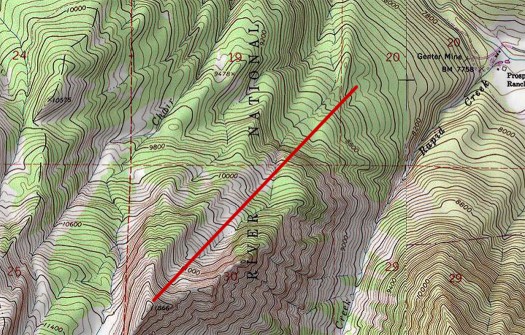
Aha, using Google Earth yields 19.5 degrees. Considering the slide junk ran into the trees (we went up there and looked), max extent was probably closer to 18. There you have it. In this case perfectly predictable based on using 18 degrees as max extent of Colorado large slab avalanche. For larger paths you can get useful alpha angles at home for trip planning or curiosity. But smaller paths such as Sheep Creek are too sensitive to errors in exact location as well as anomalies of the elevation sampling grid to get anything useful out of Google Earth. You have to observe with your feet on the ground.
To get your alpha angles at home in Google Earth, first draw a path from the top of the slide path starting zone to the point where you want to catch an alpha angle. After the path is created, just click Edit/Show-Elevation-Profile then convert the percentage grade to degrees.
So, how do you observe alpha angle in the field? Simple, just sight with an inclinometer (or trained eyeballs) to the top of the estimated starting zone, and estimate where the sight line intersects behind you (or lie down on the snow and sight). That’s all you need to get an idea of where you are in relation to the path runout. Hopefully you do this when approaching the path from the bottom, as in “Hey Salley, looks like my inclinometer is showing 16 degrees to the top of that avalanche path above us, let’s stop for lunch here before we get any closer.”
While approaching an avalanche path from side, just hold the inclinometer up and tilt to align with terrain. Angles become pretty obvious once you do this. If it’s cloudy and you can’t see the avalanche path above you? Different story, and you’ll be depending totally on vegetation clues if they exist. If it’s all a total mystery due to visibility or strange terrain, that’s a fire alarm that in many cases would dictate a major route deviation or turning back (or very careful map reading).
It might go without saying, but should be emphasized that all this angle stuff is dependent on general probability of avalanches from a given exposure, based on avalanche forecasting factors. On a day with super low danger you might charge ahead with very little fooling around with judging safe zones. During a day with high hazard you might be figuring alpha angles numerous times as you progress your route. And to repeat, different regions and types of snowpack have different average alpha angles.
Beyond alpha angle, another sometimes esoteric concept is beta angle. This dictates the area of the path where the avalanche flows easily as opposed “thinking” about stopping. It’s somewhat arbitrary and not something I find that useful. But others disagree so it’s worth illustrating. See image below:
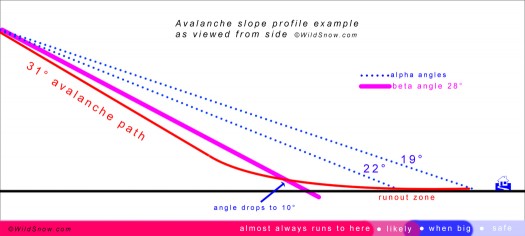
Beta angle in purple. It’s the imaginary line drawn from start to where the path reaches 10 degrees angle. In this case the beta angle is 28 degrees. I’d imagine geologists and avalanche pros use beta angle quite a bit for things like evaluating how violent a given avalanche could be, or as another way of looking at how steep an avalanche slope is. I supposed it could be used as a very non-conservative way of identifying a possible travel zone, or perhaps the spot where it becomes less likely you’ll trigger the avalanche yourself. Comments on beta angle appreciated.
I’d like to emphasize a couple more things. First, yes, topography such as deep moats or vertical channeling can either reduce or extend flow, but smaller terrain features such as lower angled or shelf parts of the avalanche path are figured into the overall alpha. In other words, if you look up a slope from the bottom and shoot the alpha angle from where you are, either with an inclinometer or just by eye, do not let changes in path angle or shelves have too much influence on your decision making. The inclinometer doesn’t lie. Also, if you get a chance to observe powder slab avalanches it is amazing how quickly they stop once they start approaching the lower alpha angle region. You can feel it when you’re in one, it’s like someone putting on the brakes. Again, physics, not chance.
Okay, over to you guys. Commenters, a challenge. Imagine you are above timberline in Colorado, and you start heading towards an obviously loaded steep slope. Perhaps you’re going to Friends Hut from Aschcroft, a common route with several miles of above timberline terrain that passes under avalanche paths — many of which have no vegetation clues as to here the runouts are located. You know it’s an avalanche slope you’re looking at because in your Avy 1 class you learned that anything this steep with snow on it is an avalanche slope. But can you figure know how far away from the bottom of the slope you need to stay to get to the hut without unnecessary risk?
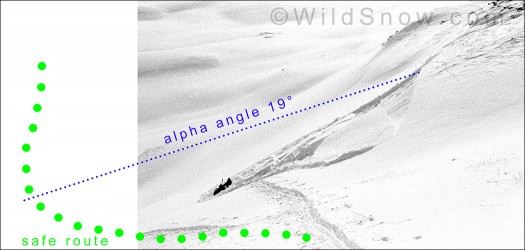
Here is a real life example. Small pocket avalanches can hurt you. This person had a wind slab flow around her feet and bury her skis, if she’d been higher up on the slope an injury could have resulted. As it was, she was scared but unharmed. This incident illustrates how important it is to judge your runout angles when you’re in places where vegetation doesn’t tell you where slide can go. The photo shows part of the route to Pearl Pass from Aspen side. At this particular spot, you can save a bit of energy by cutting up close to the wind roll, or you can drop perhaps 50 feet of vertical and swing around far enough away from the snow pillow to achieve an 18 or 19 degree alpha angle from the top of the avalanche slope to your track. Quite a few people have no ability to judge this without the use of an inclinometer. An experienced skier would tend to swing around lower, though it’s easy to get lazy and I’ll admit to that. This little thing actually taught me a big lesson about keeping up my guard and working better with groups. It’s a perfect example of how alpha angle can be used to predict safe routes — by experience or instrumentation.
Resources:
Convert slope angles from percentage grade to degrees angle.
Shopping for inclinometer slope meter angle gauge:
Inclinometers come in many different flavors. I prefer the non-electronic and inexpensive dial type, small enough to carry in a pocket. Good stocking stuffer for next December. But the Pieps electronic 30 Degree Plus is a cool option as well. (You can also use an angle gauge app for your smart phone, but then you’ve got the typical smart phone battery life and durability issues. At this time, we recommend most smart phones remain turned off and stored in a waterproof hard case if carried in the backcountry so they’ll work when you need them.)
Since every backcountry traveler should carry a compass, how about one with a built-in inclinometer slope meter? Below are a few compasses that work as clinometers, as well as some other slope meter options. (Note, slope angle gauges go by different names: Slope meter, clinometer, inclinometer, goniometer, or was that gonadometer? We tend to use the word inclinometer since it implies an incline, but we use other terms as well to mix it up.)
Silva Ranger is a classic that also includes a sighting mirror. If sighting mirror sounds like yet another geeky thing to learn about, know that the mirror doubles as a cover for the dial, and can of course be useful for a variety of purposes (checking your sunscreen, checking girls on the sly, checking makeup and so on) — as well as reading the slope meter from different angles. The cover can be removed if you want to reduce bulk and weight a bit.
If you’re planning on never geeking out with your compass but want a simple one that still functions as a slope meter, Sunnto MCA Challenger is a viable option. Costs less because it doesn’t have adjustable declination setting (if you don’t know what that means, then you don’t need it.) Again, the mirror allows you to read the slope meter from various angles. If you’re probably not going to navigate by compass but want one for a clinometer and simple direction finding, at around $33.00 this is probably the sweet spot for shopping.
If you really use your compass for navigation and want something that’s top-of-line and includes clinometer, check out Sunnto MC2G. This unit is especially nice if you’ll be traveling to the Southern Hemisphere as compasses are actually built slightly different depending on if you’re north or south of the equator.
If you plan on shooting a lot of alpha angles (perhaps you’re learning to eyeball avalanche paths, or teaching), a dedicated clinometer with larger more easily read scale is the ticket. You can pick one of these up at your local hardware store, but most I’ve seen have magnets that add cost and could interfere with electronics. Option to right is inexpensive and doesn’t have magnets. Set it on or tape it to a ski pole when you’re doing research. You have to read it from the side, but it’s much easier to read than the tiny clinometer scale on a compass. I found a really nice larger version of this with magnets which could perhaps be removed. If you’re doing avalanche research or accident reports, I’d recommend using a high-end electronic range finder. But if you’ve got the bucks, one of those could be fantastic for teaching.
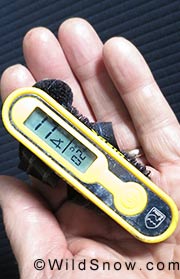
Pieps 30 Degree Plus is beautiful.
One of the best clinometers that’s been created for avalanche safety work is the little Pieps 30 Plus that velcros to a ski pole or easily fits in your pocket. This little gem reads from the top or side and even has a thermometer. Weighs one ounce, tiny yet easy to read. Senses from horizontal to vertical (0 to 90 degrees in one degree increment with plus or minus one degree accuracy, meaning it’s going to be about the same as using an analog slope gauge in the field). Five year battery life. Give one to the newb in your life who’s trying to learn avalanche safety, and tape it to one of his ski poles. Sadly, the 30 Plus is hard to find and may even be out of production. If you find one, snap it up. While a bit pricey ($100 or so), definitely one of the cooler items to come along over the last few years.
WildSnow.com publisher emeritus and founder Lou (Louis Dawson) has a 50+ years career in climbing, backcountry skiing and ski mountaineering. He was the first person in history to ski down all 54 Colorado 14,000-foot peaks, has authored numerous books about about backcountry skiing, and has skied from the summit of Denali in Alaska, North America’s highest mountain.

