Frequently Asked Questions (FAQ), Tricks, Tips Dynafit Tourlite Tech (TLT), Comfort, Vertical, Radical ST10, FT12, 2.0 randonnee tech “AT” ski bindings. (updated 01-24-2015)
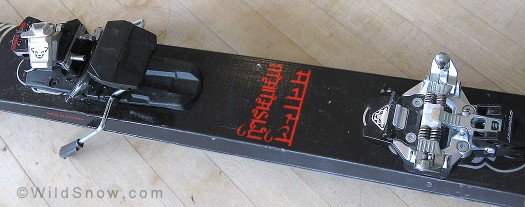
Dynafit Radical series (FT and ST) came out in 2011 and are still state-of-art in 2015.

Time tested and reliable Dynafit TLT ski binding in touring mode with heel lift, brake installed and retracted for touring. 2001 model shown here, all are similar.
FAQ INDEX
What makes the Dynafit bindings special?
What do people call these things?
Where can I buy Dynafit Bindings?
How does the Dynafit backcountry skiing binding work?
How much do Dynafit bindings weigh?
How much do the boot fittings weigh, are they durable?
The Dynafit binding looks so small, is it durable?
Up/down play in the heel, brakes don’t retract.
Can I huck cliffs and ski bumps with Dynafit?
So, can I use my Dynafit bindings as a resort binding?
I did a jump turn, and pre-released up at the heel, problem?
Do they release just like an alpine binding?
Can I telemark with Dynafit bindings?
What about riser plates for backcountry skiing?
Does the Dynafit binding have a climbing heel lift – how does it work?
How do I rotate the heel lift on TLT series bindings?
Dynafit ski brakes jam up against or between the lugs on the heel of my boot sole, fix?
Is it possible to mount the Dynafit at home without a jig?
Can you swap models of Dynafit binding on same mounting screw hole pattern?
Do Dynafit bindings adjust for different size boot shells?
Dynafit Radical bindings have funny looking star drive torx screws, what tools do I need for those?
I noticed the gap between the heel of my boot and the binding heel unit, is this important?
Any quirks with this backcountry skiing binding?
When I put on my skis, I can’t get the wings on a toe piece to close. Fix?
Any other general problems to be aware of?
I want even less weight for backcountry skiing! How?
Where can I get Dynafit ski bindings?
Do all Dynafit bindings use the same mounting screw hole pattern?
Do Dynafit bindings have a right and left?
What should I carry in my repair kit?
I pulled my heel unit off the ski, what’s the deal?
I’m confused, my Radical FT-ST binding says to only rotate the heel unit clockwise?
Can the Dynafit binding fittings be aftermarket installed in any ski boot?
I stripped the plastic threads on rear binding release adjustment screw (spring barrel cap), repair?
How popular is this ski binding, and who invented it?
What is the Dynafit binding?
Dynafit ski binding is a backcountry skiing and ski touring binding that allows you to ski downhill with your boot attached to your ski the same way a regular resort ski binding functions, yet transforms into a touring/climbing binding for skiing uphill or across level ground with your heels free to move up and down. The binding is available to one degree or another (depending on exact year) in several basic models that split into sub-models. The basic models are the Vertical and Radical ST and FT, Speed, Low Tech and Beast.
TLT Speed is a basic version that’s been available for more than a decade. While discontinued around 2013, Vertical series models (FT and ST) are still considered entirely functional. Radical FT/ST and Beast are the most popular current models, though at any given time Dynafit usually has many models selling or in production.
Note that as of circa 2009 the term “tech” binding has been in use to describe all ski bindings that use a system similar to the Dynafit binding. Many other binding brands now have tech bindings on the market.
What makes Dynafit bindings special?
In a word, weight. It is amazing what the Dynafit engineers place in a package weighing less than your ski pants. This ski mountaineering binding has safety release, allows a fixed heel for alpine skiing, frees your heel for walking and climbing, is durable, holds your boot firmly on your ski — and much more. Ski touring with this binding is a joy. It’s no exaggeration to say the Dynafit binding revolutionized the sports of ski mountaineering and backcountry skiing.
What do people call these things?
In speech the binding is often called a “Dynafit binding,” or “Dynafit” for short — or as noted above, if the binding is not the Dynafit brand but uses the system of boot fittings and “pins” originated by Dynafit and inventor Fritz Barthel, the generic term for such is “tech bindings” or “pintech bindings.” Here at WildSnow.com we use the term “tech bindings.”
While we don’t have the space here to list all Dynafit bindings that have been sold over the past decades (there are dozens), here is a brief overview:
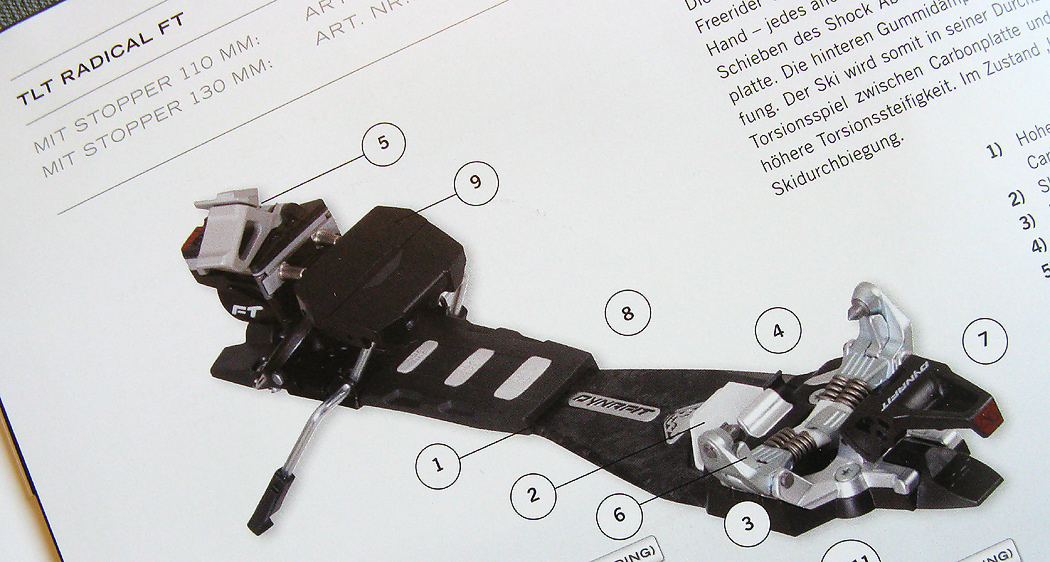
Numerous models of the Dynafit binding are in production or available on the used market. The lighter, leaner model that was sold for many years (see photo above) is usually called the “Dynafit Tourlite Tech,” or “TLT.” I’ve also seen it written as “TL Tech.” Recent lightweight models are the “Speed Radical” and “Superlite.” As of 2015 the most popular models were known as “Radical ST” and “Radical FT.” Leading up to the Radical series, models named “Vertical” were also designated by “ST” and “FT.” As of 2016 a model of the Radical has been in retail that has a rotating toe unit and stronger heel unit and is known as “Radical 2.0.”
A series of “freeride” bindings were also in the mix, known as “Beast” and since discontinued. You may find Beast models on the used market, they are not recommended. For retail season 2017-2018, among other models (see below) an upgrade for the Radical 2.0, named ST Rotation, was released that has a small change intended to help center the rotating toe for easier entry.
In the case of the Vertical and Radical models, The ST versions are nearly identical to the FT versions but have slightly lower maximum release value settings. The ST versions are the most popular for ski touring as they may cost less, weigh slightly less, and provide everything most skiers need. The FT versions usually have higher available release settings as well as cosmetic changes to make them appear more serious, such as connecting plates between toe and heel units. How much better an FT version is for aggressive skiing is an open question that’s specific to each individual.
It’s important to note that the Radical FT and ST bindings went through a serious period of “in line” changes for defects. If you buy bindings used, it’s necessary to know if you are buying a binding that’s been upgraded, or has possible defects. We have a number of blog posts regarding these issues. Example.
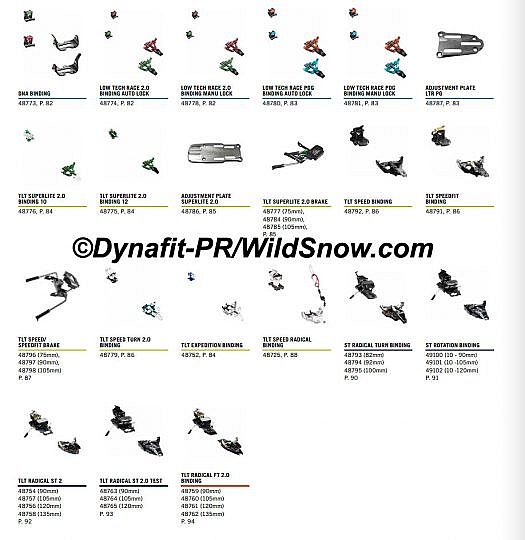
Dynafit ski touring bindings retailing 2017-2018. Note lack Beast model, but retention of Speed Radical. Click to enlarge for easier reading.
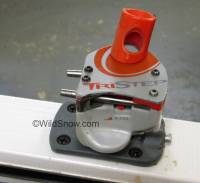
Dynafit TriStep heel is identical to Comfort model (released in 2004) heel. Tristep came a few years earlier (year 2000) and had a defective toe unit.
Another Dynafit model called the Comfort was available around 2004 through 2006, now updated and morphed into the Vertical and Radical models. Many of the Comfort model bindings are still in play, and when properly maintained can last for many years, as can the TLT models. The Comfort evolved from a failed model called the Tristep, both Comfort and Tristep had identical heel units, identified by a red or grey plastic cylindrical heel lifter that came to be known as the “volcano.”
All Dynafit backcountry skiing tech binding models work the same way as the original TLT, and are nearly the same binding. Among other differences, later models have a wider range of adjustment for different boot lengths, may be slightly easier to enter with your boot, and have a somewhat improved heel unit.This FAQ is intended to cover things that apply to all Dynafit bindings, for model specifics see our other FAQs, available via our menus above.
(Salewa North America distributes the Dynafit backcountry ski binding, and other associated gear.)
Where can I buy Dynafit Bindings?
For a good deal and terrific service we recommend the mail-order store Backcountry.com for buying Dynafit bindings. Be sure you have a good plan for mounting the bindings before you buy them mail-order. You can mount them yourself, or pay a shop to do it.
Shop for Dynafit alpine touring bindings at Backcountry.com
How does the Dynafit tech binding work?
Dynafit engineers could present a three-day seminar on Dynafit bindings. I’ll be brief. To function both as touring and fixed-heel skiing machines, most randonnee bindings have a heel and toe unit mounted on a rigid connector, such as a plate or bar (sometimes called a “frame”). Instead of being a “frame binding,” Dynafit and all other tech bindings use the boot as the connecting device, by building toe and heel connectors into the boot. This eliminates weight and parts. What’s more, Dynafit figured out a way to blend the walking pivot at the toe with the safety release mechanism, thus eliminating more weight. Vertical safety release is accomplished by the boot heel pulling a triangular metal fitting up though two springy prongs (known as the “heel pins”). Sideways (lateral) release is accomplished by the heel piece on the ski rotating under tension, while the small ball/socket joints on the boot toe pop “out of joint.”

Scale time is usually a scary moment, but not with the Dynafit (early TLT Speed model shown on scale, later models weigh a few grams more).
How much do Dynafit bindings weigh?
We weigh binding parts on a Pelouze PE5 digital postal scale (weights for one binding, not a pair, all weighed without screws and without accessories.) Scale accuracy is verified with a known weight. All our binding weights are available in one location on our Backcountry Skiing Weights Page.
The Dynafit Radical FT, with brakes, is somewhat a standard for what a full-function tech binding should more or less weigh, 566 grams, 20 ounces (per binding with 110 mm brake and screws, later production runs may weigh a few grams more or less.)
Ski crampons, brakes, and runaway straps add weight. See tips below for ways to minimize such glycogen drag. Anyone know where to get titanium screws?
How much do the boot fittings weigh, and are they durable?
The Dynafit fittings (known as “tech” fittings) molded into a Dynafit compatible boot weigh 1.1 oz (32g) per boot. They are installed during boot manufacture and are difficult or impossible to retrofit. The toe fitting is molded in, and the heel fitting is installed in a machined pocket and held by a screw and locator pin. The fittings (sans boot) are not available for retail sale, though they can be easily removed from worn out boots. The heel fitting is easy to remove (back out screw and pry the fitting out. To remove the toe fitting, grind the sole off below the toe fitting. Once the bottom of the toe fitting is exposed, pry it out. As to durability, there have been few reported problems. The heel fitting can loosen and become detached after heavy use. To prevent that, do preventive maintenance.
While they look simple, tech fittings are actually somewhat difficult to manufacture correctly and install in a way that they’ll be reliable. Most boot makers do a good job, but sometimes they fail to do so. Thus, buying boots from proven manufacturers is generally a better idea than being an early adopter of a new and unproven brand that’s recently decided to manufacture and install their own tech fittings.
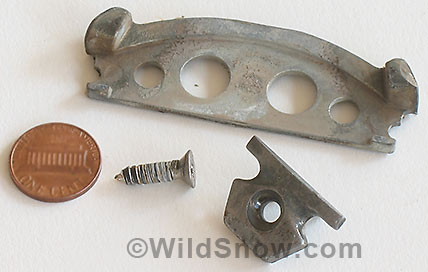
Dynafit toe and heel fittings removed from boot. Coin for scale. Total weight 1.1 ounces.
The Dynafit binding looks so small, is it durable?
Indeed, this engineering marvel is the most minimalist full-function ski binding system ever invented. It is now imitated by dozens of companies, and known generically as the “tech” syste. Yet despite it’s appearance the Dynafit binding is arguably one of the most durable randonnee ski touring bindings made. Other tech systems are usually just as durable and reliable.
Skiers who weigh more than 180 pounds, and carry a pack, may on rare occasions bend the steel heel elevator posts on the early models of TLT. This is not a critical failure, and is easily repaired with available parts (also, while somewhat hard to obtain, the heel post/plate assembly from the Tri-Step and Comfort models can be swapped onto the TLT and fits perfectly).

Dynafit Comfort binding with brake parts. Even with the brake mounted this binding was revolutionary in its weight savings, and inspired the vast array of tech binding brands and models available on today’s market.
Earlier Comfort models have occasional problems with the plastic plate under the toe unit breaking while using Dynafit’s dedicated ski crampon. This area is reinforced with steel on later models. There are also occasional reports of the front portion of this plate breaking, and it has subsequently been reinforced on later models.
A common durability question regards Dynafit toe pivot pins, and the boot-toe pivot sockets: Do they wear out? The steel used to make these parts is super-hard. Guides have used the binding for literally hundreds of thousands of vertical feet without significant wear. And in my experience (our family has owned more than a dozen pairs of Dynafit bindings, and used them for more then a decade on hundreds of peaks), this is not an issue. Nonetheless, it is prudent to make sure your boot pivot sockets are clean of grit, since heavy use combined with abrasive material could accelerate wear.
In all, use this binding with confidence in its durability for normal ski mountaineering (see “can I jump off cliffs?”), and forget the spare parts for all but huge expeditions. See the following thimble bushing info for more durability issues.
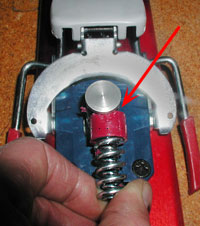
Dynafit heel with housing removed, spring and thimble bushing held in operative position. Arrow indicates where edge of aluminum post wears into bushing.
My Dynafit bindings have developed annoying up/down play in the heel, and-or the toe clicks while I’m touring. What can I do?
These problems sometimes occur with high mileage bindings. A wear point exists on small internal thimble shaped plastic bushing. This thimble bushing can easily be examined by removing the threaded torsional release setting barrel (just screw it out counter clockwise), removing the internal coil spring, then using your finger or sometimes a sharp hook such as a dental pick to pull out the plastic bushing/cap that rides on the end of the coil spring. (This disassembly procedure is used to install the removable brakes on the Vertical models and first Radical models).
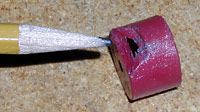
Worn thimble bushing, easily replaced.
If the thimble bushing has a worn spot, that is what’s causing your problem. Order replacements through your dealer, or from distributor customer service. Grease all bushing surfaces well when you reassemble. Moreover, frequently apply silicon or ski wax to the steel surface of the brake retractor plate that the binding rides on as it rotates between modes
You can slow down the thimble bushing wear by always retracting the brake by squeezing it closed with your hand when switching to touring mode, greasing the thimble bushing a few times a season, and lightly polishing the aluminum edges that damage the thimble bushing. Use 220 grit sandpaper for polishing. Clean well after polishing, and grease liberally during re-assembly. When taking apart and greasing, rotate the thimble bushing a bit so a less worn surface is riding against the aluminum edge of the heel post. Use a plastic compatible low-temperature grease.
Remember, this problem only occurs after many vertical feet of ski touring. It is normal wear-and-tear, easy to fix, and no cause for concern about this fine ski binding. Of interest, note that the thimble bushing and spring are the only thing holding the binding heel on the aluminum heel post, thus, if you have an exceptionally low release value setting and rotate the binding heel with upward force, you can possibly pull the heel unit housing up off the ski — rare enough to be a non-issue, but it has happened.
Clicking in the toe unit is difficult to diagnose and repair. First step is to tour with a different pair of boots. If the binding stops clicking the boots are to blame. But can they be fixed? Sometimes a boot will have too much rubber on the sole area over the binding wings, thus slightly shimming the boot up and causing it to move with each step. Inspect on workbench and remove excess sole material. If the binding clicks with any boot then you’re dealing with a defective or worn out toe pin in the binding, only solution in that case is to replace the toe unit. Occasional clicking while in touring mode is of little to no concern, but is indeed annoying. If the binding clicks with every step, in our opinion the problem should be taken care of. See this blog post for more about clicking and other Dynafit binding behavior.
The Dynafit binding looks meager, can I jump off cliffs and ski bumps with them, like I do with my alpine bindings?
First, note that beginning around 2012 Dynafit and other tech binding makers began making and marketing certain models designed for more aggressive “freeride” skiing. Examples being the Dynafit Radical and Beast models, with many more brands and models of freeride tech bindings appearing around 2014 and after. The idea with such bindings is you can use them as an alpine binding, in resort or in the backcountry.
While we feel some of the freeride bindings come close to the ideal of a tech binding that behaves like a best quality alpine binding, we still feel a full-on high end alpine binding is superior. Thus, we recommend taking care with your binding choice. If you rarely ski tour we strongly suggest not using you ski touring “freeride” bindings for resort bindings.
With “classic” Dynafit bindings (those with obviously more minimalist construction than the Radical, Beast, etcetera, moderate drops and relaxed bump skiing are fine, but you won’t be able to follow Glen Plake down through those Prius sized humps in Cham. Taking big air on classic Dynafits is not recommended if for no other reason than most ski touring boots are “soft” relative to alpine boots, and may not offer enough for/aft support for landing a jump at 60 mph on a huge pair of skis. Moreover, forcefully landing a ski in soft snow can bend (de-camber) the ski so much it jams the boot between the binding toe and heel, and thus pops the boot out of the binding. While the classic Dynafit binding is engineered to absorb some of this force, via movement in the space between boot heel and binding, alpine bindings and some other randonnee bindings can absorb more of it.
All that said, a pleasant surprise with all tech bindings is they they provide a good rigid connection between boot and ski. In fact, they’re as solid as any frame based touring binding on the market, and actually more solid than some. Just put a boot in the binding and press the cuff of the boot from side-to-side and look for wobble and slop (rolling deflection). Do so with different AT bindings and you’ll be amazed how solid the Dynafit is.
So, can I use my Dynafit bindings as a resort binding?
As stated above we don’t recommend any tech binding as a full resort binding. But in reality the choice depends on style and your feelings about how well the tech binding safety release functions.
There is some question about whether any tech binding offers the release function and retention of a best quality alpine binding. We feel this is a valid concern, and that it’s nearly certain that you are at least slightly compromising your personal safety if you forgo using alpine bindings on the resort and substitute a tech binding.
A real life example is a woman we know who uses Dynafit for all her skiing, both on and off resort, about 40 days a year (some “days” being fitness climbs before work). She is very happy with them, never pre-releases, and they seem safe enough. She seldom falls, and is not an aggressive skier.
But, and it’s a big BUT, aggressive resort skiing on the classic Dynafit is problematic (“freeride” designed tech bindings are the exception). For starters, hard bump skiing or landing large jumps, as mentioned above, can pop you out of the classic type Dynafit binding quicker than a champagne cork on a wedding night. What’s more, while the Dynafit is adequately durable in comparison with other ski touring bindings, a hard bash to the side of the heel piece can cause a lot more damage to the Dynafit than it would to an alpine binding. In summary, the Dynafit perhaps works fine as a resort binding for low-key skiing. Aggressive skiers should not use it at the resort, except for occasional “dial-in” days.
I did a jump turn, and pre-released up at the heel, is this a common problem?
Indeed, if you over-camber (bend tip and tail down towards the ground) your ski and pull up on the heel, the boot pops out very easily from most tech bindings, exception being bindings with greater upward (vertical) travel in the heel release mechanism. We’ve had this happen when standing in a steep couloir, with skis buried in deep slush. During an aggressive jump up to pull the skis out of the snow, the boot popped up vertically out of the binding.
This occurrence is easy to replicate in the shop. Latch a boot into the binding, flip the ski upside down and suspend between two solid supports at tip and tail. While pulling the heel of the boot down towards the floor, aggressively press down on the center of the ski to induce an exaggerated camber in the ski. You’ll be surprised how easily the boot pops out when the pins pull out of the heel fitting. The longer heel pins of the Vertical and Radical series bindings may help with this problem, as they allow a little extra distance before they pull out of the boot fitting. With any tech binding, be extra sure the specified space between boot heel and binding is no larger than specified (see below for details).
For much more excellent information about inadvertent binding release check out this excellent info from Vermont Ski Safety.
Do they “safety” release just like an alpine binding?
While more than a decade of testing has proven the Dynafit to have a functional safety release that’s similar to alpine bindings, it is not the same and in our opinion not as good as best quality alpine bindings. Alpine bindings may have more angles of release, and may have more elasticity (ability to handle movement, vibration, and shock). Remember that for maximum safety, all ski bindings require careful release settings tuning. Tune binding release by setting to standard settings using height/weight charts, and ski a few runs. If you have no problems with accidental release you probably have a good setting, but we also recommend having the setting levels verified by a ski shop with a release value testing machine. Ski all randonnee ski touring bindings more conservatively than you would full-on alpine bindings. In other words, ski without falling. Aggressive experienced skiers tend to have much more likelihood of injury due to pre-release rather than from falls, in their case dialing up the release value numbers higher than chart levels can be wise, but is a very individual decision.
Can I telemark with Dynafit bindings?
No, not in the sense of making linked telemark turns down a mountain. While you can ski downhill with the binding/boot in touring mode (i.e., with a free heel), and thus scoot one ski forward and make an awkward “telemark” turn, doing so places huge stress on the binding toe. If you put much force into the turn, you’ll pop the toe out of the binding, or break the binding. On the other hand, while touring with the Dynafit binding it’s not uncommon to use the telemark stance as a way to glide through sharp transitions such as creek beds. Doing so works because it includes little lateral force on the binding.
What about riser plates and stack shims?
In alpine downhill ski mode, the Dynafit TLT binding places the heel of your boot 20 millimeters above the ski, and the toe about 12 millimeters above the ski (measurement is not precise because of difference in randonnee boot soles). The Comfort and Vertical (FT ST) models yield even more rise, with 30 millimeters at the heel and about 20 mm at the toe. Radicals have similar rise, with Beast having quite some rise as well but less ramp (toe height below heel.)
Thus, not only do the Dynafit bindings provide fairly substantial “rise,” but the lower toe provides more “positive ramp angle” for your boot sole when inserted in the binding, thus compensating somewhat for the neutral stance of randonnee backcountry ski boots. However, in modern skiing (after year 2000) the use of easy turning skis has obviated the need for extreme boot and binding angles. Using relaxed angles can make skiing easier, and save your knees from stress.
Thus, it is common to modify and lessen the binding ramp angle by installing shims under the binding toe. A moderate height shim is usually sufficient, about 4 millimeters. Any more than that causes too much change to the heel lifter height while in climbing mode. This blog post has extensive information about binding ramp and shimming.
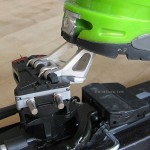
Dynafit Radical heel lift in high lift position. You change positions by flipping the heel lifters up and down with your ski pole. Earlier Dynafit bindings had a variety of heel lifts that required rotating the heel unit to change height.
Does the Dynafit binding have a climbing heel lift, and how does it work?
The climbing lift system (aka heel lift) is one of the most reviled and misunderstood parts of the Dynafit binding (or for that matter, all touring bindings) — especially in the early days. Yet when mastered, all the permutations of the heel lift are simple, slick, and efficient.
The climbing lift usually consists of three modes. When climbing steep slopes, you rotate or flip the heel piece so the appendage (the heel post) on top of the heel piece supports your heel. For moderate climbing you use the “middle height” mode, which happens to be the most efficient angle for climbing with ski skins. For touring flat or lightly angled ground most binding models also have a “heel flat on ski mode,” that’s usually invoked by rotating the heel unit out of the way, so your boot heel rests ahead of the binding heel unit.
The high lift mode of all Dynafit bindings is as obvious as adjusting the forward-backward seat position in an Audi. In the case of bindings, accomplished by either flipping a lifter up from the heel unit, or rotating the heel unit.
I have earlier Dynafit bindings (TLT series, Comfort) without the flipping heel lifters, how do I rotate the binding heel?
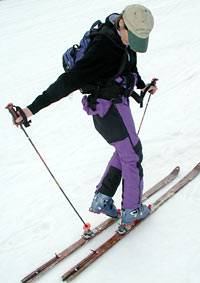
Rotating the Dynafit heel lifter post by inserting pole tip in socket, practice at home! The bindings with this system are designed to use your RIGHT ski pole on both bindings, as pictured.
Dynafit Radical model bindings after 2011 have an easily operated flip-up heel lift. Other “TLT” models such as Comfort and Vertical have a heel lift that requires rotating the heel unit. To do so while standing and using a ski pole, Identify the hole in the heel lift post, the appendage atop the heel unit.
While standing on the trail, lift the heel of your foot, insert the tip of your RIGHT HAND pole in the hole, and rotate the heel piece to your desired setting. It helps to insert just the tip of your pole — just a centimeter or two. Also, and this is important, PRACTICE AT HOME. Get out on your living room carpet, and try rotating the heel with a ski pole. Due to body size, ski pole length, etc., everyone develops a slightly different technique. Once you master it, you can click the heel unit around with an elegant flip of your wrist. Use your right hand pole for BOTH heels by reaching around behind you to the right.
The holes in earlier Dynafit heel lifters are intended for an average aluminum ski pole tip. Some carbon fiber poles may not work well, or may be damaged by the steel edges of the hole in the TLT. If you have carbon poles and experience this problem, try easing the edges of the hole with a file, and slightly enlarge it if necessary.
My binding heels rotate too easily — they spin to different positions while I’m touring and this “auto rotate” is annoying as heck. Fix?
With classic Dynafit bindings this pesky backcountry problem is usually caused by how the lugs on your boot tread sit on the binding heel when in one of the two raised heel positions. It’s also caused by buildup of snow or ice on your boot heel or binding while you’re touring, which causes the binding to be pushed to the side.
However, the Radical series binding departed from the earlier Dynafit method of preventing rotation, and includes a mechanical rotation stop that caused some problems in the first retail release of the Radical series, but is now reliable and functional. We have numerous blog posts covering Dynafit anti-rotation features.
With the older bindings there are several solutions for auto rotation problems: Use an anti-icing strategy such as silicon spray or rubbing the binding surfaces and boot heel with alpine wax before you tour. If the boot sole lugs are causing the problem, fill between the offending lugs with boot sole repair compound such as Shoe Goo, and/or bevel the edges of the lugs. Some users report that this problem is more likely if you’re using ski brakes, as the brakes exert quite a bit of upward force against the binding heel unit and may cause it to somehow rotate easier, or not return to position the way it should. Tweak for that is to remove one of the two brake retraction springs to it has less upward force when in the retracted position. Warning, removing one of the brake springs will cause it to have less beef in the deployed position, and could even cause problems with the brake triggering from the retracted position.
My Dynafit TLT or Tri-Step ski brakes jam up against or between the lugs on the heel of my boot sole, fix?

Dynafit brakes can interact with boot sole lugs in ways that can cause jamming and blocking of movement.
Heinous “brake jam” (related to toe jam?) shown above may keep your Dynafit brakes from working properly, and may degrade lateral release. In this photo, not only is lateral release blocked by the side lugs, but when stomping down into the binding, the rear sole lugs catch on the brake and drive it forward, possibly damaging it. Fix by modifying boot sole with a solid rubber block, or forget using the brakes — they weigh a ton anyway…
If the lugs on your boot sole appear to interfere with the operation of the Dynafit ski brake, screw/glue a small block of hard rubber in between the lugs, so the brake actuator plate doesn’t catch.
Or, have a boot repair shop grind off the rear lugs on your boot heel, then glue a solid rubber half-heel in place of the removed lugs.
This can be a safety issue, as the boot sole lugs may catch on the brake plate and block lateral release.
My Dynafit ski brakes stick sometimes, in other words, when my boot comes out of the binding, they don’t spring open, fix?
Lubricate all brake mechanism pivot points with light oil such as WD40 (keep off base of ski and skins). Apply silicon dry spray to all other brake parts. If lubrication doesn’t work, place a few layers of duct tape on the ski, under the front of the gray plastic brake actuator plate where it contacts the ski when pressed down by the boot in alpine mode. This holds the plate up slightly higher so the binding doesn’t “catch” in the retracted position.
With the Vertical series bindings, a certain manufacturing run did have defective brakes that readily stuck in the retracted position and did not deploy reliably. As of 2014 there is no OEM fix as the Vertical bindings are discontinued.
Is it possible to home mount the Dynafit, and where do I get a template?
If you’re handy with tools you can do it. Practice first on a pair of dumpster skis. See this article for details, it includes a link to our paper mounting template.
I’m mounting Dynafit Radical bindings, they don’t have normal binding screws but instead have star drive torx screws, what do I do?
You’ll need to tool up with torx T-20. See this article.
Is it possible to swap Dynafit bindings and use the same mounting hole screw pattern?
Mostly yes. The heel unit of nearly all models uses the same screw hole pattern, and most toes use the same pattern (layout). Main thing to remember is that prior to the Radical series (2011) which has a 4-hole pattern at the toe, most Dynafit bindings (TLT & Vertical) had a 5-hole pattern at the toe with only the rear pair of holes matching up to the Radical.
Exceptions to this are some of the super light race bindings, and perhaps some outliers. Interchange of bindings to same hole pattern is one of the excellent features of the Dynafit provided you’re working within one of the generations. The only gotcha to be aware of is that switching from a binding with more length adjustment (Comfort, FT, ST) to one with less (TLT) could result in your binding not accommodating a given boot length because the screw holes in the ski are off too far forward or back for the binding’s adjustment to compensate. For more details see this blog post.
Do Dynafit bindings adjust for different size boot shells?
The TLT binding heel unit adjusts for/aft 6.4 millimeters, which means it could possible possibly adjust for a change of one shell size, depending on where you have it adjusted when it’s mounted. Most often, a new boot shell size requires remounting the TLT.

Dynafit binding adjustment range is the same for both Vertical and Radical model series, 25 millimeters (caliper shows 26 which is extreme limit).
Dynafit TLT Comfort and Vertical ST/FT models base plate pictured above. For/aft adjustment range 25 millimeters, or around 2 1/2 Mondo sizes. The Comfort and Vertical models led up to the Radical series models which have virtually the same adjustment range.
The Comfort and Vertical binding models have an adjustment range of 25 millimeters (or about 2 1/2 Mondo sizes.) This is one of the Comfort/Vertical model’s primary advantages over the TLT.
Dynafit also sells rental/demo bindings and and possibly rental/demo plates for various bindings, these offer a wider adjustment range with the downside of adding weight (though such plates can be useful for tuning binding ramp angle.)
If your Dynafits don’t adjust for your boot length, drilling a few extra holes in today’s skis is not a big deal so long as it’s done with care. Extra holes, however, do reduce the resale value of skis, and are less favored if you mount telemark bindings, which place incredibly huge forces on the mounting screws.
See this post for more info about binding adjustment ranges and screw patterns.
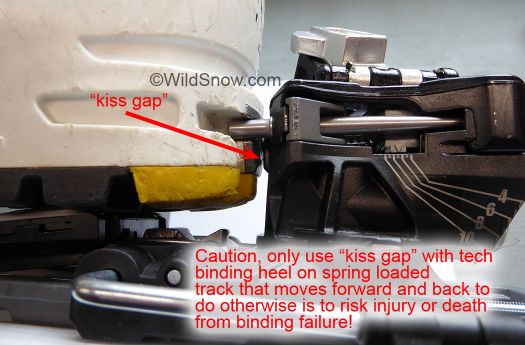
I noticed the gap between the heel of my boot and the binding heel unit, is this important?
YES! Other than Beast and later version Radical, Dynafit bindings are sold with a small plastic feeler gauge “shim” to check this space. With the Tourlite/TLT/Speed/Race binding heel prior to the 2010/2011 model this is supposed to be 4 mm, and the Comfort/Vertical/ST/FT setting is 6 mm before 2009/2010 and 5.5 mm after. (If you lack a gauge for 5.5 mm, use three nickle coins). After 2009/2010 sales season all Dynafit Radical and Vertical series bindings used 5.5 mm gap, and The race models generally use that as well.
The issue of setting correct tech gap is quite complicated due to various binding models and specifications. Before reading below, check our updated specific article about binding tech gap.
Some later Radical bindings (e.g., Radical 2.0) have a “forward pressure” spring underneath the heel unit. Check this blog post for how to spot.
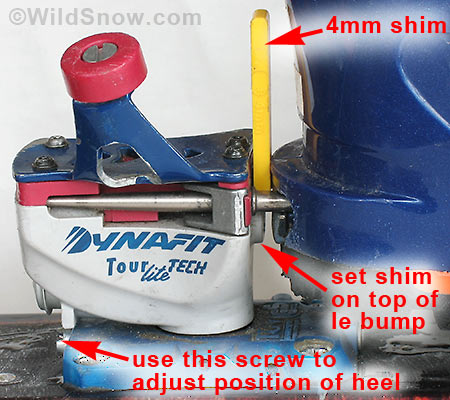
Classic Dynafit TLT binding with adjustment shim spacer in proper position. New bindings after 2009/2010 use a 5.5 mm shim gauge to set the gap. Around 2013 Dynafit switched to a very different shim/gauge that we detail below. More, the Radicale 2.0 and Beast bindings have NO significant tech gap. In reality, nearly any tech binding that requires a gap will function with anything around a 4 mm gap plus or minus one millimeter, but you’ll get your best performance and safety if you set your bindings to exact manufacturer specifications. For example, if the gap is too small your boot will bang into the binding when the ski flexes, resulting in possible damage. Or the opposite, if gap is too wide your boot can easily pull up out of the binding.
If you set this gap too wide the heel pins may pull out of your boot while you’re skiing, and the binding will have lower release values than those indicated by the numbers on the binding. Too small a space may cause prerelease or dangerous jamming when the ski flexes and the heel of the boot compresses against the binding heel. Setting this space is tricky. The TLT binding heel has a small bump on it, below the pins. You must rest the feeler gauge above this bump, otherwise you’ll end up with too much space. Recheck this periodically. Note the shim/feeler has come in different colors over the years. For extensive details about setting this gap, see this article about the Dynafit “tech gap.”
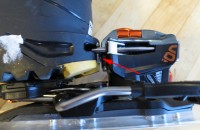
Later Dynafit bindings have a forward pressure system that allows the binding to be mounted with no ‘tech gap’ behind heel. IMPORTANT to identify which type of binding you have and set the gap accordingly.
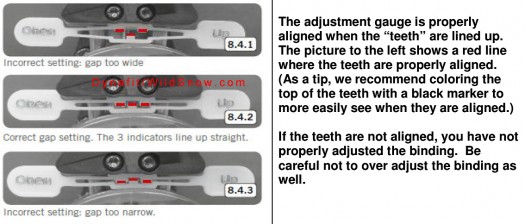
For Dynafit Radical bindings starting around 2013, BUT NOT THE LATER MODELS WITH “FORWARD PRESSURE” the gauge for heel gap is a compressible little device as pictured below. It’s a bit confusing to use. Don’t over-think it, just line up the parts as indicated in photo and you’ve set your heel gap to plus-minus 5.3 mm (officially 5.5 mm, or the thickness of 3 nickles.)
I noticed my boot had a lot of up/down play at the heel. I looked down, and noticed that the heel pins were on top of the plastic ledge on the heel of my boot! What do I do?
First, be aware that TLT series Dynafit backcountry skiing bindings are not designed for hard-core resort skiing for the larger, aggressive skier. Using them for such can cause numerous problems, including that related above. On the other hand, just about any tech binding can exhibit this behavior from time to time, caused by reverse flexion of the ski pulling the heel pins out of the boot.
Thus, whatever your model choice and use of Dynafit bindings, get in the habit of checking the bindings before and during every run. Do a quick visual check by simply looking down at the bindings and seeing if anything is awry, and get in the habit of checking for play by moving your feet a bit before each run, and while stopped in the middle of a run.
If you find your boot heel caught down below the pins, it’s time to check your binding settings. First check the clearance between the boot and heel unit. Use the feeler gage that comes with the bindings. See detailed “tech gap” instructions above and in the Dynafit mounting instructions on this website. Next, check your vertical release setting. Provided you have the correct clearance set, dialing up your vertical release setting a hair may reduce the occurrence of this problem. Note the Comfort and later (Vertial/Radical) bindings have longer heel pins than the classic TLT series, and thus may be less prone to this sort of behavior. Also consider what type of skis you’re using. Soft flexible skis may be more prone, because the flexing ski moves the pins in and out of the boot heel.
My skis are too wide for the brakes, can I swap on a different brake or modify my brakes for more width?
While brakes can be slightly bent outwards to fit wider skis, such bending quickly reaches its limit. You can gain a few millimeters by trimming plastic from the inside of the brake feet. Over the years, craftsmen have found that brake arms from other brand bindings can sometimes be swapped into the Dynafit brakes. Prior to 2013, the brakes on Dynafit bindings were all removable and could easily be swapped. Around 2014 all Radical series bindings have fixed non-removable brakes and require swapping out the complete heel unit to change brake widths.
Any quirks with this binding?
In alpine mode, if your boot is jammed sharply rearward in the binding, it will pop out. While this situation is very uncommon in normal skiing, it could happen while doing a “falling leaf” sideslip in a narrow couloir. Solution: if you’re in a situation where such release could mean injury or death, reach down and pull your toe-piece lock tabs up into touring lock mode. For all but huge skiers, this will effectively prevent the above from occurring, as well as locking out out all lateral release to approximately DIN 14-18. Bear in mind that locking the touring latch has no effect on vertical release, thus it’s not a 100% “lock out” as many people think it is.
When I put on my skis, I can’t get the wings on a toe piece to close. Fix?
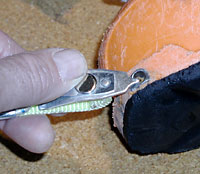
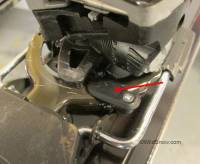
Cleaning the boot socket with the cute little tool mounted on a safety strap. A 16d nail also works well for this.
No doubt, getting your boot into the Dynafit binding is the hardest part of using it. It’s called the “dyna-fiddle.”
If you have problems, first check and make sure the sockets in your boot toe are not plugged with ice or dirt. Clean with a small sharp object. The safety straps included with some models of the binding have a built-in cleaner molded into the end of one of the metal tabs. A 16d nail also works well.
When you put on your skis, the Dynafit toe wings snap closed when your boot sole presses down on a “trigger” in the middle of the toe piece. Some boots come from the factory without enough sole in this area to press the “trigger,” and boots can wear in such a way that the same problem occurs. Fix by building a small pad of duct tape or epoxy up on the trigger, until you can easily click into the binding. See this article showing exactly how to build up the trigger using epoxy.
There are two common methods of getting in to the Dynafit backcountry skiing binding, both require practice, and both should be learned: With the “tilt to the side” method, tilt your boot slightly sideways and place one toe hole on a toe pin, then tilt boot down to snap toe closed. With the “straight in” method, rotate the binding heel unit to the touring setting that allows your boot heel to rest on the ski (“heel flat on ski mode”). With toe wings open, hold your boot toe slightly up and push your boot heel back against the binding heel unit, then press your boot toe down into the toe unit, thus snapping the wings closed on the boot. The trick with the “straight in” method is that holding your boot toe up causes the boot heel to engage the heel unit at an angle, thus forcing your boot slightly forward and allowing it to align with the pivot pints when you press your toe down. This angle is critical, and must be learned by practice.
Assuming you’re in tour mode (going uphill), once the toe wings are closed don’t forget to bend down and pull up the touring lock tabs at the front of the binding. Yank them up hard. Next, swing your foot and rotate the binding pins in the boot holes so the small cutter slots on the pins can clean any remaining ice or junk out of the pivots. Also do this cleaning swing when entering the bindings for downhill skiing (before you snap your heels down), but of course don’t lock the touring tabs if you’re latching your heels down.
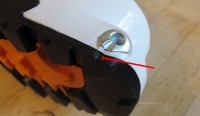
Dynafit Quick-Step-In boot toe fittings have a “lead in” notch that helps with entering the binding.
Dynafit boot toe fittings filling with hard ice can be a significant problem In climates where icing of gear common, or if you’re planning on walking or climbing without skis for long periods. In these situations it’s advisable to have something handy you can use to clean out the boot fittings. A 16d nail works well, as do the smaller implements in most common multi-tools.
Some boots are sold with special shaped “Quick Step In” Dynafit toe fittings that make it easier to enter the binding. Here at WildSnow.com we’ve tested these extensivly — they’re nice, but not essential.
I get ice in the gap under my toe piece, and it does funny things when I try to put them on after the climb.
All backcountry ski bindings can have problems with ice and snow buildup. Dynafit bindings are not immune to this problem. Keep all upper surfaces of your skis and bindings well coated with silicon, ski wax, or some kind of anti-wet compound. More, work some ski wax into the cavity below the Dynafit toe piece wings. When you’re done with a climb, use a thin object to clean ice out from the pocket under the binding toe piece (and out of the sockets on your boots). When cleaning the cavity under the binding, don’t use an object that scratches the ski (in other words, don’t use a knife), once your ski is scratched, ice will build up all that easier. Something like a popsicle stick works well.
When going to alpine mode, don’t immediately jam your heel down into the heel prongs. Instead, with your toes snapped in, swing your feet and skis a few times forward and back, thus pivoting the binding on your boot toe. Doing this allows small cutter slots built into the pivot pins to cut any remaining ice out of your boot toe sockets.
Check out our ‘How to Use Dynafit’ videos.
What about ski crampons?
Ski crampons are one of the most effective devices ever invented for ski mountaineering and backcountry skiing. Use them on a steep icy skin track, and you’ll never leave them home again. Use ski crampons on an icy slope above a certain death cliff, and you’ll sing their praises all the way to your mother’s house. She will be happy you are still alive, and will sing praises as well.
Crampons sold with Dynafit bindings attach to a slot at the rear base of the toe unit. They move up and down with your boot as you walk, and must be adjusted (by installing plastic spacers supplied with the crampons) for the amount of heel lift you prefer.
In early Dynafit bindings, the crampon slot was made of plastic and broke easily. All later bindings have metal hooks that hold the crampon and are proven to have adequate durability.
In mine and many other skier’s experience, instead of using the Dynafit crampon, a crampon that simply mounts solid to the ski, and works with whatever heel lift you choose, is an equal or even better choice. A large variety of aftermarket Dynafit compatible crampons are available from B&D Ski Gear. See their banner on these pages.
The safety “runaway” straps that come with some ski touring bindings are heavy and kinky, solution?
Tie a loop of nylon cord through your boot tongue. Using the same cord, tie another loop about 2 1/2 inches in diameter. Buy a pair of those sturdy metal clips telemarkers use for safety strap attachment (remove any steel cable the hooks come with, as you want your system to break in the event of a trapped ski or avalanche, and steel is too strong). Girth hitch the loop through the clip, then girth hitch the same loop through the binding as shown in the Dynafit instruction sheet.
Clip this rig to your boot for a runaway safety strap, remove for long tours. The idea is to use cord that would break in a big avalanche or if you caught your ski under a log.
Do not build this rig with metal cable (such as that used for telemark binding “knee ripper” runaway straps). Metal cable does not have enough give, and thus may damage your binding or your boot (or leg) in a fall. Also, the rig shown here is designed to break in a big avalanche or super-harsh fall.
Since this rig is somewhat weak by intent, DO NOT USE AT THE SKI RESORT or during glacier travel where you could loose a ski in a crevasse fall.
With all Dynafit bindings you have to take your boot completely out of the binding to change from latched heel to free heel. Is this really a big deal?
If you’re in rolling terrain, perhaps skiing a long, low angled run with your skins off, it’s nice to switch a backcountry ski touring binding between modes by simply reaching down and flipping a lever, as you can with many brands/models. With the Dynafit, you can easily drop into fixed heel mode from touring mode, but changing from fixed to touring usually requires removal of boot from binding. Thus, if you do a lot of rolling terrain tours you might consider this a problem, otherwise it’s a minor annoyance — or less.
TRICK: If you don’t use brakes with your Dynafits, it may be possible to pull your heel up out of the binding while in alpine mode, thus going to touring mode WITHOUT removing boot from binding. To do this, first lock the toe into touring mode, then pull up your boot heel while twisting the binding heel piece to the side with your ski pole or by hand if you’re acrobatic. Works for some people…doesn’t work for others. Do not try this if you have brakes installed, as doing so places too much stress on the binding.
Any other general problems to be aware of?
Don’t forget your boots must have built-in fittings to use Dynafit bindings. These fittings can not be retrofitted without major and time consuming machine work and boot modifications. As of 2015 quite a few brands provide boots with tech fittings.
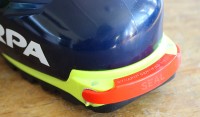
The boots (in this case Scarpa Freedom) come with a red plastic clip attached to the front tech inserts.
Know that the boot fittings are mechanically part of the binding, they thus need to be standardized and carefully made. (The same could be said for alpine boot soles, actually.) Experienced ski mechanics can easily evaluate if boot fittings are performing as they should. If in doubt, stick with tech fittings certified by Dynafit to be compatible with their bindings. As of 2015 three boot brands have certified fittings: Dynafit, Scarpa and Fischer. More about the Dynafit certified boot fittings.
I’m addicted to lightweight backcountry skiing gear, and now I want even less weight! How?
The lightweight addict treatment center will be open for business soon. Until then, it is interesting what’s going on in the area of making the TLT and Tri-Step ever lighter.
It’s said that the top rando racers in Europe have as many parts for the binding as possible machined from aluminum, especially the top plate on the heel unit.
Using titanium screws is of course the holy grail, if you know where to get them please email me. While pricey, a titanium version of the complete binding is available, as well as a titanium toe unit.
For a quick and proven weight reduction, use the bindings without the brakes, and use the minimalist safety strap we describe elsewhere in this FAQ.
Where can I get Dynafit ski bindings?
Dynafit binding models are distributed in the U.S. and Canada by Salewa North America. In Europe they are distributed by Salewa. In North America you can mail order the binding with skis using the link above, and get a mount included in the deal. Or mount it at home, but unless you’re handy with tools, you might want to have a shop do the mount. In that case, consider buying your bindings them from the people who do the mount. Doing so creates good will you can cash in later, and if you negotiate, you should be able to get them, with the mount, for a fair price.
Do the TLT, Comfort, Tri-Step, Vertical and Radical Dynafit bindings use the same mounting screw hole pattern?
Radical model bindings use a different toe hole pattern but use the same heel screw pattern as Comfort, Tri-Step and Vertical models. Amazingly, the earlier TLT models share the same heel unit screw hole pattern as Comfort, Vertical, and Radical — this has been incredibly useful over the years. Beast is entirely different.
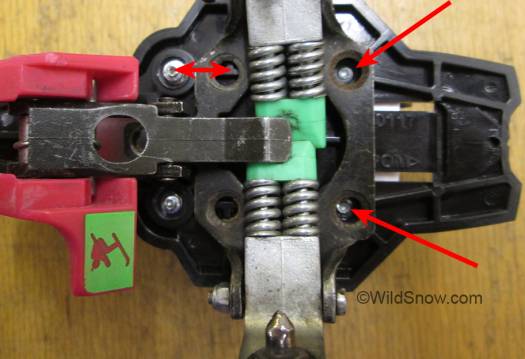
Screw hole pattern comparison, former standard Dynafit TLT, Comfort and Vertical series pattern placed on top of Radical base. The rear pair of holes match, front holes of the Radical are farther forward, also note the earlier pattern has 5 holes (one centered in forward position) and the Radical only requires 4 holes.
Do Dynafit bindings have a right and left?
No, but it is a good idea to mark your skis for right and left, so you can place your best ski edges on the inside if you damage an edge during a trip. More, some boots have the Dynafit fittings molded in slightly crooked, and dedicating a right and left ski makes this moot (the skis will still be interchangeable in a pinch, but will function smoother if used as designated).
TIP: if you put huge uphill vertical on your Dynafit bindings, you’ll put a bit less wear on the toe pins is you vary your right and left skis (because the way you move your body may tend to wear one pin more than the other).
My older Dynafit bindings (circa 1993, with a pink/green color theme) have the toe pins that thread into the toe piece wings. One of the pins has come loose and the threads appear stripped, can I repair it?
It’s amazing but true that quite a few Dynafit bindings this old are still in use. That model has toe pins that thread into the toe piece wings. All later models have pins that are swaged and press-fit into the toe piece. The later pins are made with super hard steel that doesn’t wear out under normal use, the early ones eventually wore out and were hence replaceable.
It would be difficult if not impossible to repair an older toe with this problem. Upgrading to a newer model binding would be a better way to spend your money and time (newer models use the same holes in your skis). Later models are much much better, mostly because they have adjustable vertical release that can be fine tuned, rather than having the U shaped springs that you swap into the heel of the older model, in order to change your vertical release tension.
I’m going on a long trip and am putting together a binding repair kit. Normally I carry screws, glue, steel wool, some wooden matchsticks, a multi-tool, some wire, and the binding diagram. Is there anything else I should add to the repair kit specific to the standard Dynafit binding?
Be sure your binding screws are inserted with epoxy when you mount the bindings, and set your release tension at a reasonable level. If so, it is highly unlikely the binding screws will loosen or pull out during normal use (the event your above repair kit is biased towards).
As for other problems that would dictate repair kit items, overall breakage rates with Dynafit bindings are quite low (with exceptions for first-year-release products with problems requiring “in-line” manufacturing changes, such as the failed anti-rotation system of the early Radical models.)
Nonetheless, things happen. To prevent catastrophic problems, inspect your bindings carefully every morning before you use them. Look for press-pins that may be working loose (especially in the brakes), bent or cracked parts, etc. Work the heel piece with your hand, feel for smooth action and thimble bushing wear (see thimble bushing info above). Check that the toe locks correctly into touring mode. If you’ve left your skis outside, check for ice in the pocket under the toe wings. One of the most important checks is to look for cracks in the toe unit base plate, radiating out from the screw holes.
If the unlikely happens and the Dynafit binding actually breaks, most problems would be difficult to repair in the field without spare parts). The beauty of the Dynafit and most other tech bindings is that you can carry spare parts at very little weight penalty. Thus, on a big trip you can carry a spare toe and heel unit or at least a few thimble bushings. For shorter trips perhaps carry a spare toe unit and the correct screw driver bit to remove screws (pozidrive or torx), and remember to heat epoxied screws with a hot screw driver, small heated metal rod, soldering iron, or butane lighter before attempting removal.) All that said, we’ve found mature (not first sales season) Dynafit bindings to be so reliable that we don’t carry spare parts unless we’re more than a hard day’s travel from civilization. But we do carry enough duct tape, wire, ski straps etc., to attach a boot to a ski well enough to plod through snow in the event of catastrophic binding failure.
I’m so confused, my Radical FT-ST binding says to only rotate the heel unit clockwise, but people tell me I can ignore that?
There is no end to consumer confusion about the heel rotation of the Radical. Dynafit in our opinion should be using more model names, as they make quite a few “inline” changes to their bindings. Some inline changes result in marked differences in how the binding operates, and could thus use more clarification in the product naming. In any case, as of 2015 this is how it works (caveat: We fiddle with this stuff all the time and even get confused about what variations are available.)
1. Early Radical ST and FT bindings had a small internal spring-loaded pin in the heel housing that indeed required you to only rotate the heel clockwise. Problem was, you could still go the wrong way, people did, and doing so damaged the binding. On top of that, the Radical version with the internal pin was weak from the beginning, broke, and was discontinued.
2. External anti-rotation stop installed on the brake plate. This is obvious (see photo to right). We’ve used this extensively and frankly we’ve never figured out which way we like to rotate the heel, or when. Provided you squeeze the brake down with your hand you can go both ways. Experiment. Clockwise direction will have a nice positive feel and sometimes click when you switch from downhill mode to touring, go either direction to switch back. You can visibly see how the rotation stop functions, just watch things as you rotate.
3. Third iteration, known as Radical 2.0 was to have begun sales in 2014 and may have had some limited distribution, but distribution was delayed. It is slated for retail starting fall of 2015. Version 3 has an entirely redesigned rotation stop system that’s more integrated (not screwed on like version 2). As far as we can tell, you can rotate this version either way. This version is somewhat easy to identify as the brake lacks the metal ring visible in the photo. Both version 1 and 2 have the metal ring.
Radical 2.0 heel has what appears to be a super solid anti-rotation lock and brake lock. Note the lack of metal ring on the brake.
For a doctorial thesis on Dynafit anti-rotation solutions, check these search results.
I was rotating the heel unit around with my ski pole when I actually torqued the entire heel unit off the assembly! I realized what I had done, and by unscrewing the torsional/lateral release setting barrel, I was able to reattach the heel unit onto the mount. Was I just being too harsh on the binding, or does this mean that the torsional/lateral release setting is too low (I had it set to 6)?
With most models of Dynafit tech bindings, if the spring inside the binding gets compressed, and you torque the binding at just the right angle while pulling up, you could pull the heel up off the post, since the only thing that holds the heel unit down on the post is the thimble bushing (see above) being pressed into a slot in the aluminum heel post, as you can easily see when you take the binding apart.
Set your torsional/lateral release value slightly higher, and practice rotating the heel at home, with care! If you are using older bindings without flip lifters, that require rotating the binding for heel lift, analyze how your ski pole interacts with the hole in the heel lifter. Sometimes easing the edges of the hole with a file, or even enlarging the hole slightly, makes things work much better. I suspect that while you were rotating the binding, you were placing quite a bit of upward force on it. Try to avoid the upward force (and don’t underestimate its power).
Can the Dynafit binding fittings be aftermarket installed to any ski boot?
Doing so is possible but difficult. The toe fitting is molded into the boot when it’s made, and the rear is precisely installed. More, the fittings are not available for sale separate from boots. Nonetheless, it’s been done. As of 2014 the Cast system company will retrofit fittings in the toe of your boot, but only for touring use not for the downhill.
Spring barrel cap is the silver colored metal part to the right of the visible release setting numbers.
I stripped the plastic threads on the rear binding unit, can these be repaired?
Assuming you are referring to the “spring barrel cap” at the rear of the binding. The part used to adjust sideways lateral release and retention settings? If so, yes, stripped plastic threads here can usually be repaired by “chasing” with a 20mm x 1.5 thread tapping tool.
More information.
How popular are Dynafit bindings, and who invented them?
Dynafit and other tech (aka pintech) “frameless” bindings are enormously popular. All accounts report literally millions sold throughout the world, with yearly sales overall of approximately 175,000 binding sets (insider data circa 2014). They are used by everyone from weekend warriors, to ski touring guides logging hundreds of thousands of vertical feet, to competitive randonnee rally racers who treat ski mountaineering like a gym workout.
For details about Dynafit binding history, please see our binding museum display as well as numerous blog posts covering the history of tech bindings.


2 comments
I found this article when searching for an answer for why my Dynafit Radical heel piece has a lot of play in it. I took the heel piece apart to inspect the plastic bushing, which I didn’t think was the problem and found that it’s barely worn at all. My issue seemed to stem from play between the top plate of the heel piece that is held down by 4 small torx screws. When I removed the screws and the top plate I found that the two forward screws on one binding and one of the forward screws on the other binding are sheared off. Definitely not good. Thankfully I have other skis I can swap the bindings from. But my questions are: Is this a known issue? Has anyone at Wild Snow come across this before? Is there a fix? If I could get the broken part of the screw out of the binding I’m sure I could just replace the screw. But the screws are so small I’m not sure they can be drilled out without damaging the binding. I am grateful for any guidance in this matter. Thanks in advance!
First off – this site is fantastic. Second – the one thing that gets under my skin about touring with my TLT bindings is I can’t kneel down without the toe popping out. It sounds like a small issue, but when I’m camping I kneel down all the time to do small things like get into my pack or adjust a boot or ski or mine or someone else’s. When I switched to Rando from Tele I doubled down two setups and it’s the same on both. These are the old TLTs with Scarpa Maestrals. Is this just me? Just my Mondo31 sized boots? Or does no one else want to kneel in touring mode. Actually considering going back to tele for touring. For the kneeling, and for the rolling terrain.