As a millenial, #vanlife pulls me nearly as strong as avocado toast and selfies. However, my cooler head (and light wallet) prevailed. I resisted the temptation of a camper van, instead opting for the lower cost and much bigger pain in the derriere, of building a camper trailer from scratch!
The common choice for a trailhead camper among backcountry skiers is a tricked out camper van, preferably a sprinter, and preferably with its own instagram account. However, the lowly tow-behind has its own unique appeal. For one, it is classic. Warren Miller may have invented sleeping in ski-area parking lots, and he did it in a diminutive teardrop towed behind a jalopy. For me, the ability to own only one car, and one that doesn’t double as a living room, is appealing.
A tow-behind camper can be left set up while you drive to another trailhead, or to town to grab supplies. I’m sloppy, and whenever I’m on a long ski mountaineering trip, the inside of my car ends up a wet, smelly mess (several people can vouch for me on that). A camper allows you to use the car as gear storage, and have a nice clutter-free area to cook, eat and sleep. However, I’m all talk right now, and it’s all hypothetical; my camper hasn’t even had the honor of being pulled out of the driveway. Yet. (Check out our teaser, in the garage.)
Theoretically, a tow-behind camper is much less pricey compared to a van. However, buying one new still isn’t cheap. Even a junker is at least a few grand. No matter what I bought I would want to fix it up and modify it anyways (yeah, WildSnow.com, everything shall be modded). So, I decided to design and build a custom camper, from scratch. Just a bit more work than fixing up an old one, right? Hah, yeah.
I began the process with lots of planning and designing, putting ideas down on paper, and then making a CAD model on the computer. I even made a full-size mock-up of the floor layout with masking tape.
Since this thing is custom, it needed to be exactly what I wanted. Here’s a list of requirements (roughly in order of priority):
- Just large enough for at least two people to sleep, cook, and most importantly, stand up inside.
- Small and light enough that it could be towed with a small vehicle, and be almost unnoticeable towing with a truck or SUV; between 700-1500 lbs, hopefully closer to 700.
- Well insulated and waterproof.
- Built out of materials that are as long-lasting and rot-resistant as possible. It needs to hold up to the ever-present wetness of a PNW winter.
- The camper isn’t designed to have much off-road capability initially (taller tires, re ground clearance), however I want it to be built so that it could be upgraded in the future, as well as heating and electrical upgrades.
- As simple and inexpensive as possible, while fulfilling all other requirements.
This covers some of my gripes with commercial camper trailers. Pop-up campers are light and roomy, but are not well insulated . Most campers are built with junk wood frames and rot issues abound, they lack thick insulation as well. Teardrops are light and small, but they’re not much more than a hardsided tent. Not being able to stand up inside is a major bummer in the winter. There are some commercial camper trailers out there that solve many of these issues, but they are expensive, upwards of $20k. If I’m gonna spend $20k on something, it’s definitely not going to be a trailer.
My design has evolved significantly over the course of the building project, but this is where it stands now:

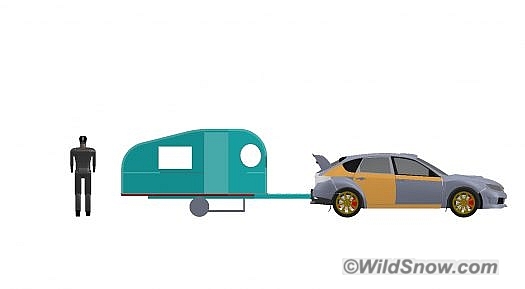
Here’s the initial CAD model for my design (with a car and person for scale). As you can see, it’s pretty small, but with the retractable drop floor (the rectangle below the floor) it’s tall enough to stand in. It’s also not much taller than a small car, so there isn’t much added air resistance when towing.
The camper floorplan is an elongated hexagon, it is 10 feet long, and 5.5 feet wide at its widest point. The interior has a built-in bed that is large enough for two people to sleep with extra room, or 3 if they squeeze (the bed is about the size of a 3 person tent). The bed converts to a “booth” and table, in classic camper fashion. In front of the bed is a 4×4 foot “drop floor” that stows for ground clearance while transporting and can be lowered when the trailer is parked. When the floor is fully lowered the the interior has 6ft 2in of head room. When the drop floor is raised, the camper is still fully functional, however the interior height is only 5 feet. In front of the drop floor is a trapezoidal kitchen table.

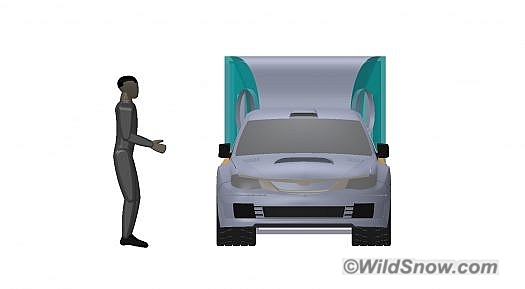
Front view, it isn’t any wider than a car (making towing and backing up easier), and only a little bit taller.
The hexagonal shape is somewhat unique, I decided on it for a few reasons. First, I thought it looked cool. Also, since none of the walls are parallel, the structure is stronger, and the walls are much more resistant to “paralelograming” and collapsing (e.g., house of carding). The front of the octagon is located on the tongue of the frame, making the trailer a shorter and lighter. The shape makes the interior a little smaller, but the inside has no unnecessary space, making the trailer lighter. The catch: a lack of right angles made this thing a bear to construct. Brushing off my highschool trig helped, as well as accumulating additional custom carpentry tools such as bevel gauges, straight edges and saw guides.
A few more unique features: The drop floor achieves many of the benefits of a pop-up, but it is lighter, won’t collapse under snow, and is much easier to make. The camper is also fully functional when the floor isn’t lowered, something that can’t be said for most pop-ups.
The frame of the trailer is built on an old pop-up camper trailer frame. This original camper weighed over 2000 lbs, so this trailer is way overbuilt, which is a good thing. It is not uncommon to see a funky home built trailer skidded to the side of the highway, frame broken or an axle stub jacked at an odd angle. Not with this — it is burly (and while heavy, will keep the center of gravity nice and low).
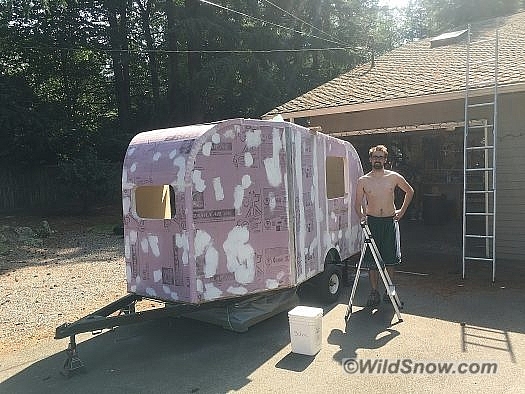
The structure of the camper is clever, and something I can’t take any credit for. There’s a community of folks who’ve come up with this process for making camper trailers, dubbed “poor man’s fiberglass” or PMF. This is exactly what it sounds like; a cheap substitute for fiberglass. The structure of the camper is made entirely out of XPS foam (the pink foam commonly used to insulate houses), then the inside and outside are coated in heavy canvas soaked in glue. This results in a hard, waterproof shell. The materials are perhaps 10% of the cost of fiberglass and resin, and easier to work with. The major disadvantage is that the resulting structure is quite a bit less strong and durable than an actual fiberglass shell. For that reason, I’m still considering coating the exterior in fiberglass, although it’s unlikely I’ll go that route.
Many have made campers larger than mine that entirely use foam for the structure. However, I wasn’t confident in the strength of the foam, especially for a snow load, so I added pieces of embedded wood and aluminium framing to beef it up. It still won’t hold up to a ton of weight, but should be fine with up to a few feet of snow. (For example, leaving the rig at a high-altitude trailhead during a week-long storm, while staying at a hut.)
Ok, that was the plan. I’ve now been working on the thing for a while, and have made some progress. Stay tuned for part two for the start of the build.

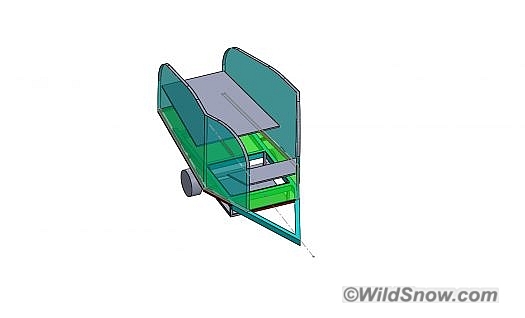
Here’s the CAD model showing the floor plan. The retractable drop floor is shown by the gap, but nothing in the drawing really shows how I constructed it or how the floor is raised and lowered. Hopefully that’ll be a blog post.
(Rigid foam cutting tip for you builders out there: To avoid making a mess with mass quantities of foam dust blowing all over your work area, cut foam with a circular saw or table saw, using a continuous rim diamond abrasive blade such as that linked below. You’ll make a bit of dust, but nothing like cutting with a normal toothed bladed. Also, I built a hot knife that works quite well. If you’re in a hurry you can score and break the foam (as is often done on construction sites), but doing so results in a somewhat wavy and rough cut. For trimming, I use a normal carpenter’s hand saw. The “foam DIY” community has developed quite a few specialized techniques for this type of building, google terms such as “foam camper diy.”)
Louie Dawson earned his Bachelor Degree in Industrial Design from Western Washington University in 2014. When he’s not skiing Mount Baker or somewhere equally as snowy, he’s thinking about new products to make ski mountaineering more fun and safe.


