Spring is here. The snowpack is freezing and thawing. The days are getting longer (or rather more daylight, still only 24 hours long). And non-skiers are starting to talk about gross things like mountain biking in the desert or deep sea fishing in Baja (both fun, but we’ll never admit it).
In anticipation of upcoming spring missions, I thought it could be helpful to share my spring touring kit. I’ll bring the same core gear no matter what the mission (Touring Kit). If an overnight is on the menu (because more time in the backcountry equals more fun), I’ll include a sleeping and eating system (Overnight Kit). If there are going to be technical ascents or descents, I’ll include the heavy and/or pointy stuff (Mountaineering Kit). Open to your thoughts, readers: What’s missing? What could be left out?
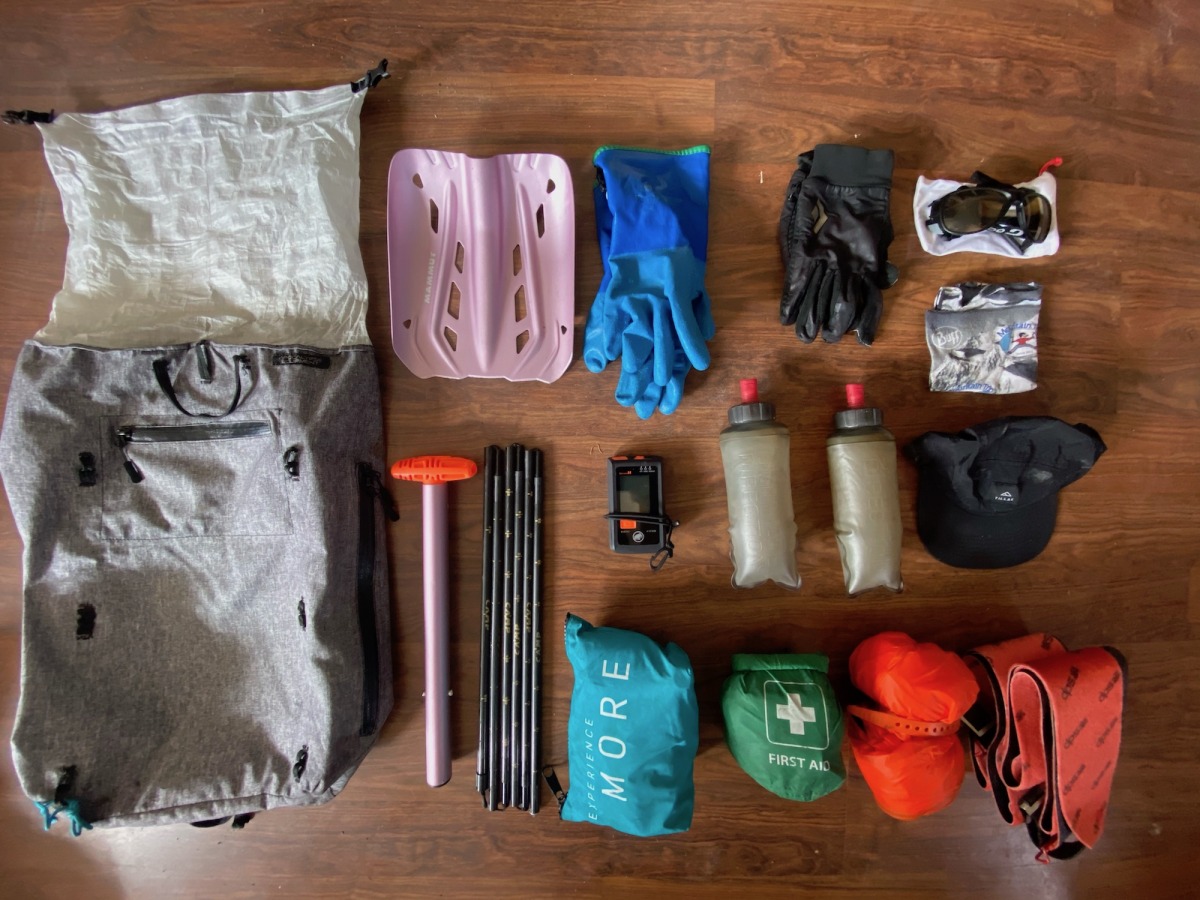
Touring Kit
1. Pack (Apocalypse Equipment SaC): 30-40L is small enough to not compromise downhill skiability and big enough to fit everything inside the pack for a two night mission.
2. Transceiver, shovel, probe (Mammut Barryvox S, Mammut Alugator Light, Mammut Carbon Probe): Transceivers need to have a 60m search radius and mark function, shovels need to have an extendable handle, and for spring I prefer to carry a 240cm carbon probe to save weight.
3. Wet gloves and dry gloves (Showa Temres 282-02, Black Diamond Midweight Softshell Gloves): I use wet gloves for skiing downhill and boot packing when my hands are typically cold and/or wet. I use dry gloves for touring uphill and warm downhill skiing when I want something more breathable, less warm, but still windproof.
4. Soft flask x2 (Ultimate Direction Body Bottle II 500): 1L between two separate bottles is perfect for me. Electrolyte drink mix makes water taste more fun. Soft flasks make the act of drinking water more fun. These models lock which is crucial. Once empty, soft flasks collapse down small which I like.
5. Full-Coverage Sunnies (Julbo Explorer 2.0, REACTIV High Mountain 2-4, the Aerospeed is a good option too): CAT 2-4 photochromic full coverage sunglasses provide a cool and comfortable mix of goggles and sunglasses. Unless it’s forecasted to be extraordinarily windy or there is precip on the menu, I will not bring goggles spring skiing.
6. Sun Hat & Buff: A lightweight nylon five panel hat and midweight full length buff is the ideal combo of face and head protection for me. The hat can fit under my helmet. The buff can fit under my hat. Full weather protection and full smiles.
7. Fix Kit/First Aid: If it’s gear that can break, bring something to fix it. Similarly, bring medical tools that match your level of experience and/or training. See our other posts for more detailed repair and first aid kits.
9. Rescue Sled/Shelter (Apocalypse Equipment Rescue Sled): This piece of kit allows you to ‘stay and play’ or ‘bag and drag’ in the case of an emergency that warrants either a shelter to stay put and wait for rescue or a sled to drag your victim out of the backcountry. Practice using a rescue sled/shelter in both cases before you encounter either dire circumstance in real life.
10. Skins: These fun, fluffy tools are used to access mountain terrain without the butt-cramping and atrophy-inducing mechanisms commonly known as chairlifts. For spring skiing, it’s important to remember skin wax like Black Diamond Globstopper. A chunk of warm weather ski wax works too.
11. Ski Helmet (Not shown, Salomon MTN or Scott Couloir): I like dual-rated helmets for ski touring. The dual rating means they are both CE 1077 (alpine skiing) and EN 12492 (climbing) certified to meet impact requirements for both sports. They work on the up and the down for their intended purpose.
12. Stuff I Have In My Pant Pocket: I keep my transceiver in an internal pocket on my pants. In the other pocket, I have a plastic snow scraper to de-ice my skis, a microfiber cloth to wipe my sunnies, lipscreen (I like this stuff), and a sunscreen stick (my rule with sunscreen is that if it rubs in, I don’t trust it. >50 SPF). I wouldn’t fix the problems that these tools fix if they weren’t in my pocket and easily accessible.
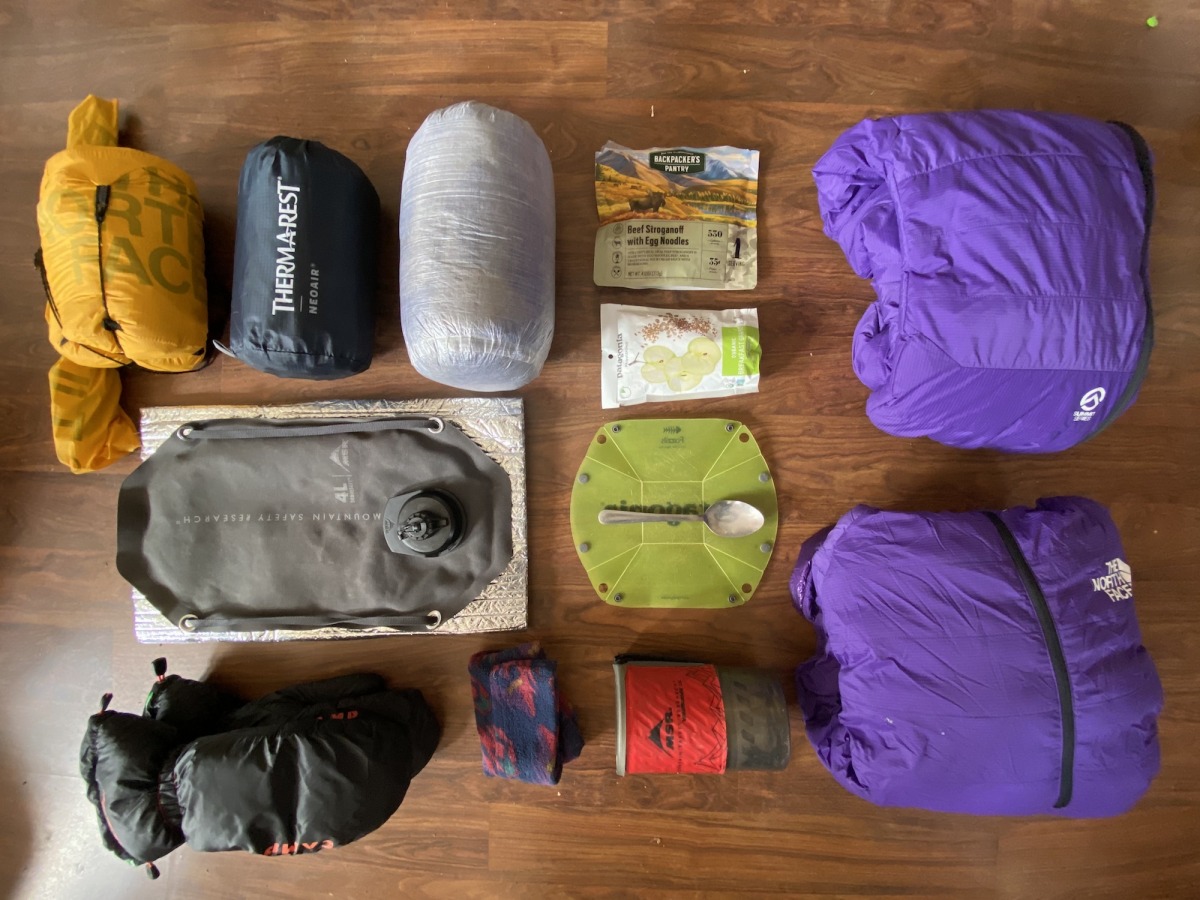
Overnight Kit
1. Tent: Single wall tents are light but don’t manage condensation as well as heavier double wall tents. Vestibules are nice if you know there will be inclement weather. The best single wall tent on the market right now [from my experience] is the TNF Assault 2. The proprietary fabric on the Assult manages moisture quite well. A separate review for The North Face Assault 2 is here.
2. Sleeping Pads (Reflective Insulation and Thermarest NeoAir XTherm): One closed cell foam pad and one insulated inflatable pad work great together for winter camping. I use the foam pad for sitting on while hanging at camp. My foam pad is cut to fold into thirds as a 2/3 length. That way it can double as a back panel in my pack to save space. The rectangular inflatable pad is MUCH more comfortable than the mummy shape and is well worth the added grams.
3. Sleeping Bag (Vireo UL from Feathered Friends): I like to use a zipperless 3/4 length down bag paired with a parka to save space and weight. The Vireo UL from Feathered Friends is the best option on the market right now for its size, weight, and warmth.
4. Breakfast and Dinner: Freeze-dried meals feel like a treat saved only for backcountry overnights. Because of that exclusivity, I’ve Pavlovian-ed myself into loving them. They are always delicious after a full day of moving in the mountains. Lyo Foods is an overseas brand that has shocked me with the quality of their meals — dinners, soups, and breakfasts. Interesting ingredients that feel wholesome and nutritious.
5. Dromedary (MSR 4L Dromedary): This water bag makes collecting and/or melting water a lot more convenient when at camp. Some people like to use these as a water bottle during the day, but I’ve seen too many drom-blowouts (halfway through a day, nowhere near water, having a drom leak and/or explode all over one’s back and butt while inside a pack) to subscribe to that methodology. The 4L size is plenty for 2-3 people on a 1-2 night trip.
6. Eating Utensils & Bowl (GSI Pouch Spoon and Fozzil Snapable Bowl): Long and not-metal spoons are preferred to scoop into dehydrated meal pouches while also not getting one’s hand cold in the process. Fozzil snapable bowls are awesome because you can lick them clean and they can double as a cutting board for cheese or other shared snacks.
7. Puffy Mittens (CAMP Hotmit’N): These act as an insurance policy against frostnip during cold days. I put the mitts on my feet for bedtime and it makes my feet happy. The CAMP mitts are the lightest version I’ve found for their level of warmth.
8. Fleece Hat: Once the sun dips below the ridge during an overnight, I switch from sunhat to fleece hat. It makes life more comfortable. Once I’m touring the next day, I’ll eventually get too warm and transition back to a sun hat.
9. Stove System (MSR Windburner): A stove system is for boiling water (mostly) and stoves are for cooking. I prefer easy meals that only require boiled water — thus I prefer stove systems. Don’t forget fuel and a lighter. I’ve found the MSR Windburner to be more reliable than the Jetboil.
10. Puffy jacket and pants (Mont Bell Plasma 1000 and Light Down Pant): I’ll take off my outer layers once at camp and change into a puffy jacket and pants. The Mont Bell is lightyears ahead of other brands when comparing warmth-to-weight for down garments. They are a small brand, which allows them to source small amounts of 1000-fill goose down (the creme-de-la-creme of down quality). The Plasma jacket is fragile, so be gentle, and in return, you will be gifted obnoxious levels of warmth at a featherweight (pun intended). Pair this coat with the Light Down Pant and you truly won’t notice the weight of this down outfit.
11. Puffy Boots (Not Shown, Western Mountaineering Flash Down Booties): It’s important to get your feet out of wet boots, start drying out your liners, and prep your feet for another day of skiing. Before swapping ski boots for puffy boots, I like to fully air-dry my sweaty feet (hopefully in the sun), apply hand sanitizer, apply foot powder, slide on dry socks, THEN put on puffy boots. The Flash Down Booties are a high quality product made by a small-scale manufacturer based in California.
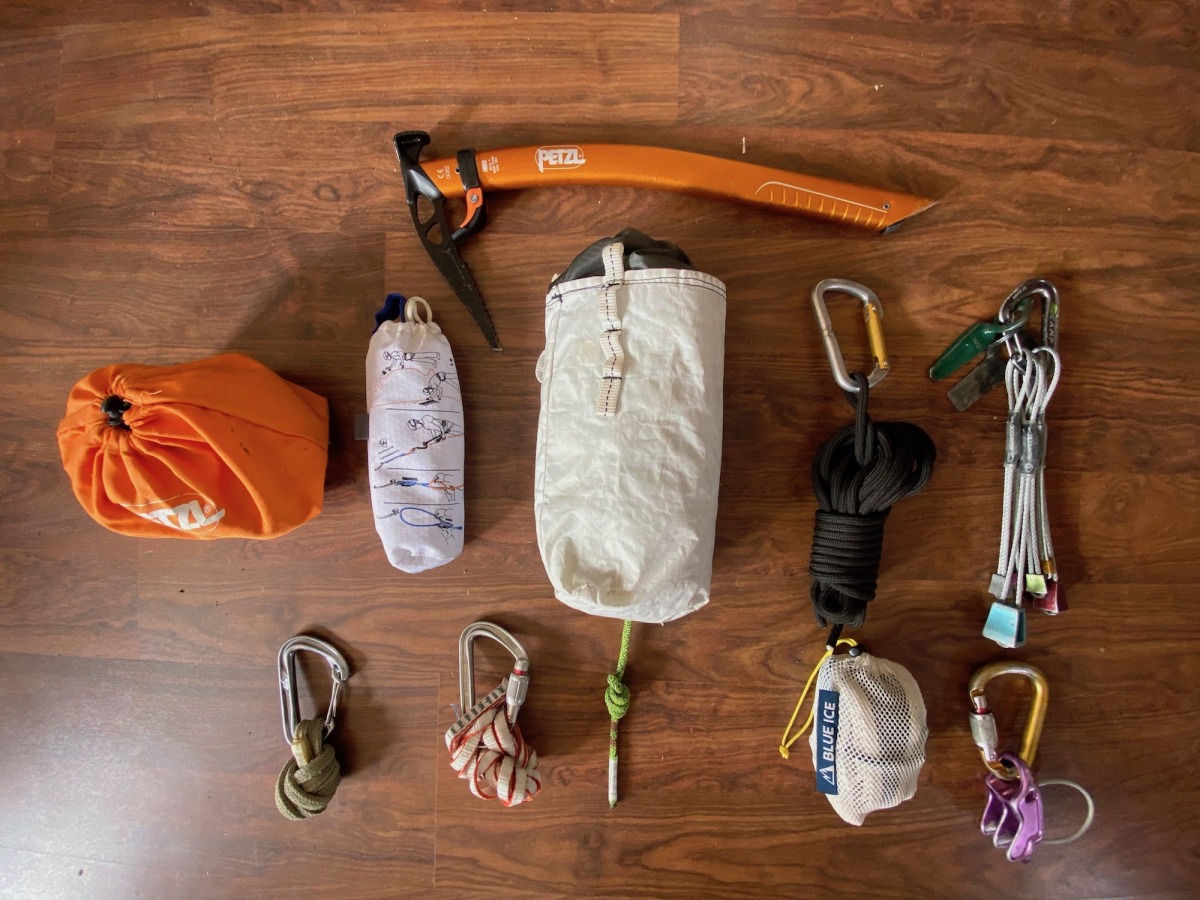
Mountaineering Kit
1. Crampons (Petzl Irvis Hybrid): I use crampons whenever ascending technical terrain. As much to add security as to save the toe welts of my touring boots. Crampons are less expensive and less important than touring boots, so I prioritize the condition of my boots over my crampons. I prefer steel toes and aluminum heels with crampons. It’s the goldilocks of performance and weight-savings by having the added security of a steel front point and the light weight of an aluminum heel. Petzl seems to excel with just about every product they create – the Petzl Irvis Hybrid being a great example.
2. Ice Axe(s) (Petzl Gully): I will use an ice axe [or two] when ascending if I think it will help me add security while climbing up or help me catch myself if starting to fall down. The Petzl Gully pairs nicely with the Irvis Hybrid crampons.
3. Rope (Beal Back Up Line): 40 m of 5 mm static cord allows for rappelling and belayed skiing if needed.
4. Anchor cord and bail carabiner: Building strong anchors or refreshing old, existing anchors is safe and important. If you come to an anchor that doesn’t look reliable, but you have no option other than relying on it in order to descend – that’s a bad position to be in! Don’t be stingy with anchor cord or bail carabiners when building/rebuilding anchors. Make sure the anchor is unquestionably solid before trusting your life to it. I like to bring 5m of 6mm tech cord for anchor cord and an oval gate carabiner for a bail carabiner.
5. Pins and stoppers: Passive anchor building protection like pins and stoppers are important for the same reasons as bringing anchor cord and a bail carabiner. Having the option to build a robust anchor is much better than deferring your safety to a preexisting anchor of questionable quality.
6. Rappel device and pear-shaped locking carabiner: For rappelling and belayed skiing. If using a small static cord (5-6 mm), be cognizant of the rappel device you use and ensure you have adequate stopping power. The Edelrid Mago 8 is a great option for rappelling on skinny cords.
7. Double-length runner and small locking carabiner: This climbing equipment is used to build a personal tether to attach yourself to anchors or build an extended rappel system.
8. Friction hitch and small locking carabiner: This kit is used to build a backup for your rappel system.
9. Harness (Blue Ice Choucas Light): A ski mountaineering harness is a light and svelte version of a climbing harness, typically without additional padding or gear loops. The ideal features in a ski mountaineering harness are lightweight and compact, like the Choucas Light.
The Mountaineering Kit touches on a lot of techniques and skills that get complex quickly. Do your homework and consider hiring a mountain guide to ensure you learn these skills the right way. It’s not worth risking your life by sort-of-understanding technical systems in the mountains.

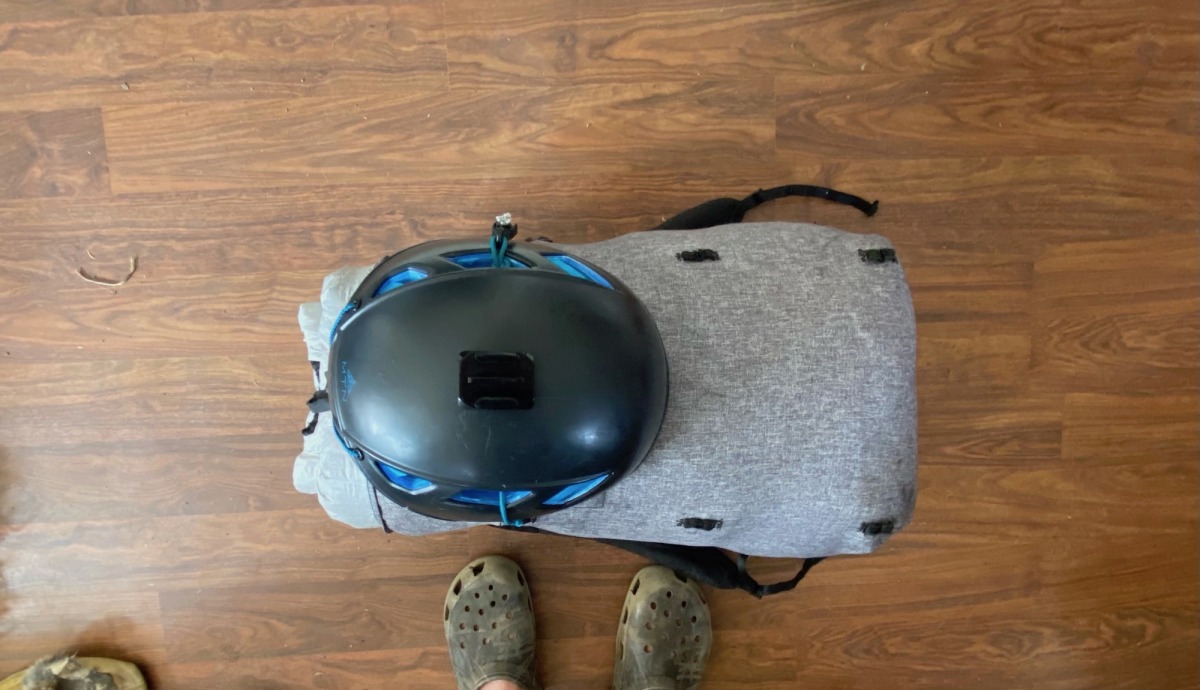
Here’s all my Touring Kit, Overnight Kit, and Mountaineering Kit packed up and ready for the next spring mission.
Slator Aplin lives in the San Juans. He enjoys time spent in the mountains, pastries paired with coffee, and adventures-gone-wrong. You can often find him outside Telluride’s local bakery — Baked in Telluride.


