– The Backcountry Ski Site
  • Avalanches
  • Gear Reviews
    • Ski Reviews
    • Boot Reviews
    • Binding Reviews
    • Snowboard Splitboard
    • Book Reviews
    • Avalanche Beacon Reviews
    • Airbag Backpacks
    • Backcountry Electronics
    • Misc Gear Reviews
  • Podcast
  • Tips & Tricks
    • Ski Touring Basics
    • Boot Fitting
    • Fitness & Health
    • Gear Mods
  • Trip Reports
    • Fourteeners
    • Huts – Cabins – Lodges
    • Denali McKinley
    • 8,000 Meter Skiing
  • Stories
    • History
    • Humor
    • Land Use Issues
    • Evergreen Ski Touring
    • Poetry
  • Resources
    • All Posts Listed
    • 100 Recent Comments
    • Backcountry Skiing & Ski Touring Webcams
    • Ski Weights Comparison
    • Archives of WildSnow.com
    • Authors Page
    • Ski Touring Bindings
      • Trab TR2 Index and FAQ
      • Salomon Guardian & Tracker
      • Naxo Backcountry Skiing Bindings – Info Index
      • Silvretta Pure Backcountry Skiing Bindings – Info Index
      • Marker F10-12 Duke Baron
      • G3 Onyx Ski Binding FAQ
      • G3 ION Ski Touring Binding
      • Fritschi Backcountry Skiing Bindings – Info Index
      • Fritschi Diamir Frame Bindings Mount DIY
      • Fritschi Diamir Bindings FAQ
      • Fritschi Tecton FAQ
      • Atomic Salomon Backland MTN
      • Dynafit Tri-Step Binding 2001-2003
      • Naxo randonnee alpine touring AT ski binding FAQ
      • Dynafit Skiing Bindings – Info Index
      • Dynafit Binding Frequently Asked Questions FAQ
      • Dynafit Beast 16 FAQ Review 1
      • Dynafit Beast 16 FAQ Page Two
    • History
      • Ski Touring Binding Museum
      • Trooper Traverse Intro & Index
      • Randonnee Ski Touring “AT” ski gear — What is Hip?
      • Chronology
    • Backcountry Skiing Core Glossary
    • Gear Review Policy & Disclosures

– The Backcountry Ski Site

  • Avalanches
  • Gear Reviews
    • Ski Reviews
    • Boot Reviews
    • Binding Reviews
    • Snowboard Splitboard
    • Book Reviews
    • Avalanche Beacon Reviews
    • Airbag Backpacks
    • Backcountry Electronics
    • Misc Gear Reviews
  • Podcast
  • Tips & Tricks
    • Ski Touring Basics
    • Boot Fitting
    • Fitness & Health
    • Gear Mods
  • Trip Reports
    • Fourteeners
    • Huts – Cabins – Lodges
    • Denali McKinley
    • 8,000 Meter Skiing
  • Stories
    • History
    • Humor
    • Land Use Issues
    • Evergreen Ski Touring
    • Poetry
  • Resources
    • All Posts Listed
    • 100 Recent Comments
    • Backcountry Skiing & Ski Touring Webcams
    • Ski Weights Comparison
    • Archives of WildSnow.com
    • Authors Page
    • Ski Touring Bindings
      • Trab TR2 Index and FAQ
      • Salomon Guardian & Tracker
      • Naxo Backcountry Skiing Bindings – Info Index
      • Silvretta Pure Backcountry Skiing Bindings – Info Index
      • Marker F10-12 Duke Baron
      • G3 Onyx Ski Binding FAQ
      • G3 ION Ski Touring Binding
      • Fritschi Backcountry Skiing Bindings – Info Index
      • Fritschi Diamir Frame Bindings Mount DIY
      • Fritschi Diamir Bindings FAQ
      • Fritschi Tecton FAQ
      • Atomic Salomon Backland MTN
      • Dynafit Tri-Step Binding 2001-2003
      • Naxo randonnee alpine touring AT ski binding FAQ
      • Dynafit Skiing Bindings – Info Index
      • Dynafit Binding Frequently Asked Questions FAQ
      • Dynafit Beast 16 FAQ Review 1
      • Dynafit Beast 16 FAQ Page Two
    • History
      • Ski Touring Binding Museum
      • Trooper Traverse Intro & Index
      • Randonnee Ski Touring “AT” ski gear — What is Hip?
      • Chronology
    • Backcountry Skiing Core Glossary
    • Gear Review Policy & Disclosures
   

Mammut Zephir Altitude Harness — Review

by Rachel Bellamy August 24, 2016
written by Rachel Bellamy August 24, 2016
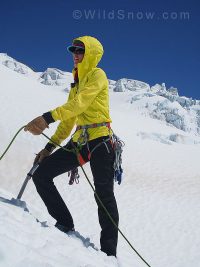
At work with Mammut Zephir Altitude.

At work with Mammut Zephir Altitude. Photo by Eli Mauksch.

Earlier this summer I wrote an first look review for the Mammut Zephir Altitude harness and have since been testing it on some of Washington State’s glaciated terrain. Most of the testing was in an academic outdoor education setting where we were repeatedly testing ourselves to failure with self-arrests on rope teams, crevasse rescues, ascending, and climbing. In other words, I spent a lot of time dynamically testing this harness.

The Mammut Zephir Altitude harness has a lot of really excellent qualities and has beat my expectations in terms of packability and weight. Features on this harness:

  • Four locations for ice screw hangers
  • Two large gear loops
  • An ultra lightweight construction of Dyneema, mesh, and nylon weighing 215 grams
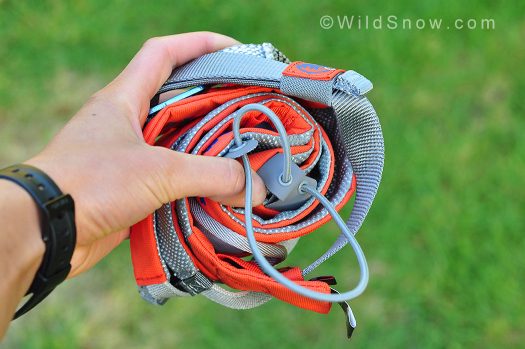
  • Not only is it light, but its also easy to pack up nice and small and shove in a pack.

    Not only is it light, but its also easy to pack up nice and small and shove in a pack.

    Each leg is adjustable from the front plastic coated metal buckles. These buckles are also easily undone to step into the harness when wearing skis or crampons — essential.
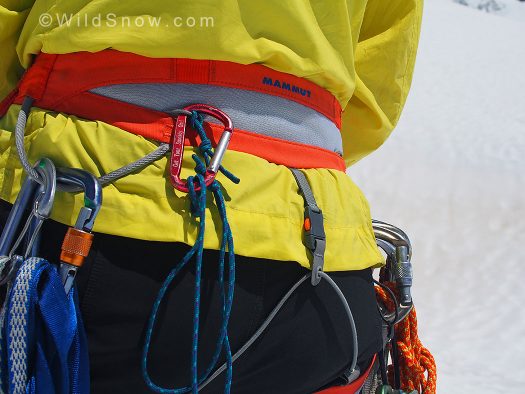

    A drop seat in the back (don’t let your friends pull on the elastic cord, the recoil packs some tremendous snap!

    A drop seat in the back (don’t let your friends pull on the elastic cord, the recoil packs some tremendous snap! Photo by Eli Mauksch.

    The belay loop is a slender loop of Dyneema — I had to learn to trust it the first time I jumped in a crevasse and now I feel that with proper care, it is an awesome way to shave bulk off of a harness. Just be careful of what you attach to it (I wouldn’t directly attach a rope or personal anchor to it for example, and keep in mind that Dyneema may be even more sensitive to heat failure than normal nylon type materials. Also, as with all harnesses watch closely for belay loop wear.)

    Like many other mountaineering harnesses, the belay loop is permanently attached to the bottom part of the harness and the user has to pass the waist belt through the belay loop when putting it on.

    What makes this harness unique is how the waist belt secures. The gray part of the buckle can stay adjusted to the diameter of your waist and all you do is slide it through the slot in the blue half of the buckle, line the two halves up parallel, and click them together. At first this system seemed too simple and not redundant enough, but now that I’ve used it, I feel it is very secure and it is really easy to fasten with gloves on.
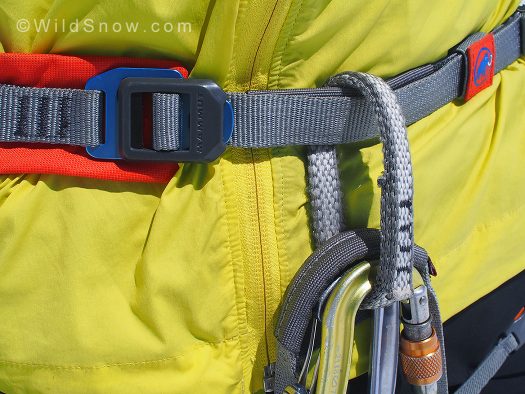

    The lower plate (blue) on the buckle is aluminum and the upper plate (gray) is plastic coated steel.

    The lower plate (blue) on the buckle is aluminum and the upper plate (gray) is plastic coated steel. Photo by Eli Mauksch.

    There are a couple places on this harness that are going to show wear and tear sooner than others. After only a few trips, I’m starting to see the beginning signs of these. Firstly, is the elastic band part of the leg buckle. Mine have already started to look overstretched and wiggly. Luckily, this is just a cosmetic flaw and does not really matter in the harnesses integrity. The second is that the Dyneema belay loop has started to appear fuzzy (see my warning above). As of right now, I have no concerns over it as I know it is just from the material’s tiny loops catching on other things, but as with all harnesses, I will continue to monitor its quality before each use.

    One thing about this harness that I do not like is how it sits on my waist. Basically, the two legs that are hard sewn onto each side of the harness are a certain length and not adjustable. These two lengths of webbing determine where on your hips the harness sits based on how they wrap around your legs. Now I’m not sure if many other people would have this problem or not, but because of this it sits in a way that my hip bones are right at the junction of the waist belt and those two sewn in leg anchors. This means that when there is a lot of gear weighing down the belt or if I’m performing a crevasse rescue (when I’m holding the weight of another person in a self arresting position) all of the weight and friction is directly on my two hipbones instead of distributed throughout my waist and lower back.

    Even with several layers of clothing padding the hip area, I have not found a way to make the Zephir more comfortable. I believe that this could be solved if the two leg anchors were sewn in further aft on the harness belt as to sit on padding rather than bone. Or I believe that if I had a thicker waist, the harness would be more opened up and the leg anchors would sit further towards my back (my size small harness is maximally cinched down to fit).
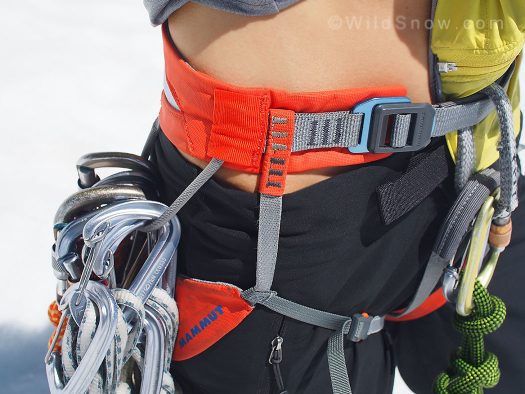

    To show how the harness sits on my hips, I’ve removed the padding of my clothing. Both the gear loop and the leg anchor weigh down from the same junction on the belt, which causes a lot of friction and pressure on that one spot on my hips if I’m holding any weight.”

    To show how the harness sits on my hips, I’ve removed the padding of my clothing. Both the gear loop and the leg anchor weigh down from the same junction on the belt, which causes a lot of friction and pressure on that one spot on my hips if I’m holding any weight. Photo by Eli Mauksch.

    As far as general comfort goes, this harness is pretty good for what it is made for: traveling around in glaciated terrain, the rare crevasse rescue, belays, some lowers, and ski mountaineering. However, I wouldn’t ever want to use it for much else (ice cragging for example).
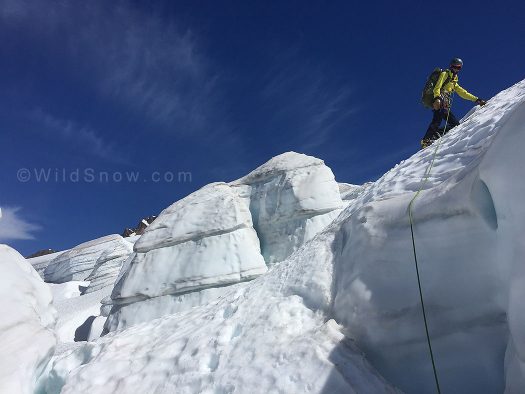
    Traveling in the Mammut Zephir Altitude on fun terrain on the Easton glacier on Mount Baker. Photo by Josh Cole.

    Traveling in the Mammut Zephir Altitude on fun terrain on the Easton Glacier on Mount Baker. Photo by J. Cole.

    Shop for a Mammut harness here.

    Rachel Bellamy

    WildSnow Girl, Rachel Bellamy, skis, snowboards and does just about everything else that’s fun. Rachel calls the Pacific Northwest home but is often romping around the mountains and crags of other states she loves. Whether on snow, rock, or in the sea, this WildSnow Girl will frequently have a camera in hand to capture the bliss of adventure through photography. See her beautiful images on Instagram: birdrachel.

    wildsnow.com/
    0
    Email
    previous post
    WildSnow Technical — Dynafit and Tech Binding Heel Gap Spacing and Safety Release
    next post
    Ski Touring News Roundup — Closing out August 2016

    Trip Reports

    • A Small Hut for Big Skiing in the San Juans: Aladdin’s Lamp

      April 23, 2024
    • Revisiting a 2011 Trip Report: Adventure in the Pickets — Thread of Ice Ski Descent

      December 9, 2022

    Avalanche Department

    • Ask a Forecaster: Q&A with CAIC’s Andrew McWilliams

      March 10, 2024

    Tips & Tricks

    • Transition Efficiencies 101 with Tech Binding Heel Units

      January 6, 2023
    • Visualizing the Backcountry as a Splitboarder: Minimizing the Challenges of Movement by Anticipating Terrain

      December 5, 2022
    • TURBOCHARGE YOUR TRAILHEAD BEACON CHECK

      November 15, 2022

    Recent Comments

    • Daniel on Backcountry Ski Boots Buyer’s Guide: The Touring Boots Worth the Money
    • Jim Milstein on Best Touring Packs for Guides and Daytrippers
    • Bergen Tjossem on Much more than a steep ski: Fischer Transalp 92 CTI Long-Term Review
    • Maciej on Much more than a steep ski: Fischer Transalp 92 CTI Long-Term Review


    • Facebook
    • Twitter
    • Instagram
    • About Lou Dawson
    • Terms of Service
    • Authors Page
    • About
    • Contact
    • Advertise
    • Copyright & Legal
    • Website Security

    @2025 - All Rights Reserved. Designed and Developed by WildSnow


    Back To Top

    Read alsox

    Much more than a steep ski:...

    January 31, 2025

    Wolverine Split Sticks: A Terrific Telescopic...

    January 2, 2025

    Good and Bad of an Experimental...

    May 24, 2024