Disclaimer: By using these mounting instructions and templates, you agree to not hold Wildsnow.com, its owners or associates liable for anything.
 |
|
Naxo randonnee alpine touring AT binding. Tour latch is also the climbing lift.
|
1. Gather your tools and material: Wide blade flat screwdriver; posi-drive screwdriver; tri-square; fine point sharpie; clear tape; electrical tape; power drill with sharp *5/32" drill bit ; hammer; center punch; paper mounting template (comes in box with Naxos); 1-hour epoxy.
 |
|
Naxo heel unit
|
2. Next, fit your Naxos to your boots. First, rotate the rear adjustment barrel (see photo), to adjust the binding heel release DIN setting to a low number so it is easy to cock and de-cock the bindings while you’re fitting them. To set lower release, rotate the rear release adjustment barrel counter-clockwise. (Do so with your hand or flat blade screw driver).
3. Use a wide blade screw driver to raise the binding toe "jaw" up so you’re sure your boot toe will fit under it. Leave it up high, you’ll fine tune this after the bindings are mounted.
 |
 |
|
|
Naxo binding toe detail
|
Length adjustment catch – open position |
4: Cock the binding heel so it’s ready for boot entry by pressing down the cocking lever. But don’t place your boot in the binding yet — you’ve still got to adjust the length for your boot.
5. To adjust for length, flip up the length adjustment lever as shown in photo above, place your boot in the binding, and slide the heel unit along the rails until your boot heel fits down in the heel pocket with about
1/8 inch clearance, and you can latch the boot into the binding by pulling up on the cocking lever, or setting the binding on a hard flat surface and pressing the boot down (as you would enter the binding while using for skiing). If necessary, to be more precise find the sole midpoint "mounting mark" on your boot (see next page for photo), and measure in centimeters from this mark to your boot heel. This ends up being half your sole length. Notice the boot length scale on the Naxo binding rails, behind the heel unit
(see photo above). Set the binding length on the scale so the first number you can see next to the binding housing corresponds to your sole half-length.
(Most modern boots have the sole length stamped on the side of the heel area. Try using that as a guideline as well.)
 |
| Correct length adjustment of Naxo is shown by the small groove on this indicator in the end of the heel unit. In most cases the groove should be hidden, but most of the indicator should still be protruding from the end cap. |
6. With your boot latched in binding, check the forward pressure indicator to make sure your length adjustment is good. The indicator (as shown in photo) is a small metal stub sticking out of the rear binding housing. It has a small ring-groove machined into the surface. If you can see this groove, and it’s just a hair out from the housing, then your forward pressure is a bit low and may need to be adjusted — but may work fine. If the groove on the indicator is hidden, then your forward pressure is higher and may be what the manufacturer recommends. I’m somewhat mystified by this, as when I set my bindings with the groove hidden, there appears to be somewhat heavy forward pressure, and the heel of my boot is almost too far back when I enter the binding. When I lengthen the binding one notch, I can see the groove in the indicator, it is much easier to enter the binding, and my forward pressure seems more reasonable. After more testing and research I’ll add more info about this. Meanwhile, use the measurement method in step 5 to get your length setting close, then experiment with setting length one notch above and below and see how it works for you. Boot wear may be a factor in this.
7. After all above, you should have a Naxo binding with a boot inserted, so you can figure out where to mount the binding on the ski. Gather up a ruler, fine point sharpie, and your Naxo paper mounting templates, and see the next page for how to place the binding position on your skis.
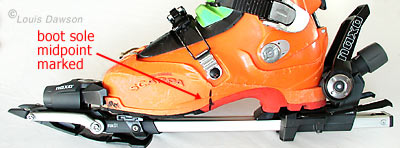
By now you should have your boot in your binding, looking something like this.
1. Identify boot mounting mark on skis and boots. Most ski boots have a mark on the side near the sole, indicating midpoint between toe and heel. If your don’t have a mark, measure in centimeters and make a mark with a Sharpie. As mentioned in part one, this measurement should be close to the number shown on the scale on the Naxo length rails once the binding length is adjusted for your boots. As for your skis, they should have a mark similar to that shown in photo, which indicates the midpoint of your boot sole.
2. Mark a tip/tail center line on your skis ( for accurate use of paper mounting template).
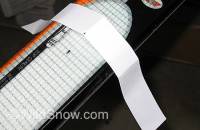
To find center using paper, simply wrap a strip of paper around the ski, crease it over the sharp steel base edges, remove and fold in half using the edge marks as reference, then place back on ski and use the crease to locate center. While simple, work carefully (mainly, mark the spot on your ski where you place the paper, as moving it towards the tip or tail will throw things off because of the ski’s varied width.)
2-a. Make super-accurate left/right center marks/dots on your skis, about 12 inches for and aft of your binding toe and heel unit locations. These marks are important so take your time. You can make left/right center marks by eyeballing a ruler and double checking, using a drawing compass to measure from the edges is a good method as well, but our favorite is to simply use a strip of paper you fold around the ski.
Connect your left/right center marks with a your yardstick and draw an accurate line using the edge of the yardstick as a guide. The idea is to create a long tip/tail center mark down the center of each backcountry ski in the binding mount area (in the tip/tail direction). Be sure this mark is long enough to go well past the mounting area of both front and rear binding units.
2-B. Center the paper template by aligning with the center marks you drew on your skis.
3. Identify the size of your Naxo bindings (small, medium, or large). This can be confusing, and is essential to proper use of your paper mounting template. The box the bindings come in may be marked with the size. If not, try setting your bindings on the paper jig, with the heel touring latch unit, and identify which screw pattern everything lines up with. Along with that, examine the length numbers of the boot length scale, printed on the rail behind the heel unit. The ranges are thus:
Small size Naxo binding — from 240 to 300mm
Medium — from 280 to 340mm
Large — from 320 to 370
4. Transfer boot sole mark to paper template. Almost time for power tools, but a few more steps ’till nirvana. Examine your paper jig. You’ll notice it has a mark for your boot toe (Schuhspitze), and other, more confusing marks for your boot sole midpoint. I dislike using the boot toe as a mounting reference, as older boots may have quite a bit of material worn off the toe. The simple solution: snap a boot into a binding, then set the binding on the paper jig, line up the front screw marks with the screws in the binding, then transfer your boot sole mark to the paper jig, then use the square edge of a paper sheet to extend the mark across the paper jig (see photo below). Make this mark as carefully as you can, but a millimeter or two of error will not affect the way your skis perform.

Paper template with boot sole position marked.
5. Affix paper template to ski. Now it gets easier. Cut a small window over the mark you made on the template. Set the template on the ski (be extra careful you’ve got the FRONT of the template toward the tip of the ski). Line up the boot mark on the ski with the one you made on the paper template, using your window to see the mark on the ski. At the same time, line up the center marks on the template with your tip/tail center mark on the ski. Tape template securely at both ends. Use clear tape so you can see your center-alignment marks under the tape. Voila — your template is attached to ski in the exact centered position, with the boot midsole mark lining up with that on your ski! Double check by setting the binding/boot combo on top of everything. And yes Jimmy — it is time for POWER TOOLS!
Section 3 — Drilling your Skis

Paper template taped to ski, boot/binding combo set on top to double check placement of template.
1. After verifying the placement of your paper template, grab a sharp center punch and hammer, and using the the screw marks on the paper template, punch small dimples in the top skin of the ski. With the rear marks, be extra careful to punch for the correct length of binding. To avoid error, I cross out the wrong holes before grabbing any dangerous and powerful tools.
2. Remove the template from the ski. Chuck a sharp 5/32 inch bit in your drill. (Using a sharp drill bit prevents the bit from wandering sideways while you drill.) Seat a screw in the binding so you can see how far it will protrude from binding into ski. Tape a depth stop to your drill bit by wrapping tightly with electrical tape. Drill ONE of the forward screw holes. Drill with minimal pressure, so you don’t mash through a ski. Remember, only drill one front hole at this point, and be clear that you’re only working with the toe unit at this point, the heel heel unit comes later.
(Note: Using a special ski drill bit is better. These are available from etailers such as SlideWright.)
If you do totally klutz it and drill through a ski, it’s actually not that big a deal (repair with epoxy and P-tex), but it’s considered poor style — to say the least — and is none too good for your kitchen countertop.
3. Screw binding to ski and check everything. Put a small amount of 1-hour epoxy or wood glue in the one hole you drilled, then screw front of binding to ski, latch in a boot, and check your for/aft and side/side alignment. Unless you’re an experienced craftsman, don’t use a power driver for binding screws. Instead, use a screw driver with a pozi-drive bit to fit screws that come with the binding (with care you can use a jumbo philips bit, but pozi is much better.) Be extremely cautious as as you tighten the screws, so not to strip the screw holes. One reason I recommend epoxy for mounting is that it seals and locks the screws even if they are not tightened to the absolute max, thus allowing the home-brew mounter a bit of caution while tightening.
4. Check? If everything looks good, rotate the binding or remove it, drill the other 3 forward holes (don’t drill the rear ones yet), and put glue in the holes.
5. Remove protective covering from the adhesive under the bumper (photo). If binding is still attached with one screw, rotate back into position while holding the bumper up, then let it stick down when it’s in the correct place. Before sticking down, clean top of ski with rubbing alcohol — or clean with something stronger if you suspect it’s necessary to remove who knows what gunk. Many ski sellers shine their skis with Armorall or silicon, so this cleaning is super important. Also, once you get the bumper stuck in the correct place, hold it down tightly for at least 3 minutes, as the special adhesive takes time to properly adhere to the ski topskin.
Snug down the front screws to the point where they’re somewhat tight, but allow the rear of the binding to wriggle sideways with a bit of hand force. Using the center line on your ski, shift the binding so the rear end cap on the rails is centered (measure if necessary, or eyeball it). Now tighten the screws, all the while checking the rear end-cap for centering.
Naxo Binding Home Mounting Step-By-Step — Part 4 — Install Rear Heel Lift & Latch
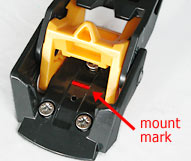
Rear lift/latch unit.
1. Checking correct position of heel lift touring-latch unit is critical, as you’ve only got about 1 mm of front/rear fudge factor to work with. First, examine the latch unit. Inside, about midway between the front and rear screws, you’ll see a small left/right groove (marked with red in photo). This is a marker for the front/rear position of the heel latch unit. Take the screws out of the unit, set it on the ski, then lower the rear of the main binding into the unit. Position the latch unit so the mark is just visible at the end of the main binding rail cap. Then look down into the screw holes, and make sure they line up with your punched marks in the top of the ski.
2. If everything lines up, drill. If not, adjust marks by re-punching, then drill. Most often everything will line up, but the double-check above will save you grief. All good? Put a bit of glue in the holes, then sink screws. Check once more that everything lines up, and that the heel tour/downhill latch works, and you’re done with the mount. Adjust your toe jaw height and release settings, then go skiing!
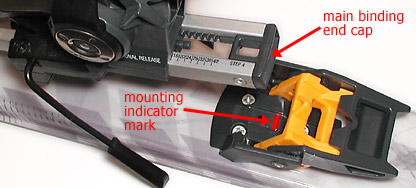
When you drop the main binding end cap in to the pocket in the heel latch unit, be sure it is within 1 millimeter of the mounting indicator mark, preferably exactly centered on the mark.
Toe Height and Release Value (DIN, RV) Adjustment.
Disclaimer: By using these instructions, you agree to not hold Wildsnow.com, its owners or associates liable for anything.
Adjusting Naxo bindings for different boot sizes and release settings is easy. First, adjust the distance between the toe and heel units (see above for length adjustment instructions). Once the length is correct and your boot snaps into the binding correctly, setting everything else for backcountry skiing or resort skiing is easy.
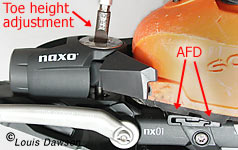
Naxo binding toe details.
1. Set the toe jaw height. Snap a boot into the binding, then slip a piece of paper under the boot sole, between the sole and the AFD (see photo). If the fit is too tight to slip in the paper, raise the toe jaw by rotating the screw counter clockwise (use a a wide flat-blade screw driver). Once the paper is in, lower the toe jaw (crank screw clockwise) until you can’t pull the paper out, then raise a touch at a time until you can pull the paper out without tearing it. The idea is to have the toe jaw holding down the toe of the boot, but not wedging the boot down under tension, which can compromise the sideways (lateral) safety release.
WARNING: Setting the toe jaws too low and tight may damage the binding by placing too much upward stress on the toe unit. Likewise for snapping your boot in the binding with ice or snow built up under the toe. Such damage may include catastrophic failure of the toe unit where it attaches to the binding.
There are two ways to test your toe height setting to see if it’s too loose. First, while on the workbench simply press the toe of the boot sideways with your hand, to the point where it releases laterally from the binding (this test is easier with lower DIN settings). Release should be smooth, with no catching or binding, and the AFD should move free. Next, lock the cuff of your randonnee boot in downhill mode, then grab the top of the cuff and attempt to rock the boot forward and backward, while observing up/down play of the toe where it’s held by the binding jaws. A very small amount of play is necessary and acceptable (see warning above), while more than just a bit of play indicates you should adjust toe jaw height.
Warning: Some skiers make too big a deal out of small amounts of binding play, and may adjust the toe jaw so tight it compromises lateral release. Be careful — your ligaments and bones depend on having the toe jaw height set correctly.
2. Set toe and heel release using DIN settings you choose. Test at ski resort on moderate terrain, if you pre-release increase release value in small amounts. If you’re an average skier and find you need to set release value more than 1 step above that recommended in this chart, examine your bindings for defects in adjustment, and examine your ski technique. To set the release, use your wide blade screwdriver and move the heel and toe release barrels in our out, so the edge of the barrel lines up with the corresponding setting number on the scale that’s printed on the binding.
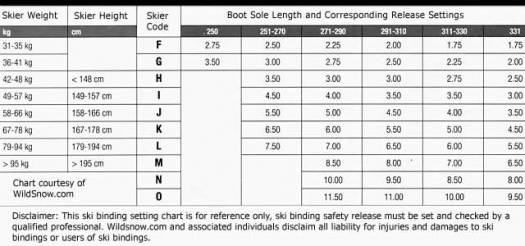
Release values ‘DIN” settings chart, use at your own risk, know that the marks on ski bindings may be inaccurate.
Instructions for using binding release settings chart: Choose your “Skier Code” using weight and height, then follow line to right and choose number that corresponds to your boot sole length. IMPORTANT: Pick your skier type below, then use following correction factor: Type 1, use value you figured in table, without correction. Type 2, choose value one line below (one step higher number). Type 3, use value two lines below (two steps higher). Age correction: If over 50 years old reduce setting one step. And finally: if you choose to set your bindings yourself for backcountry skiing or resort skiing, test bindings on moderate terrain at resort. Be aware that the numbers printed on ski bindings may be inaccurate. If you come out of toe or heel, slightly increase release setting of toe or heel (not both). Continue to fine-tune using this method. To be safe, have your binding settings checked by a qualified technician using a testing machine at a ski shop.
Skier types: Type 1: Careful skier preferring moderate terrain, or a beginner skier. Type 2: Skiers preferring average speeds and somewhat difficult runs. Type 3: Few skiers in this category; racers, extreme skiers, prepared to take risks, ski at high speeds. Most backcountry skiers are Type 2.
*(Drill bits: Ski shops use special drill bits for drilling skis, usually 4.1 mm for skis with metal layers, and 3.5 mm for skis without metal. If you mount a lot of skis, it’s a good idea to buy some special drill bits from an outfit such as Slidewright, but for most people it’s okay to use the 5/32 inch drill bit as suggested above. If you use a 5/32 bit, especially with non-metal skis, just be careful as you twist the screws in so you don’t over-tighten them and strip the holes, and always use epoxy in the holes. If in doubt about tightening a screw, insert it with light torque, let the epoxy set up, then take the screw out and re-insert with more epoxy and a bit more torque. More, if you are an aggressive skier using high DIN settings (above 9 or 10), always use the EXACT drill bit size recommended by the ski manufacturer, tap the holes, and insert screws with epoxy.)
While most of the WildSnow backcountry skiing blog posts are best attributed to a single author, some work well as done by the group.

